If you have a site defined for your web site project, you're ready to install Bootstrap if you haven't already done so.
There are several ways to go about this. The first method we'll try out is accomplished in Dreamweaver.
Installing Bootstrap using Dreamweaver's New Document Dialog
Go to File > New and choose the Bootstrap tab. Select "Create new". Uncheck "Include a pre-built layout". Click Create.
 |
Create a new Bootstrap layout via the New Document window. |
A blank HTML file will open in a new document window. Right away, go to File > Save As, saving the HTML file as index.html in your practice folder.
Take a look at the Files panel in the top-right corner of Dreamweaver's interface. Several files have been created: the index.html file, a css folder, and a js folder.
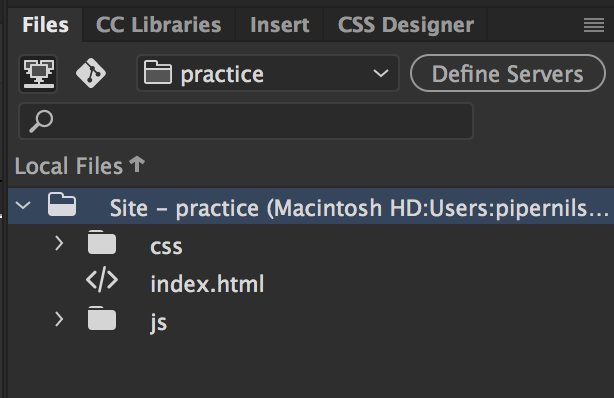 |
The Files panel lists all of the files inside the local site folder of the defined site. |
In the top-center of the Dreamweaver interface (in what's called the Document toolbar), you'll find three very important buttons: Code, Split, and Live. Choose Code now.
 |
Use the buttons in the Document toolbar to toggle between the various views. |
In Code View, you'll see the HTML source code for the index.html file you just created. You have a standard HTML5 doctype, as well as links to several external files: bootstrap.css, jquery-3.2.1.min.js, popper.min.js, and bootstrap-4.0.0.js. This is the Bootstrap framework.
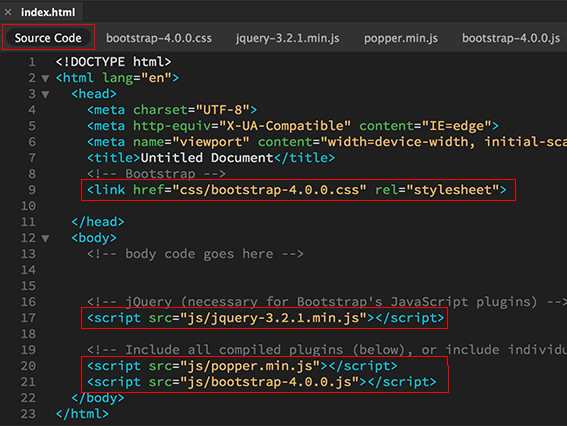 |
Source Code is the parent HTML document, which is currently selected.. |
Toggle to the bootstrap.css using the related files toolbar. You'll notice a warning that "bootstrap.css is read only". You can't edit or modify any of the styles that you see here. Dreamweaver provides an option to make the bootstrap.css file writable, but I recommend keeping it read only. You can use a separate custom.css file to modify the Bootstrap formatting. You'll learn how to attach a custom.css file in Lesson 3.
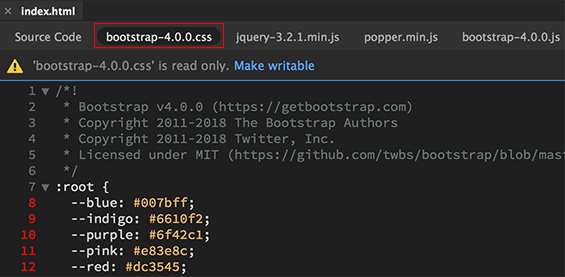 |
External CSS and JS files are listed in the Related Files toolbar. |
Scroll down for a quick overview of the styles provided in the bootstrap.css file. You'll notice many media queries along the way. These media queries format the width of the container div in specific screen sizes. If a screen is at least 576 pixels wide, the container will display at a maximum width of 540 pixels. If a screen is at least 768 pixels wide, it will display at a maximum width of 730 pixels.
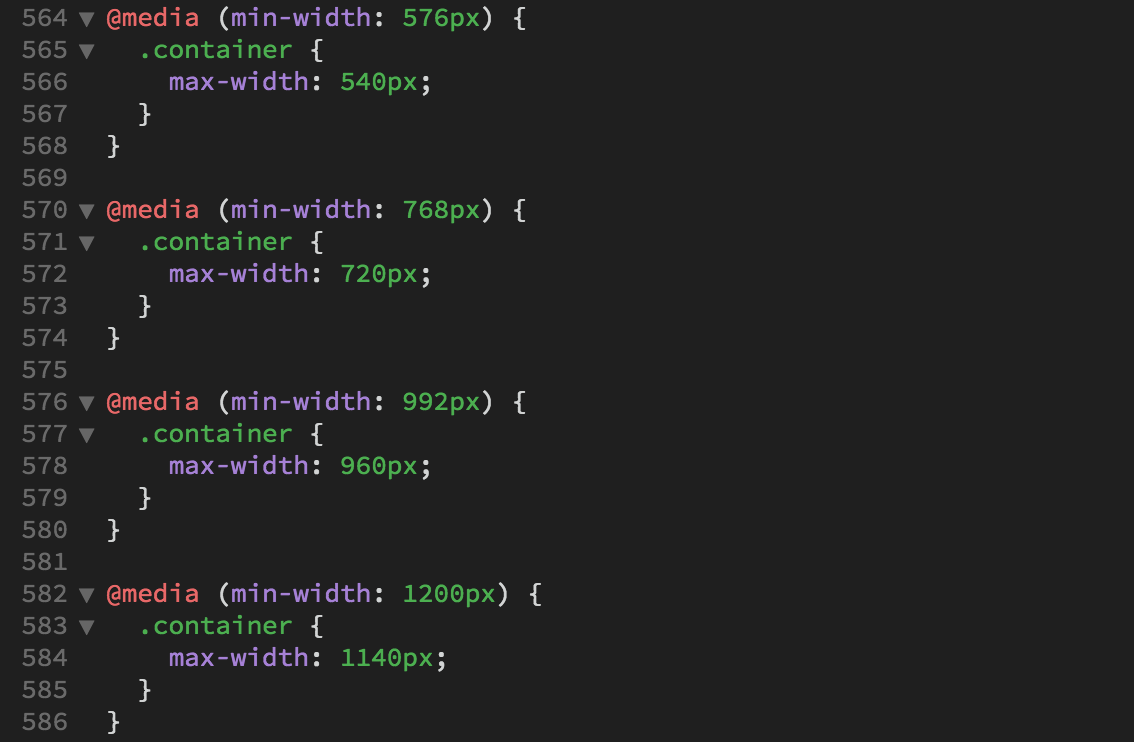
Notice the extra set of brackets around the media query? Any style nested within the brackets will be affected by the media query.
If a style isn't enclosed in a media query, it will take effect in all screen size variations as a "global" style.
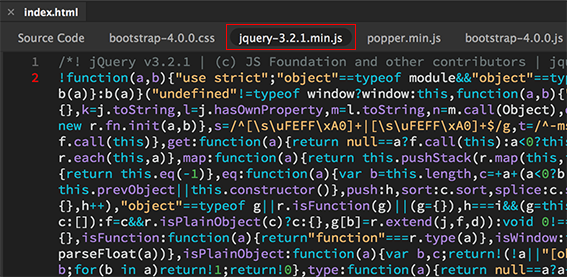
Use the related files toolbar to toggle to the jquery.min.js file. This file has been minified so it loads faster in the browser. All line breaks have been removed so it is a big chunk of code. You won't need to edit this file. The popper.js and bootstrap.js files contain additional JavaScript code, necessary for dismissing alerts, running image carousels, collapsing accordions, displaying dropdowns, and popping tooltips.
There are pros and cons to using Dreamweaver to install Bootstrap.
For me, the cons outweigh the pros. Let's look at two more installation methods to compare.
Select the index.html, css, and js in your Files panel, then hit your Delete key.
Dreamweaver will ask if you're sure you want to delete the files. Click Yes.
You'll be left with an empty Files panel – a clean slate to try this again.
Installing Bootstrap by Download
Dreamweaver makes installing Bootstrap easy, providing you with the necessary CSS and JavaScript files when you create a new HTML file that uses the Bootstrap framework. However, you can also download these files manually from the Bootstrap website. Go to getbootstrap.com. Click the Download button for the Compiled CSS and JS.
 |
Download the compiled CSS and JS files. The source files are precompiled - use the source files if you'd like to customize the framework using Sass. |
Expand the bootstrap-4 download folder to examine its contents.
You'll find the same Bootstrap files that Dreamweaver provided, but with more options. You can choose from a bootstrap.css file (exactly like the one you just looked at in Dreamweaver) or a bootstrap.min.css file (the same file, but minified, so it loads faster in the browser). You could choose to use just the bootstrap-grid.css, leaving out the typography, component, and content styles. Or, just the bootstrap-reboot.css, which removes default browser styling.
You also have several JavaScript files to choose from. The bootstrap.bundle.min.js combines both popper.js and bootstrap.js into one file. The bootstrap.js doesn't include the popper.js, but if you're not planning to use pop-ups or modals, you won't need it.
The idea here is to pick and choose. To get all of the Bootstrap features, you'll use the bootstrap.min.css and the bootstrap.bundle.min.js. Let's try it out.
1. Drag and drop the css and js folders from the bootstrap-4 downloads folder into the practice folder on your computer desktop.
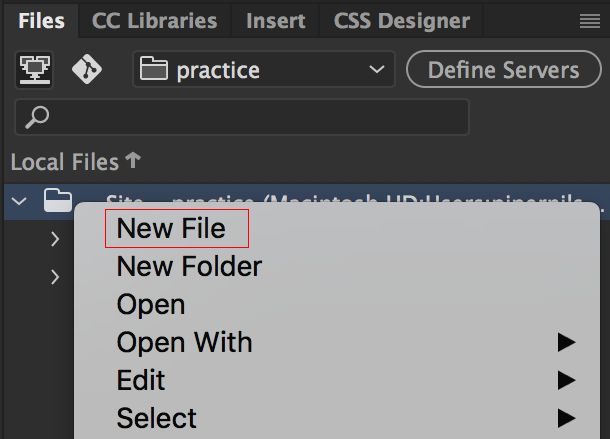
2. Right-click (Windows) or Control-click (Mac) the top level practice folder in the Files panel. Choose New File from the context menu. When the bounding box appears, name the file "index.html".
You should now have a css folder, a js folder, and a index.html file. Using the Files panel, double-click to open the index.html.
Toggle to Code View.
3. Go to getbootstrap.com. Click the Copy button in the top-right corner of the starter template code sample.
4. Back in Dreamweaver, go to Edit > Select All and hit your Delete key.
5. Edit > Paste the Starter Template code you copied from the Bootstrap website.
Look for the link to the bootstrap.min.css file in the document head. You need to change this from an absolute link (it currently links to a file on a remote server) to a relative link (which will link to the bootstrap.min.css file inside the local site folder).

Select the https://maxcdn.bootstrapcdn.com/bootstrap/4.0.0/ file path before the css folder directory and hit your Delete key.

Select the integrity and crossorgin attributes inside the stylesheet link and hit Delete.

The resulting file path tells the browser to look for a css folder, then find the bootstrap.min.css.

6. There are three script tags at the bottom of the source code.
The first script tag links to the jQuery library on a CDN (content delivery network). Keep this script tag as it is.
The second script tag goes to popper.js. You don't need this script since you'll be using the bundled JavaScript file inside. Select the popper.js script tag and hit Delete.

The third script tag links to the bootstrap.min.js file on a CDN. Change this to a relative link. First, delete the integrity and crossorgin attributes.

Select the https://maxcdn.bootstrapcdn.com/bootstrap/4.0.0/ file path before the js folder and hit Delete.

Change the bootstrap.min.js file name to bootstrap.bundle.min.js. As you type, a code hint will pop up listing the files inside the local site folder. Key down to choose the bootstrap.bundle.min.js file and hit Return.

You'll have two script tags when you're done. The first links to the jQuery library on the CDN. The second links to the bootstrap.bundle.min.js in your local site folder.

This gives you all the files you need. The Bootstrap framework is installed.
We'll try out one more installation method. Delete the files in your practice folder. Select the index.html, css, and js in your Files panel, then hit your Delete key.
Dreamweaver will ask if you want to delete the files. Click Yes.
You'll be left with an empty Files panel.
Installing Bootstrap by CDN
Content Delivery Networks (CDN) store content in multiple geographical locations, delivering data at high speeds.
You can improve site performance by linking to the Bootstrap framework on the Bootstrap CDN. Bootstrap's high-speed server is probably faster than your humble Web host, and chances are, your site user has visited another Bootstrap CDN site so the files are already cached in their browser. Sweet!
1. Right-click (Windows) or Control-click (Mac) the practice folder in the Files panel. Choose New File from the context menu.
2. When the bounding box appears, name the file "index.html". Double-click to open the index.html file and toggle to Code View.
3. Go to getbootstrap.com. Click the Copy button in the top-right corner of the starter template code sample.
4. Back in Dreamweaver, go to Edit > Select All and hit your Delete key.
5. Edit > Paste the starter template code you just copied from getbootstrap.com. Go to File > Save. Go to File > Close to close the document, then double-click the index.html file in the Files panel to open it again. This is an extra step, but it is sometimes necessary to get Dreamweaver to recognize the external files.
The Bootstrap starter template links to several remote files: bootstrap.min.css, jquery.slim.min.css, popper.js, and bootstrap.min.js. All four of these files are posted on remote servers. You won't be able to edit them, but you will be able to apply the styles to your project.

Installing Bootstrap by CDN will give you the best possible site performance.
If you have a good Internet connection, I recommend using the CDN installation method. It's easy and quick.