Texture
sets are groups of textures designed to be used together to texture
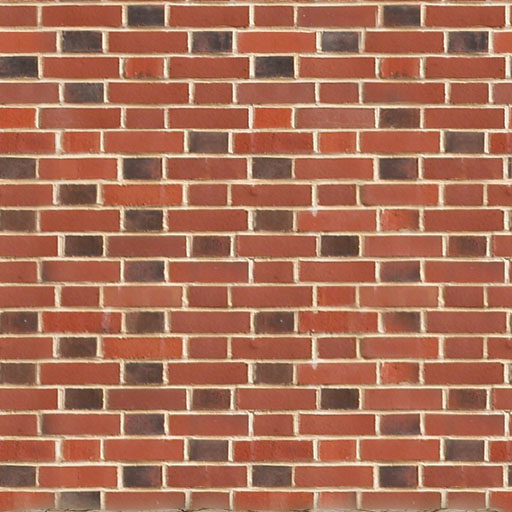
an environment. A single brick texture does not a building make—you'll
need textures for things like doors and windows. A brick building will
often have some variations in pattern, such as
a row of vertical bricks along the edge of the roof, or the base
of the walls, or around shoulder height. We'll see examples of
brick texture sets in future lectures.
Your
ground texture will need some help if it is to be part of a believable
environment. After you have made the effort to remove all conspicuous
detail that might draw undue attention to the tiling, a single
texture is still likely to create some patterns when tiled over
a large surface. It may also look fairly bland and uninteresting,
especially if you have removed too much detail.
You can break
up the pattern and make a surface more interesting by adding
one or two variations on the original texture. Such textures
might not be noticeably different until viewed side by side with
the original. A few more textures can be added that include details
like large cracks or broken earth. The ground is rarely free
of debris, so a good texture set will include a good range of
things on the surface—stones, small plants, or bones, for example.
There
is nothing technically significant about texture sets—they
share a certain visual theme, and are designed to work toward
a common goal, but the relationship is all in the mind of the
artist, and with any luck, the game designer as well.
Applying
Textures to the World
Textures
in a set are all applied to an environment in the same way. At
this point in your studies you have applied textures to 3D objects
in Maya.
In most game engines and level editors, as in Maya,
a single polygon can usually only have one material (and thus
one texture) applied. There
are some differences in game engines in the way that textures
are applied to surfaces that have some impact on how texture
sets are used. I'll give you some examples:
In the original PlayStation, the limitations of the
hardware resulted in most PS games having certain similar characteristics.
The PS did not include hardware perspective correction. This
had far-reaching implications for games on the PS—the first
being that you inevitably had lots of polygons which looked like
these.
Lack of perspective correction
meant that textures would shear along the center edge of a quad.
3D systems do perspective correction by their very nature—points,
and thus faces, are always drawn in correct perspective. It is
within the surface of a face, farthest from the points at its corners,
that the perspective on the texture itself would be drawn inconsistently.
The result is that the texture appears to warp and bend as the
camera angle changes.
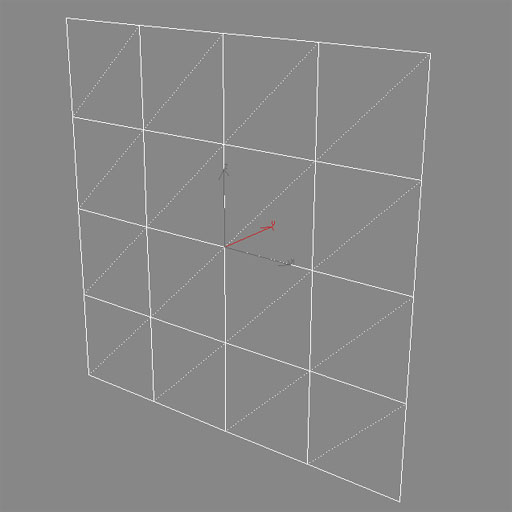
The only way to fix this is
to make the distances between points as small as possible. This
will mean more points and more faces, however, so a balance must
be found. On some original PlayStation games, even the flattest surface
was subdivided into quads of 64 units. In the image below, a
surface that could easily have been composed of a single quad
is subdivided into 16 quads, each 64x64 units in size.
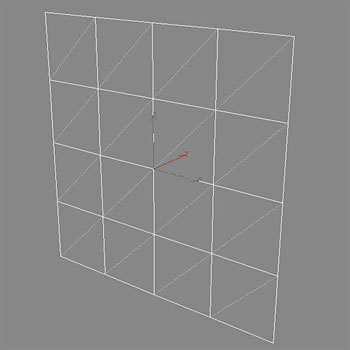 |
Click the image above for a closer look. |
One implication of this is
that many more polygons are required to build even the simplest
surface. The second is that it becomes convenient to "face
map." Face mapping is a process by which a different
texture is applied to each quad.
Since surfaces were all subdivided
on the PlayStation, face mapping became a convenient way to
apply texture maps. It is especially effective for any texture set
that includes variations on a theme, because any single face can use
any texture.
Even when subdividing a surface
in this way, the warping of the texture still occurs. Wherever
possible, artists would avoid having certain types of distinct
detail in the center of the texture, especially bold horizontal
or vertical lines. Throughout the environment, bold horizontal or vertical
lines (such as the dark lines that appear between planks of wood)
would be placed along the edges of the texture, and thus at the
edges of the polygon.
Alternatives to Face Mapping
The easiest and quickest approach
to mapping for games might be what's called world coordinate
mapping (also called solid texture). Doom and the Quake series
handle most mapping this way.
In this approach, textures have
an absolute size. In the case of Quake III Arena, a texture map
of 256 pixels square occupies 128x128 units of world space, by
default. Apply any texture to a surface, and it will have this
type of mapping applied. If the surface sits with one edge at
0,0,0, the center of the coordinate system, then the texture
that appears on the surface will have one corner at that point—and
the opposite corner at 128,128,0. Textures tile by default, so the
entire surface will be covered by tiling the texture.
Because the Quake III Arena
engine uses perspective correction, any huge, flat surface can
be created using one "brush," each surface of which
is composed of only two tris. The total poly count obviously benefits
from this. To use an alternative texture (such as a variation
on the original) to reduce the appearance of tiling would require
using more surfaces.
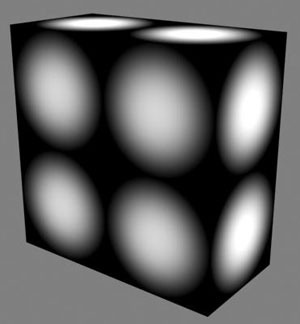
The image below shows one simple
texture (a white dot on a black background) tiled over the surface
of a simple geometric shape.
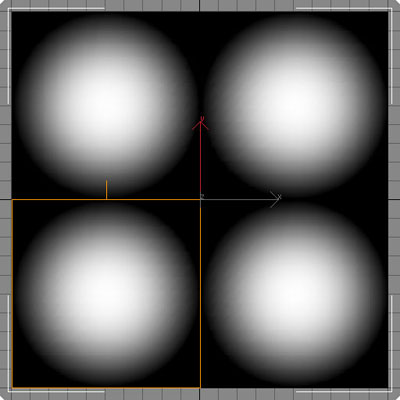
In the image below the orange square outlines one instance
of the texture.
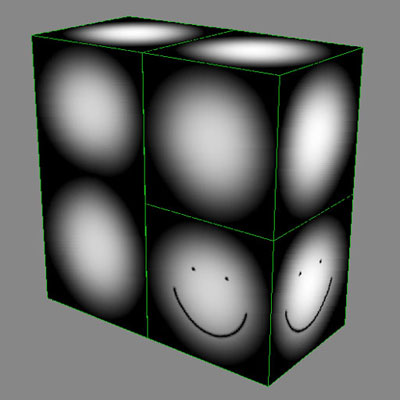
The image below shows what must be done to introduce a new
texture—new geometry is introduced so that the new texture
can be applied. As you might imagine, when working in such a
system the designer is less likely to use variation textures.
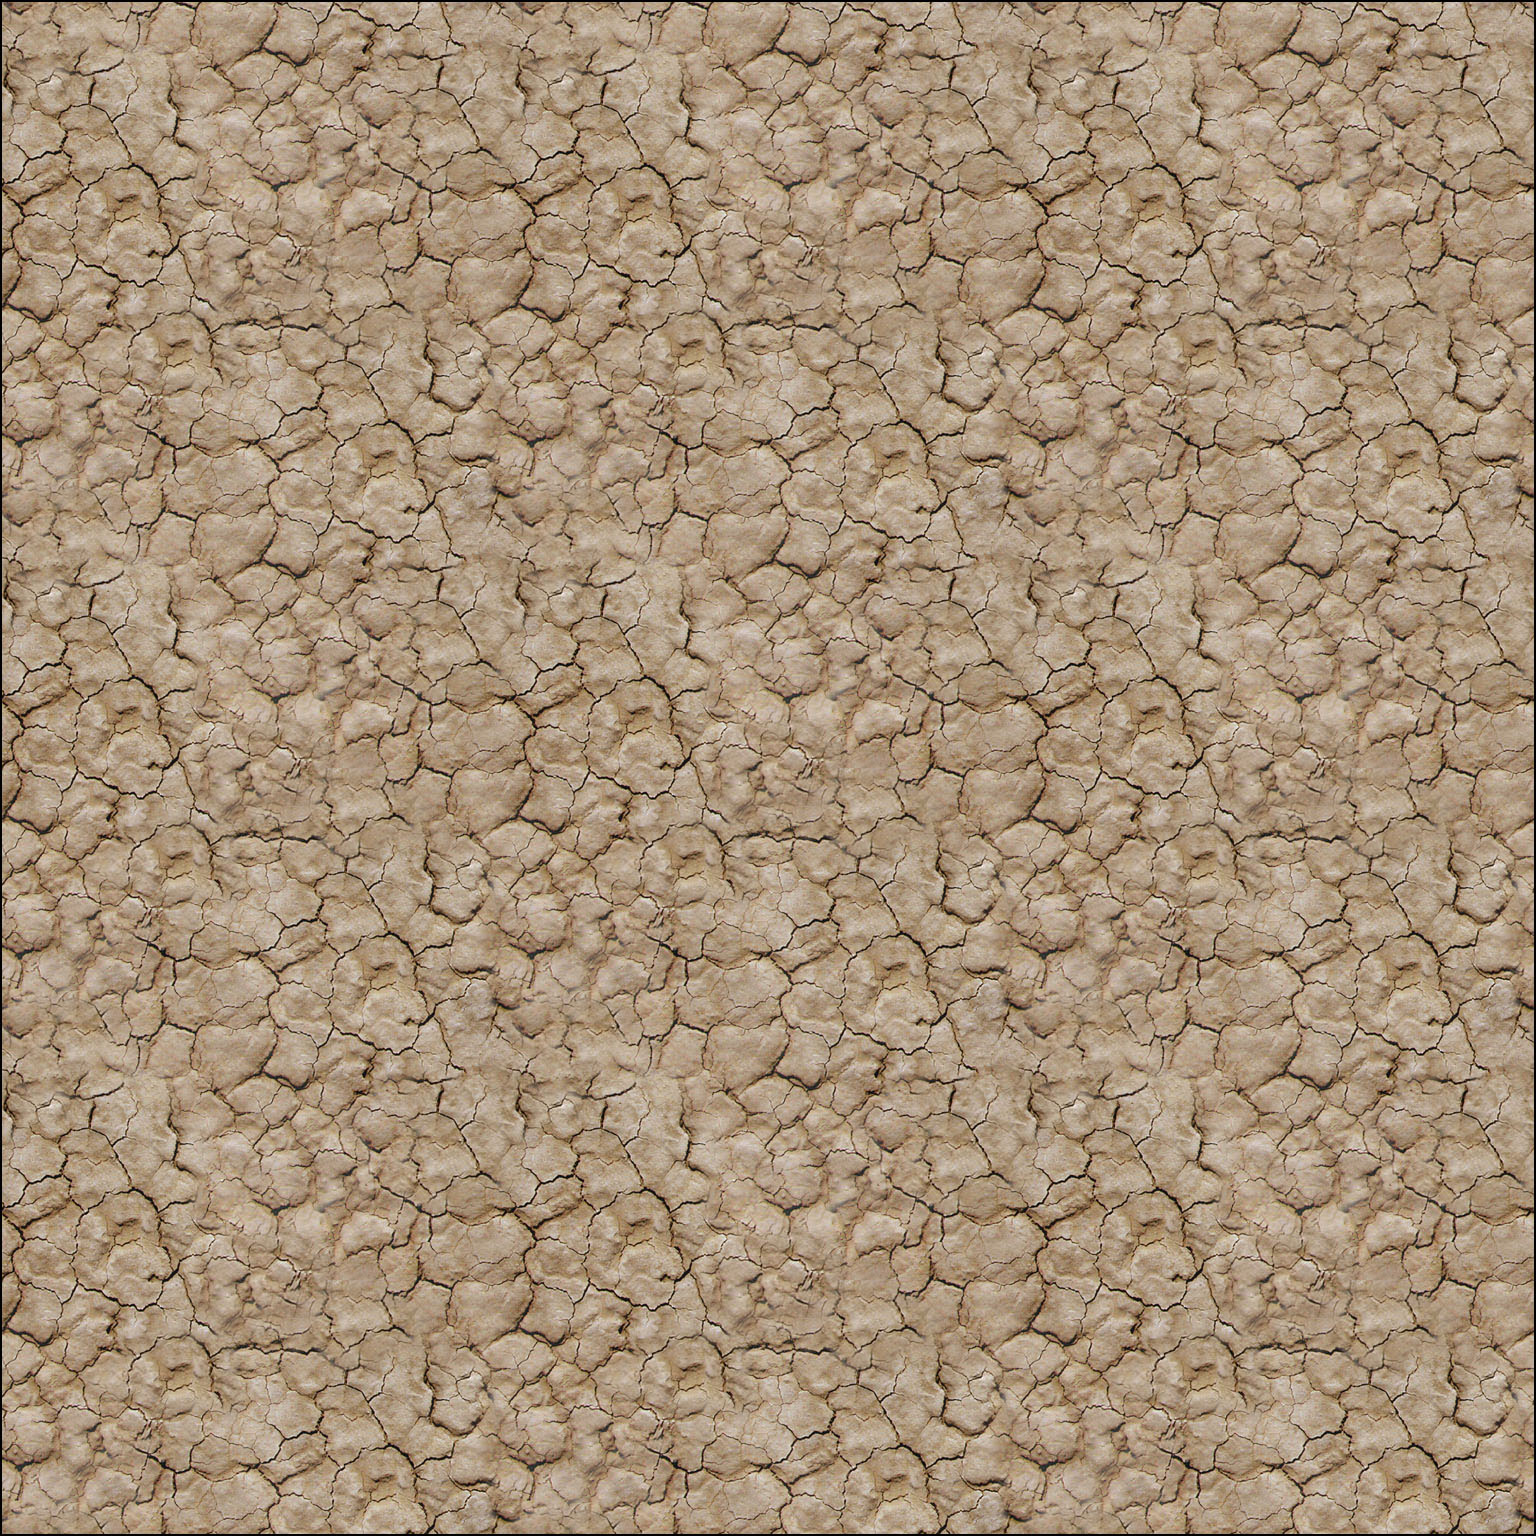
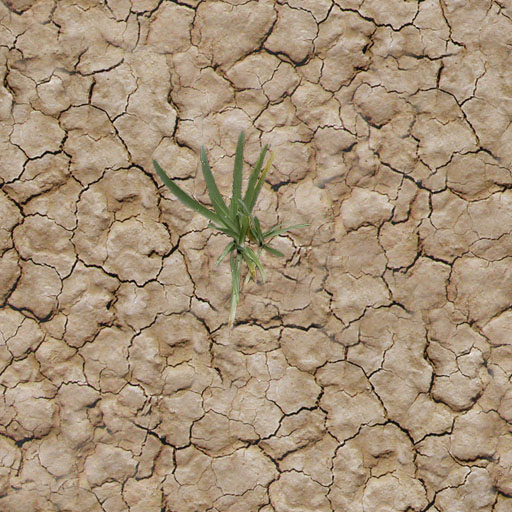
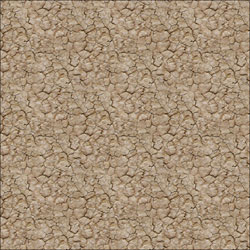
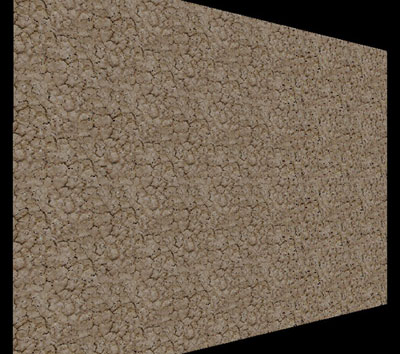
Below left is our ground texture tiled 3x3. You should remember our
discussion about the process of removing conspicuous detail,
and the effect that often has in terms of making the texture
more uniform, and thus compromising its character, perhaps making
it less interesting.
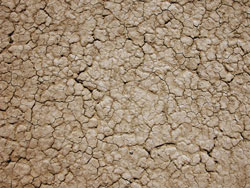
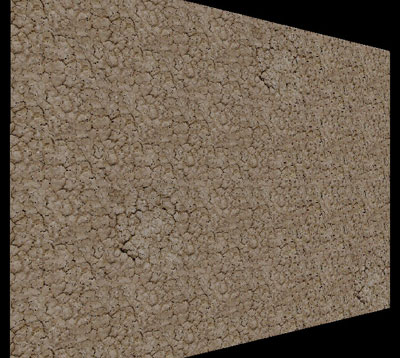
Below right is our color corrected source image. It
shows all of the variation of color and pattern that nature gave
the desert floor itself, at least a small part of it. We have
done a good job with our texture, so it doesn't look unrealistic.
But in some ways the source image is more visually interesting.
 |
 |
Click
the images above for a closer look. |
As we start to create a set of textures around a texture theme
such as our ground texture, one of the first things we might
consider is an alternate to our original tiling texture. We have
already made a texture that tiles without showing seams which
has a minimum of strong detail to draw attention
to the tiling. A good second texture for our ground texture set
might be a slight variation on this original texture that we
could use to help break up further any pattern we might see when
we tile the original.
 |
The five tiling textures above
(from UT2004) represent a small wall texture set. Any of these
textures can be placed next to any other, and will tile seamlessly.
Click each one to see it at full size.
|
A Texture Set Vocabulary
A while ago I tried coming up with names for the different
types of textures commonly found in texture sets, rather than
just using descriptions whenever I needed to talk about them. I
decided to call the type of textures you made in Lectures One through Three
"Base Tiling Textures."
A Base Tiling
Texture, placed next to (or
above or below) an exact copy of itself, shows no seams, and
as far as possible, shows no indication that one is seeing a single
texture tiled. This type of texture should show little or no
conspicuous detail that creates a noticeable pattern when tiled
across a large surface.
The type of texture I talked about at the beginning of the lecture I
call a Base
Tiling Texture Alternate—a variation on the Base Tiling
Texture that tiles with the Base Tiling Texture (and with itself),
but contains
somewhat
different detail so as to make it useful specifically for breaking
up the repetition of the Base Tiling Texture. There may be more
than one of these, but making more than two or three is not usually
necessary.
If we expect to use a Base Tiling Texture Alternate
often, we might consider making it tile much like the Base
Tiling Texture, which tiles seamlessly, and has little
conspicuous detail. Such a texture could be used by itself on
a ground plane. Because it too will tile over a large area without
obvious patterns, it is a viable alternate for the original ground
texture.
Another option is to introduce to the Base Tiling Texture
Alternate some of the character of the source image—I call this a Base Tiling Texture Variation.
If we plan to use this texture only sparingly, then it can contain
detail that would create obvious patterns if it were used more
often.
It might be a good idea to create both tiles, which we'll do right now...
Creating a Base Tiling Texture
Alternate
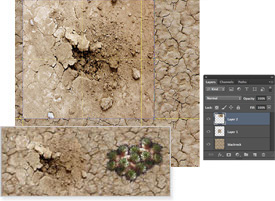
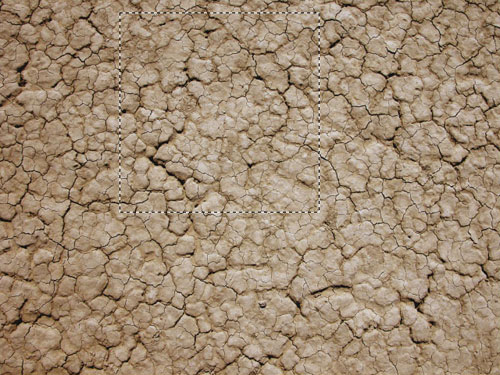
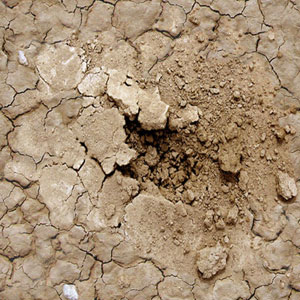
The image below shows my choice of a 1024x1024 portion of
the color corrected source image, which I will use to create
my Base Tiling Texture Alternate (as you may remember,
we used a 1024 square pixel region for our first texture, and
resized it to 512 square). I chose the area I thought looked
the most interesting.
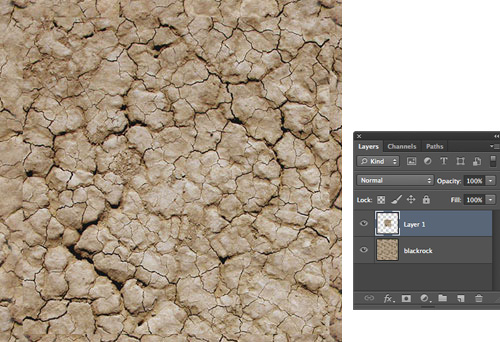
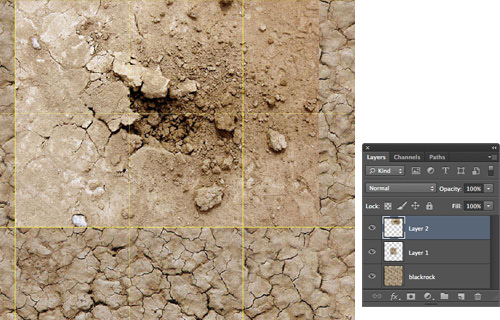
The image below shows my selection resized and pasted as a
new layer over our original ground texture. It has been lined
up precisely over one tile of the original texture, using the
grid.
You will have to look closely to see the edges, but these
new edges do create seams that will be visible when tiled, and
will have to be dealt with. The most efficient way to do this
will be to use the Eraser tool to expose the edges of the original
texture. Remember to erase artistically, and make the new texture
blend into the old as naturally as possible.
Below is our 3D test plane with the original ground texture
applied.
Below is the test plane with the second ground texture added
here and there for variation.
One texture of this type can add a little extra realism by
adding some variation to the surface. This particular texture
has a lot of character, and draws the eye a bit too
much to be used often. As I mentioned before, you may need another
Base Tiling Texture Alternate that shows as little
conspicuous detail as the Base Tiling Texture itself.
Base Tiling Texture Variations
Base Tiling Texture Variations go beyond
the Base Tiling Texture Alternate, introducing minor detail that increases
the realism of the texture set. In a brick texture set this will
typically include cracks, broken and/or stained bricks, small
vents and such. Let's see what this might be in our ground texture
set.
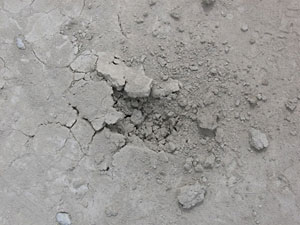
Below is another image I shot between photographing painted
people and art cars at Burning Man. It is called "blackrock2.jpg"
and is included in your course downloads.
Fortunately, I made note of the settings I used to color correct
the other desert floor texture we worked with previously (don't
fail to take note of this example of the value of making such notes!).
If you need a reminder of the setting used, you can refer back
to Lecture One.
There is a lot in this image I find interesting, and would
like to include. It is wider than it is high, so a decision will
have to be made whether to eliminate some of the detail on either
side, or to make it smaller overall in order to fit. It doesn't
seem worth it to make two textures that will always need to be
used together in this case.
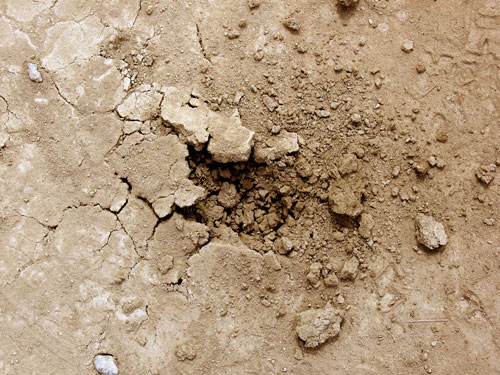
I started by resizing the color corrected source image to
512 in the vertical axis, and copying the results into a new
layer in my 3x3 working PSD image. I wanted to see it in context
before making my final decision.
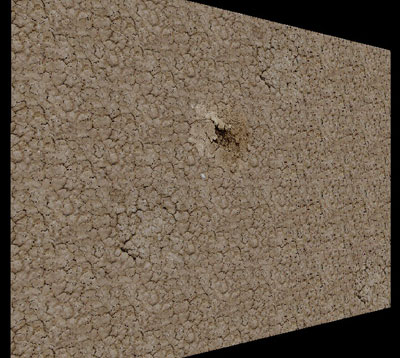
In the end I decided to distort it a bit, as you can see below.
 |
I used the Scale transformation here, pulling
the right side in a bit. |
With this texture we'll want to do some very careful erasing.
The texture will look its best if we use a small eraser brush,
and erase carefully around some of the small debris so that we
have debris lying on cracked ground rather than compacted ground.
This will make it blend better into the original ground texture.
Closer to the edges this will be more important, as the transition
from the top layer to the original texture takes place starting
at the edges.
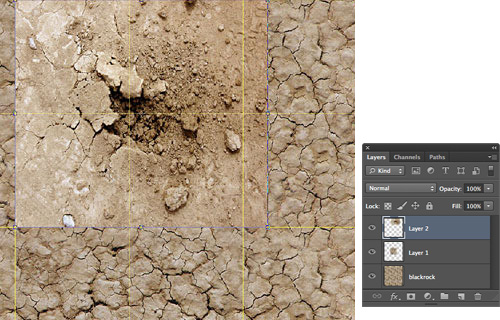
After some especially artistic erasing, we might end up with
a texture like the one below:
 |
Click the image
above for a closer look. |
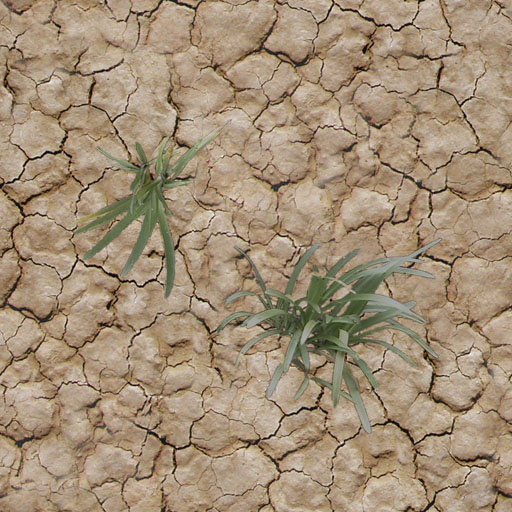
The new texture in use with the others in our growing texture
set:
The three type of texture we've discussed—base tiling texture, base tiling texture alternate, and base tiling texture variation—will give you a good start. But we're not done yet. Surface detail textures and set piece textures may be required to give your surfaces life. Let's look at those now.
Surface Details
Surface Detail Textures include detail
necessary to create a realistic environment: windows and doors,
including bricked-over windows and doors, for a brick texture
set, and small plants and similar surface detail for ground texture
sets.
Black Rock Desert is a fairly dry, lifeless clay lake bed.
But that doesn't mean the ground for your game has to be the
same. What do you think your creative license is for? The textures
above add life to your environment in more than one sense—they make
the surface more interesting to look at.
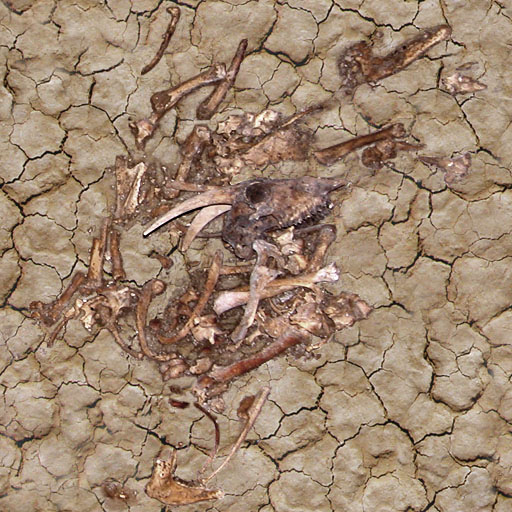
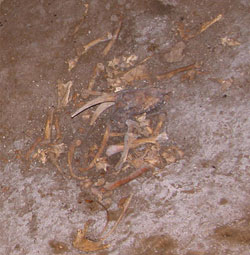
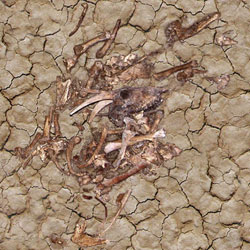
Set Piece Textures
But let's not depart from the whole lifeless theme too abruptly... if
we're talking video games, death is never far behind, yes, including
your own! Unless you're "lucky" enough to be working
on the sequel to Barney Undersea, you'll probably be called upon
as a game artist to include textures like this in your texture
sets.
Source (left) and texture (right):
 |
 |
Click
the images above for a closer look. |
It took extensive and careful use of selections (and feathering)
and the Eraser tool to remove the ground from the top image,
so that the bones integrated well into my ground texture.
Sometimes you will include a texture, like this one, so interesting
or otherwise likely to draw a lot of attention that you may only
want to use it one time in the whole game. Such a texture I call
a Set Piece Texture.
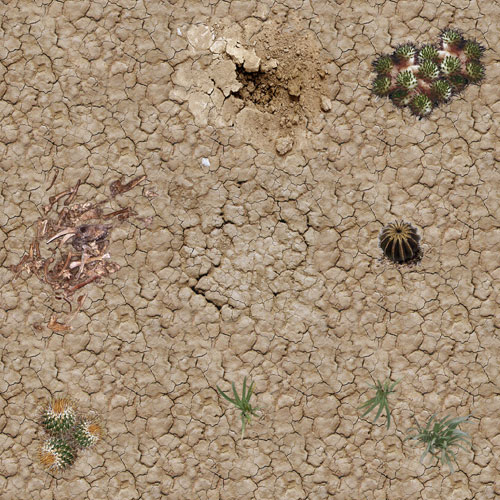
The Texture Set Palette
A few more textures and we have a small ground texture set.
Below you see all nine textures in this set in a single image.
I like to work on my texture sets in an image like this, in PSD
format, with each detail in a separate layer. You might call
this a texture set palette, in which you mix up your texture
set one tiling texture at a time. Working in this way allows
us to see the entire set as we work with it.
As you might guess, the principles for establishing a texture set we've just discussed can also be applied in creating geometric surfaces and texture sets.
You'll want to establish a base texture with alternate and variation textures, then think about what surface detail and set piece textures will add realism and interest to your texture set.
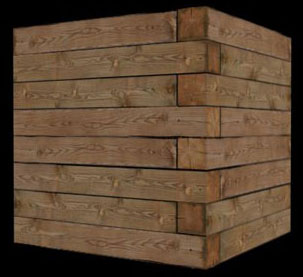
To wrap up this lecture I'd like to explore the challenge of creating joins between geometric textures, a challenge that's most clearly illustrated by attempting to model the end grain in wood.
Important Ingredient of a Good Texture Set
End Grain is a term used to describe a texture created
to solve a problem that is common to wood textures. It will be
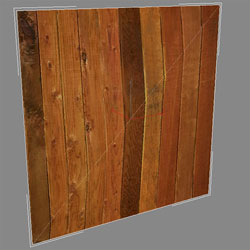
tempting to beginning texture artists to use wood textures like
this:
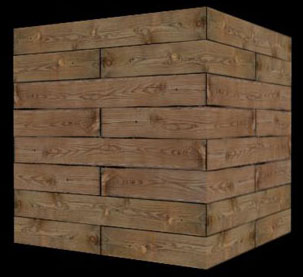
You're not likely to see a wooden object in the real world
that looks like this. A wooden object will usually look better
if you create end grain textures for the corners.
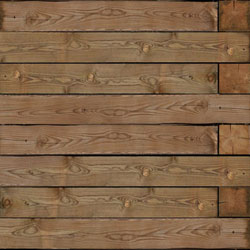
Making textures like this requires some thought. You'll usually
need a basic wood texture that tiles with itself, like the one
below (this is the Base Tiling Texture for this wood texture
set).
|
Three identical tiles. Click each of them for a
closer look. |
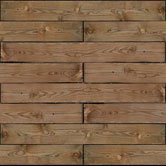
The two end grain textures need to tile seamlessly when placed
end to end (as shown below, and on the cube shown two images
above). The ends of the beams probably won't match naturally
into the sides of the beams unless you take steps in Photoshop
to make them do so.

Just in case we need to texture something small, the two end
grain textures tile when the other edges are placed side by side
as well!
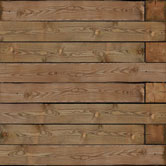
Of course you'll also need the textures with end grain to
tile seamlessly when placed next to the basic texture, as they
appear below.

Take a moment, and think about what strategies you might use
to make a set of textures likes this.
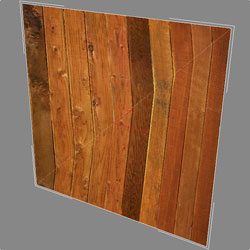
End Grain Is for More Than Just Wood
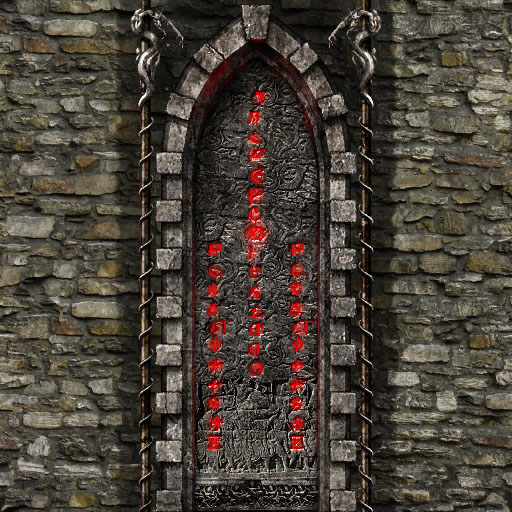
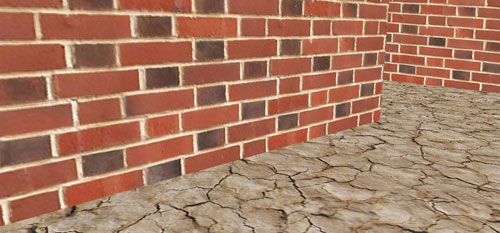
Consider the image below. The lack of end grain creates an
unrealistic look. Some sort of end grain is needed.
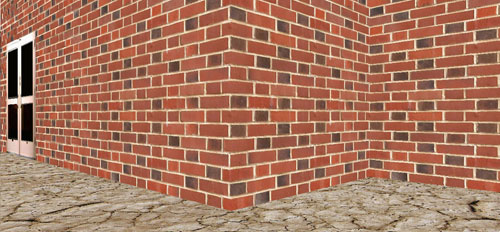
With end grain the scene becomes much more believable.

With tiling textures we are often trying to make flat, computer
generated surfaces look real. You should always use every means
at your disposal to enhance the illusion. One good way to do
this is through the use of end grain textures.
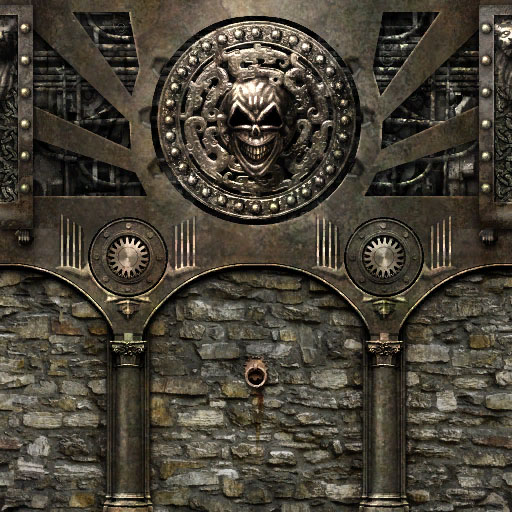
The texture used below doesn't have the sort of problems that
the brick texture has without end grain.
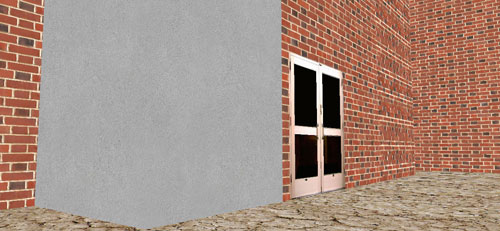
But use of end grain can still improve the look.
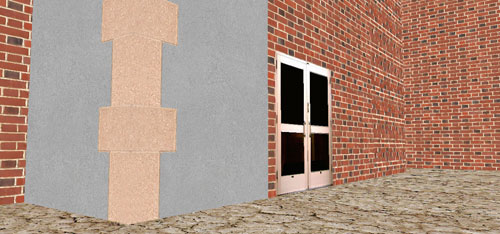
End grain can also help with transitions from one surface
to another.
I consider such textures to be a subset of End Grain,
which I call Transitional Textures. This
type of texture may share many characteristics of the End Grain Texture.
The purpose of the Transitional Texture is to offer the
most useful and realistic transition from one texture set to
another.
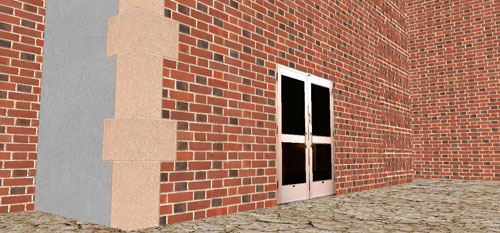
Transitional Textures can be used in other ways to
break up the very hard-edged, geometric look often associated
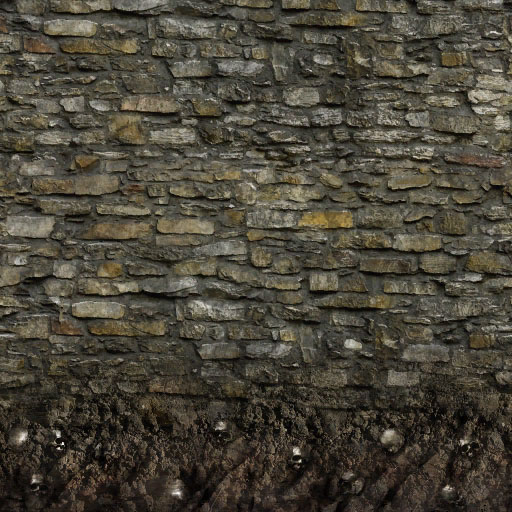
with computer-generated imagery. Compare the two images below.
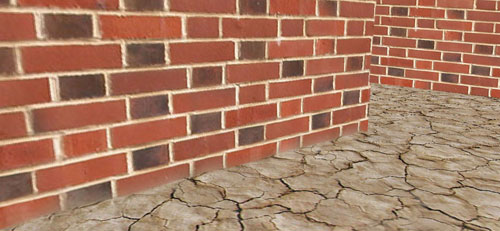
This effect is achieved by including a very thin, irregular
piece of the ground texture along the very bottom of the brick
texture. A little dust has been added to the bottom-most bricks
as well. This thin piece tiles with the ground texture, creating
a continuity between the two textures and the surfaces they're
applied to that effectively blurs the hard edge of the geometry.
|
Click
the image above for a closer look. |
With these basic texture types in your toolbelt, you're better
prepared to make useful texture sets.