OK, let's get our hands dirty, shall we? In this part of the lecture I'll show you a simple approach for creating a
tiling texture from a source image. We'll simply make it tile: When we
place our texture next to a copy of the same texture, we will see no
seams.
The texture will not necessarily be properly finished,
however, until after Lecture Two.
Download the asset pack
for this lecture if you haven't already (in the course download area). It contains the file
"blackrock.jpg," which you can use to follow along
with this lecture.
Remember to start with the full-sized version in the course download area, not the smaller version you see below.
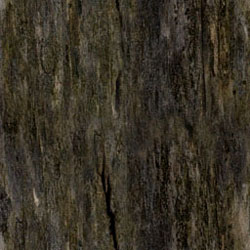
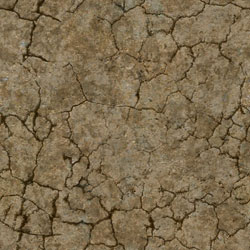
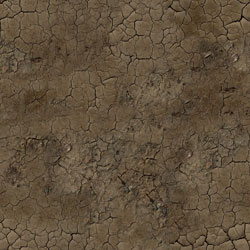
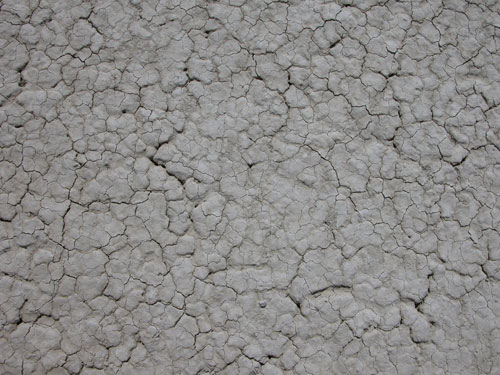
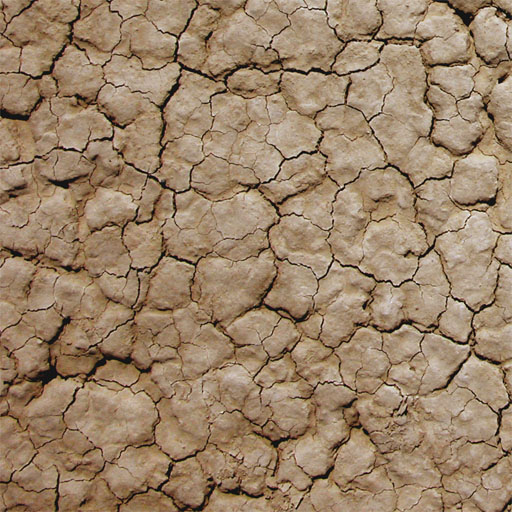
We'll first create an organic tiling texture starting from
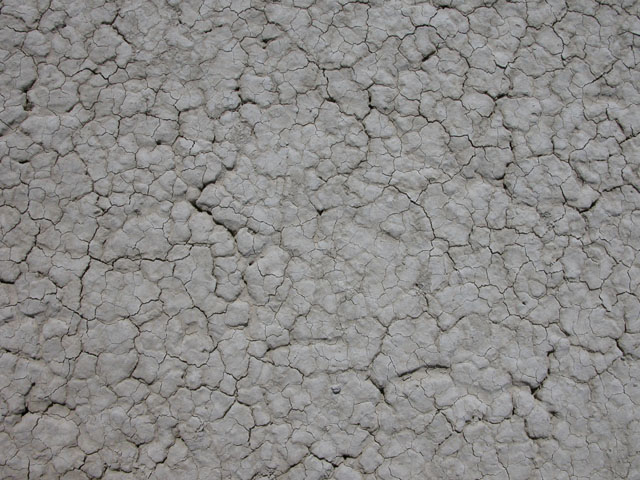
a source image. This image is a digital photo of the floor of
Black Rock Desert in Nevada, home of the Burning Man festival.
Before we begin, let's first take a look at the steps we'll
take in the process. To create a tiling texture based on the
image above, we will:
 |
|
 |
| |
1. First, make any needed adjustments
to color, contrast, and so on, and save the adjusted image with
a new file name.
2. Make sure the grid settings are correct.
3. Select a portion of the image as the starting point for the
texture. Be sure to choose one that is fairly uniform, with little
extreme detail.
4. Check to be sure the texture is the correct scale for the
environment.
5. Using the offset approach:
a. Offset the texture by 256 pixels in each axis to move the
edges to the center.
b. Overlay a copy of the original,
un-offset texture, and use the Eraser tool to expose the edges
of the offset layer. Be sure
not to expose the original seams!
c. Tile the texture in Photoshop to see how well it tiles.
d. Rinse and repeat as needed, until the texture shows no seams
at all when tiled.
|
|
 |
|
 |
Let's go to it...
Step 1. Planning Ahead: Adjust the Image
When working from a source image like this, the first thing you'll
want to do is think about any adjustments you may want to
make to the image. Are you happy with the color? Would it look
better with more contrast?
After you make one tiling texture, you may still want to use
other parts of the image for further textures in the set. For
example, you might want to make subtle variations on the first. It will save
you time if you make necessary adjustments before you go any farther, and save a
copy of the image so that you can return to it later.
The clay desert floor (below) is very gray in color. Perhaps your environment
and set of textures would look better with something that is more red
or yellow in color.
In this case, this is the
first texture we are creating, and so it is more likely that
we may want to make adjustments later, as our texture set develops.
This will sometimes be the case—just remember to think ahead and plan
as
much as possible as you work.
You should always consider the contrast of the image. Increasing
contrast can often improve the illusion of depth, making your
flat surface have the appearance of not being so flat. Below,
the original image is shown with contrast increased by 50 in Image > Adjustments > Brightness/Contrast. Notice that I have Use Legacy checked in the Brightness/Contrast dialog. This gives me much stronger results.
Adjusting Colors in Photoshop CC
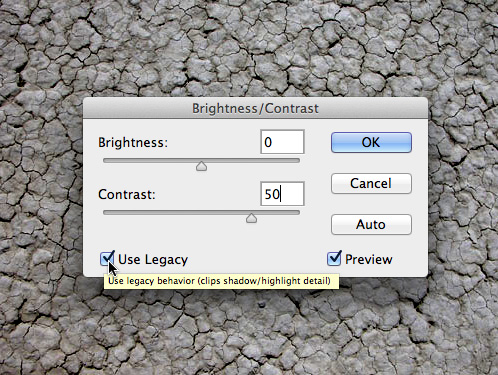
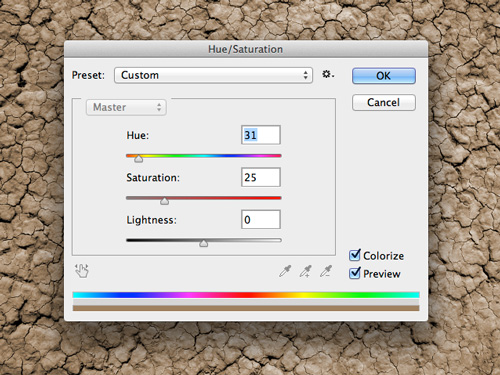
Image > Adjustments > Hue/Saturation can
be used to adjust the color of the image. Make sure that you check Colorize. As shown below, you can adjust to achieve a brown ground color. As with
most of these adjustments, there is a Preview checkbox, and you
can check and uncheck it to compare the original with your latest
changes.
Now that we have made adjustments to the original image, we
should save it so that it is available later. But don't overwrite
the original! You may want to go back to that image at some point,
and possibly use it for another purpose. Hard drive space is
cheap, so save your color corrected image using a new file name.
If you want to really be organized, you should type a short
note to yourself about the settings you used, and save them into
a file. Why? Well, maybe you shot two or more images when you
shot source photos, and maybe you'll want to save some time if you
ever need to color correct one of those images.
Step 2. Texture Resolution
Game
artists talk about their textures in terms of resolution—they
might make textures with a resolution of 256x256, for example.
Technically, they are talking about the pixel dimensions. For
folks working in other fields, including those who work with
printed images, "resolution" refers to the number of
dots per inch (dpi) or pixels per inch (ppi). Dpi/ppi isn't an issue that generally
concerns the game artist. If you are used to the more accurate
terminology, you'll have to grin and bear it as your fellow game
artists talk about texture "resolution."
Many games still use a 256x256 resolution as their basic texture
size. Some, like Unreal, use textures of up to 1024x1024, but 256x256 is still quite common. Someday this will
increase, probably soon.
Note: If you work in a higher resolution than
you intend to actually use in the game, you can make textures
that you may be able to use again later, in the sequel to your
game on a next-generation game engine.
I recommend that you work at twice the resolution that
you'll use in your game for another reason: It is usually easier
to create effective, realistic, and believable art at a higher
resolution. You'll be surprised how amazing and realistic images can look
when downsized if the higher resolution version looks good.
We'll assume that we're designing for a game engine that uses 256x256 textures, and
create our tiling textures at 512x512.
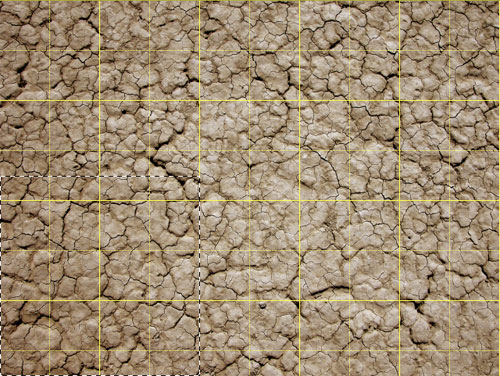
Step 3. Selecting Your Starting Texture
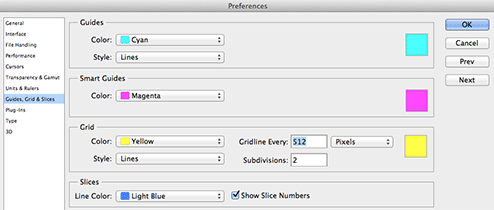
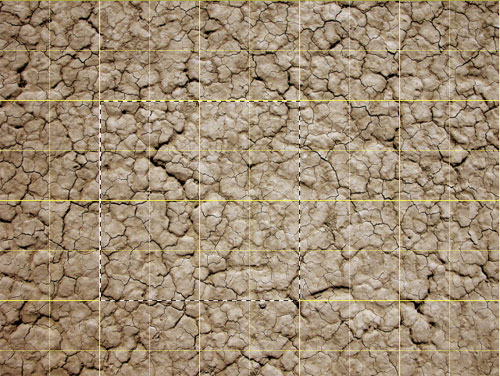
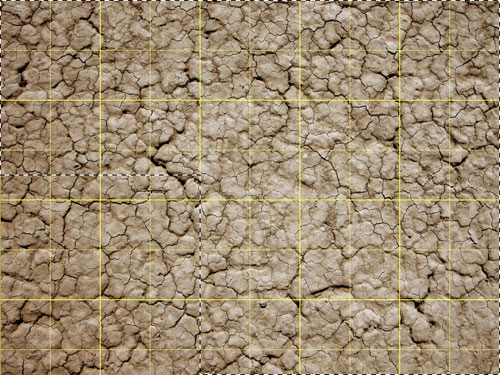
The grid is an indispensable tool for making tiling textures,
and it will be helpful to set up your grid now. If you don't already see
a grid on your image in Photoshop, first go to View > Show > Grid. Then
you can change the default settings by going to Edit > Preferences (PC) or Photoshop > Preferences (Mac). Choose Guides, Grid, & Slices.
Choose
a color for your grid that will show up well against the overall
color
of
your
texture.
In this case yellow works well. Set "Gridline every:" to 512 pixels,
and set Subdivisions to at least 2.
Working with the grid on will allow you to select precisely
the right portion of your texture, and also to place your textures
precisely within the image window when you move them.
You can
easily select a 512x512 portion of the image because your Rectangular Marquee
tool will snap to the grid lines if you click near enough to
them (if they don't, go to View > Snap To > Grid). The distance between the solid yellow lines is 512 pixels.
The subdivisions are represented by dotted yellow lines, and
allow you to easily select regions of 256x256 pixels. You can also refer
to your Info panel to make sure you have a selection of the desired
size.
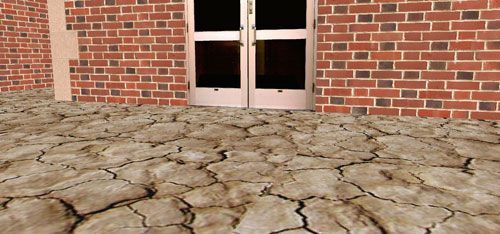
Step 4. Check the Texture Scale
The image below shows a selection of 512x512 pixels, which is
the size you need for your texture. It might occur to you that this would
make for some rather large cracks in the ground at this scale. If you thought
that, you are really thinking ahead! Good for you!

Unless you already have examples of textures from your game
engine to use as reference, you will want to test the size of
your textures before you go any further. I'll give you a preview
in this case, to save you the trouble of testing this texture
for yourself.
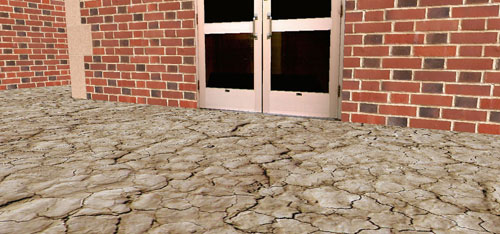
As shown in the image below, this detail in this
texture is probably too large (a door has been added for reference,
since looking at this image doesn't give you the same information
as if you had actually entered the game world yourself).
At
this point you aren't using any particular engine. In Lecture Two,
you will test your textures in Maya. But since in Maya there is
no "player" (it is a 3D application, but not a game
engine), there is not a specific scale you have to work at.
Therefore, for the purposes of this course,
you will only be able to focus on scale in terms of relating one texture
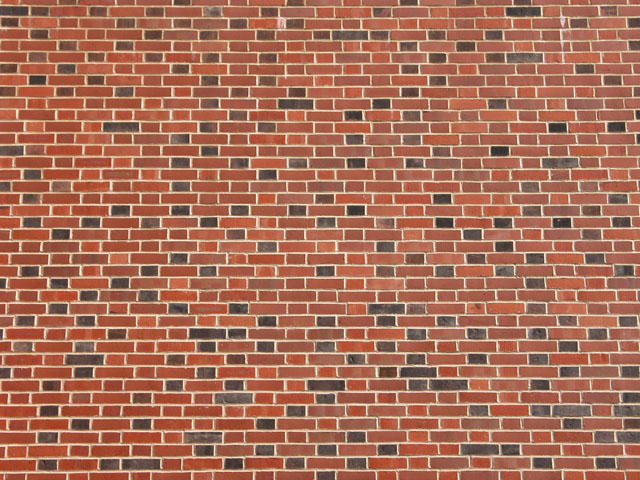
to a benchmark—for example, the size of a brick in one texture
compared to the size of an image of a doorway in another.
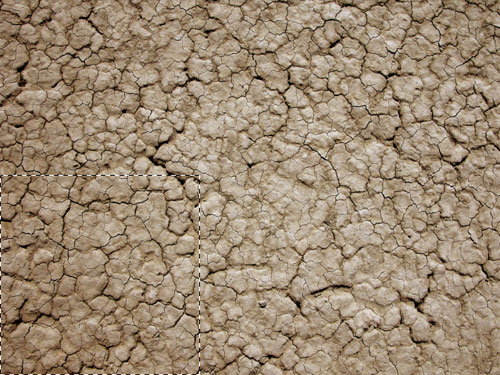
A region of 1024 pixels square will have four times as much
detail as 256 pixels square and will be easy to select as well. The image below shows
such a region selected.
Press Ctrl-' (Command-' on a Mac) to turn
off the grid. Move your selection around and choose the part of the image
that has the most uniform pattern.
I like the lower left portion of the image.
Press Ctrl-C (Command-C on a Mac) to copy the selected portion of the
image into the clipboard. Press Ctrl-N/Command-N to create a new image
window of precisely
the size of the image stored in the clipboard. Press Ctrl-V/Command-V to
paste from the clipboard into the new image. Flatten the image
(you currently have two layers, the background and the layer
you just pasted in). Resize the image to 512x512, and save it.
A quick test in my game engine shows that this is a much
more suitable size for the texture. This can also be tested in a 3D
app, which we'll do in the next lecture.
You have your starting texture. You've noticed the seams that
are visible in the image above, right? Next, you'll get rid of those
seams and make it tile!
One way to make a texture tile is to take the part of the
original (color corrected) image that lies just to the right
of the part you used for your texture, and place it over the
left side of your texture. That way you know that the left side
of your texture matches the right side.
You'll have a new
seam in the middle, and you'll have to use the Eraser tool, and
maybe the Clone Stamp tool, to eliminate that seam. And you'll
have to take the area immediately above the part you used for
your texture, and put that at the bottom, and deal with that
seam too.
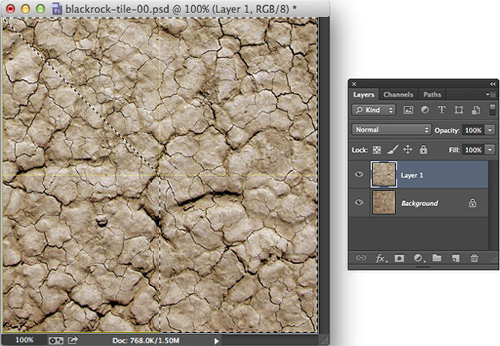
Let me show you what I mean. Remember how I chose the bottom
left portion of the original image as my starting texture (see
the selection in the image below)?
I can now easily move the 1024x1024 pixel square selection
so that it is immediately to the right of the portion I chose
before (see the image below).

So now the left edge of my current selection matches up with
the right edge of my starting texture.
You may also remember that I changed the resolution of the
portion I chose for my starting texture to half of its original
size.
So now I will:
|
|
|
| |
- Copy the selection shown above and paste it into a new document.
- Change the size of the new image to 512x512.
- Drag the top layer into my starting texture as a new layer.
(Note that you may need to "un-tab" your documents in order to drag from one to the other. Drag the file name tab at the top of a document away from the other tabs and it will float independently.)
|
|
|
|
|
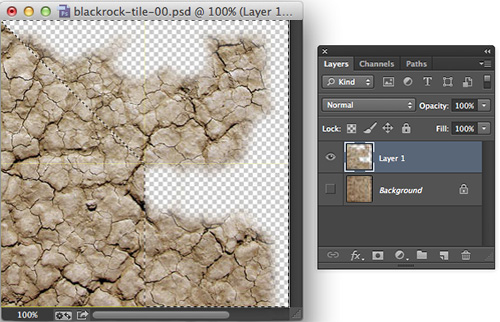
The selection shown above is now Layer 1, as you can see below.

I like the right edge of my background layer. Remember,
this is the part that matches up with what is now the left edge
of Layer 1. Therefore, I'll need to make sure that I erase the right
edge of Layer 1 so that the right edge of the Background layer
is visible. I'll also repeat this process with the top
edge of my texture, so I want the top edge of the Background
layer to be visible as well.
Using the Polygonal Lasso tool,
I can select parts of the new layer that I can safely erase, including
the parts I need to erase and excluding the parts I need to
preserve:
Feathering the selection (Select > Modify > Feather)
will insure that I leave no hard edges behind as I erase. A feather
radius of 1 or 2 pixels
is sufficient for this purpose. I'll want to use the Eraser tool
at 100% opacity, at least at first, to be sure I completely erase
the top and right edges of the new layer. I recommend a round, soft-edged
brush to be sure I leave no hard edges behind. The opacity and brush tip
settings for the Eraser tool are in the Photoshop options bar at the
top of your screen. Set the Hardness of the brush tip to 0% for the softest
possible edge.
The new layer doesn't match the pattern of the layer beneath,
so it won't be sufficient to erase only the edges. We'll need
to erase artistically, looking as we erase for the most natural
match between the two layers. You may be surprised at how the
cracks will line up as you erase, if you watch what is happening.
Be ready to use undo (Ctrl/Command-Z) if you go too far and want to
erase again. Sometimes a slight tweak of the color or contrast may be
necessary
to make the two layers match better.
The image below shows the erasing I did to my top layer (bottom layer hidden). You
should save your work often, so at this point I recommend saving
a PSD file, so that the layers are preserved.
At this point, you'll want to check that the texture actually does
tile horizontally. You can do this easily in Photoshop by using Image > Canvas Size, and making the
image at least twice the resolution in both dimensions (you'll want to
check vertical
tiling soon enough). Don't forget: "resolution" means pixel dimensions
in game art.
I'll later recommend working in a canvas
that can contain 3x3 tiles, so I'll go ahead and make my canvas
300% of its current size now (leaving the current image content
in the upper left quadrant).
I can merge the two layers (using the Layers panel flyout menu), duplicate
the resulting layer, and move it, with the grid on,
to place one texture right
beside
the other. With the grid off, I can see that horizontally at
least, the texture tiles seamlessly.

You should be able to imagine how you would repeat the process
to make the texture tile vertically by taking the area above
the top of the texture (from the original color corrected image),
and using it on the bottom of the image. Creative selecting is a very important
part of using Photoshop...
Creative Selecting
Thinking creatively when you make selections can save you
a lot of time in Photoshop. Here is one example: we know that
we want to select the region just above the lower 1024x1024 pixel
region of the original (color corrected) image.
We can easily
create a 1024x1024 selection using the grid, but placing it precisely
where we need it is not as simple. One easy way to approach this
problem is to start with the lower left 1024x1024 pixel region
selected, and invert the selection (Select > Inverse), as shown below.
Then you can simply deselect everything to the right of the desired
region.
Don't worry that you are left with fewer than 1024 pixels in the
vertical axis, you only need the bottom-most pixels to make the
texture tile.
OK, so maybe you are clever enough to know how
to make that selection on your own. Everyone in this class should have some experience with Photoshop,
after all. But I hope that explaining the process was helpful.
So what are the advantages and disadvantages of this approach?
Well, it's fairly easy, right? Not the easiest approach perhaps,
but certainly not the hardest. But it does become problematic
in some situations.
Suppose we had not used the lower left part
of the image, but some random part in the middle somewhere. How
would you accurately select the neighboring regions later?
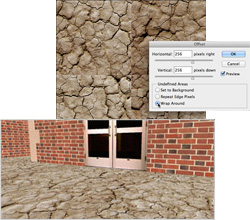
The Offset Approach
I prefer a different method for creating tiling textures. The
simplest version of this I like to call "the offset approach."
This means simply moving the seams to the middle of the image,
rather than the edges of the image, so that you can paint over
or otherwise eliminate them.
If we go back to the first 512x512 texture we made, we can
use the offset filter (Filter > Other > Offset) to move
the edges (and thus the seams) to the middle of the image. Be sure to choose the Wrap Around option so the offset texture will move into the unused space.
First duplicate the background layer, and then hide the
new layer and select the background layer again. Then use settings
of +256 in each dimension to shift the seams precisely to the
middle.

There are now many ways that you could go about dealing with
the seams, but perhaps the easiest is to work with the original
texture that is now in the top layer.
The main problem with the top layer is that it doesn't tile and
you can see this on the four edges of the image. The problem
in the lower layer is the seams that run through the middle horizontally
and vertically. So, if we carefully (and artistically) erase
the edges of the top layer, making sure not to expose the seams
on the bottom layer, we can end up with a good tiling texture.
You can use a selection like the one shown below to make sure
you don't expose any seams from the bottom layer, but make
sure to completely erase the edges of the top layer. You'll probably
need to deselect everything to fine tune your erasing.
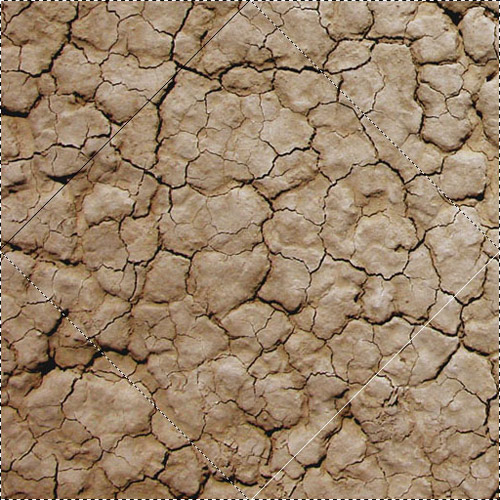 |
To get the selection here, you can
use your Polygonal Lasso to get straight edges. Hold Shift to create
perfectly horizontal,
vertical, and 45-degree edges. |
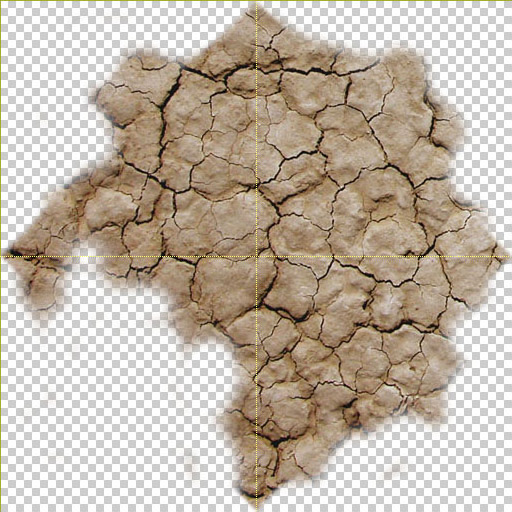
Below you can see the erasing I did to my top layer. I did
expose the seam area in one spot, but fortunately you can't see
it in the resulting texture.
Below you can see the texture tiled 3x3 in a single PSD file
in Photoshop.
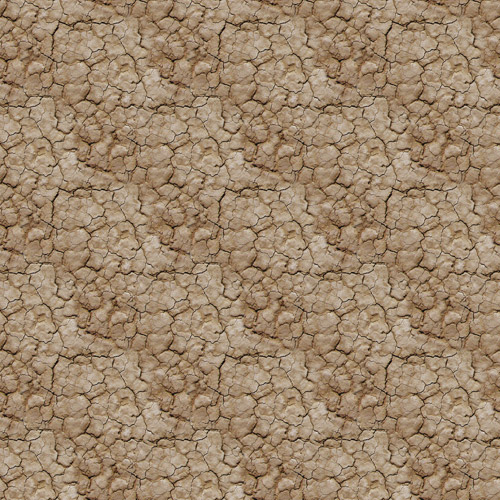
We can tell from this image that our texture tiles seamlessly.
You may see other problems with this texture—but that's OK,
we're still in the learning process. We'll learn to deal with
other problems in the next lecture.
Save your texture in PSD format, preserving the layers. We'll
work on it some more in the next lecture.