We use two documents to present the variables in a piece and facilitate all needed communication. The creative brief fosters dialog between the designer and client. Print specs fosters dialog between designer and printer. Both items are crucial in connecting the three points of the project triangle.

As we explore the two types of documents, always remember this: It makes a lot of sense to start with all of your limitations incorporated into the plans, rather than starting with an excessive design and scaling back halfway through the process. This scaling back is hard for any designer to endure, and likely pretty disappointing for the client to witness once they've fallen in love with your expensive but now outlandish project.
This isn't to say that a client's budget won't change in the middle of a job. Even after all of your meticulous planning, things can change in a big way. Nothing is ever set in stone, and your flexibility and adaptability is paramount in shepherding a successful print production process. That said, you should put as much effort as possible into understanding the needs of the job very early on.
The Creative Brief
The purpose of a creative brief is to demonstrate your understanding of the client's goals and needs for a given project. It can be a somewhat lengthy document if the project scope calls for it. In any case, it should be used as a tool that documents your findings from the initial client meeting or phone call. Not only does it hold you accountable for your understanding of the project, it acts as a way of showing the client how you think the solution will play out.
A creative brief can be a really great indicator for any miscommunications between client and designer. Once the creative brief has been presented and approved, it is a good reference to keep the designer on track. More often than not, complex series of design revisions and content edits will seem to distract from the goals of the project. It's a good idea to keep the brief nearby and review it periodically throughout the design process.
Let's take a closer look at the creative brief we explored in Lecture One:
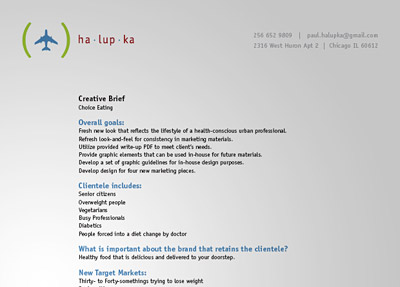 |
Click here to view a full creative brief I created for a real client. |
I was asked to help my client Choice Eating redesign a web site. When I went to do a pre-meeting little research, I discovered the web site was in terrible shape. Not just poorly designed, but poorly constructed. And their look was very out of date. When they mentioned that they had considered doing a new logo, I suggested that we just dive in for a rebrand, knowing that I could develop a better (albeit very simple) logo within their budget. Thus, the project became not just a site design, but a brand (look and feel), a logo, and brochure as well.
You can see in my creative brief that I was very interested in learning what the client liked, who he needed to reach, and how I could develop a brand that fit these guidelines. I did a little research pre-meeting, then brought in some important questions to ask. More or less, I came in with a blank creative brief as an interview tool.
How did I know what questions to ask? Luckily, I had prior exposure to a creative brief. And now you do too!
In the end, I knew it was going to take some convincing to prove that rebranding was a smart idea, and worth the budget increase. Using my research, carefully listening to and interpreting the client's goals, I was able to show him that it was very much in his best interest...a smart investment. The creative brief was a critical tool for this step in the process because it helped me understand everything the client needed to succeed, in turn allowing me to show the client exactly how I could help him achieve his goals.
In the end, there wasn't a huge amount of budget for the branding addition, but just enough that I could efficiently develop three logo options, some color options, and some web site concepts to choose from. I allocated some hours from the web site part to allow for more time with the brand. This worked out pretty well.
What to Include in a Creative Brief
So what to do when it's your turn to make a creative brief? Seems like a lot, and it is! Not every project needs one, especially those very limited in scope. But if you have the time, no matter how small the project, a creative brief is a fantastic way to get all your ducks in a row. Here are some tips on what to include in a creative brief. Remember, these aren't set in stone. You may not need all of these, and you may need to customize your brief with other categories. But this list should get you started in the right direction.
a. The client's goals and expectations.
Some of the client's expectations will be subjective ("make it look beautiful and elegant"). Some will be objective ("we hope for 5,000 people to attend our event"). Use these goals as a way of staying on track during the creative process. Check back on these often.
b. The target audience for the pieces(s) and/or the current clientele.
Learn who currently uses your client. Is this different from who they want to attract? Are they reinforcing their current clientele or reaching out to prospective clientele? Use this information to guide the look of your design. Does it need to look modest for an elderly audience, or exciting for a teenage audience? Does the design need to accommodate a vast range of age groups and income levels?
c. Any notes on high-level concepts behind the client's ideology.
The client might tell you, "Our brand's most important attribute is that it's eco-friendly. We must maintain this attribute above all else." Such high-level notes help you see the project from the client's point of view, which in turn helps you make them happier.
d. Notes on the client's taste in design. (Optional)
You may choose to ignore this step if you feel like this hinders your process. You don't want your client to start hoping to look like Nike or Apple. Use your best judgment. For a branding project, I usually will get a sense of the brands the client likes, and then ask them to explain why. This shows me their design sensibilities and helps them to start thinking from my position. I will then interpret these ideas and use them to guide my process a little. This increases the odds of doing design that fits the client's expectations. Sometimes this is a smart route, but sometimes it is really crippling to my creativity.
 |
In my sample creative brief, I noted five logos that my client admired. |
e. Measurable success.
This may not always be a possibility, as with a business card project, but ask the client if there's a tangible measurement of success. For the example creative brief, the client told me they would watch for web site hits after putting an ad in Gay Chicago Magazine. Another example would be watching for an increase of attendance at an event after a newly designed invitation.
f. A detailed look at competition. (Optional)
For a branding project or advertising campaign, examining competition is very relevant and should not be optional, though it is not necessary for some other types of projects. Competitive analysis helps make sure that you're keeping your design distinct from your competitors' look and feel. Note what competitors are doing right, and where they seem to go wrong. Use this to try and highlight where your client can fill the gaps and really succeed. This is also a great jumping-off point for designer-client discussion on things to avoid and things to include in the upcoming project.
g. A look at the client's current materials. (Optional)
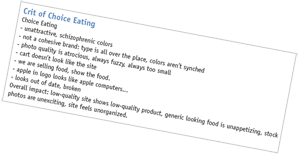 Be really careful in evaluating existing client designs. You don't want to insult your client, and this may not be a necessary step. However, it can be a good way of benchmarking where the client stands so that you can show how much you've improved his materials. In the example, I was able to be fairly critical with Choice Eating because the client had told me that they really didn't like their current branding. So I detailed what I saw as faults and where I thought we could improve, and delivered a brand that satisfied all of their goals.
h. A plan of action.
This part of your brief should be a fairly broad look at how you plan to take what you've learned from interviews, research, and the creative brief and use this knowledge to develop a great product. It can be a synopsis of anything from aesthetic guidelines to targeting strategy. The key here is showing that you're conscious of your decision making at every step. This shows the client that you're worth the money, and really taking the project seriously. It puts into simple terms what you are both expecting out of the project.
i. Project scope and hours.
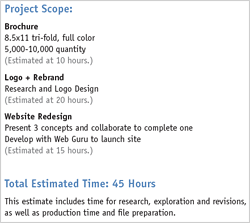 Make a list of the anticipated pieces for the job. Give a sense of item dimensions, quantities, basic descriptions, and any other information you collect from the client. If possible, estimate your billable hours for each item and provide an overall project total. You may choose to include a formal estimate as a page of your creative brief (makes sense!), but I prefer to do this in a separate document out of habit.
j. Project schedule.
Document when the client needs the pieces in the job delivered, and work backwards from here. Create a schedule for each piece if necessary, unless you anticipate printing several pieces in the same print run. (This is common with a stationery suite, for instance: letterhead, envelopes, and so on.) When you send the creative brief to the client, be sure to bring attention to this schedule, pointing out where the client is responsible for a particular turnaround. More often than not, the client will make you late, and it will be your job to work twice as hard to catch up to the deadline. But it's always worth requesting their cooperation!
k. Anything else to document?
My example is customized to how I like to interact with the client. It's also geared towards helping me find out details that will aid my own design process. Feel free to use this as a starting point, but include more sections if you feel they're relevant to your process! Are there things you tend to forget to ask? Are there printing details you need to document sooner rather than later? Use your creative brief as a tool to guide the entire process, as a document that can help you make the smartest, most attractive, and best-planned print project possible!
Print Specs
In Exercise Two, you became familiar with the use of print specs, also known as a spec sheet. Normally, this isn't an item provided to you; outside of this class, it will be your job to create the spec sheet. Let's take a look at how this usually goes.
Your print specs are created relatively early on in the design process, once a basic concept for a design has been established. This allows the printer to respond with a print estimate, which in turn is presented to the client. The spec sheet is also an important internal reference for the designer, and makes sure you have considered all of the important aspects of your print job.
Here's how I go about creating and using specs in the early stages of a production process:
 |
|
 |
| |
1. Learn about the project budget from the client.
2. Conceptualize a design within that budget.
3. Create a spec sheet for this design concept.
4. Use the specs to get a few print quotes to compare. |
|
 |
|
 |
You may be wondering how you conceptualize within the budget (step 2) before you've gotten any quotes on your print job. This is tricky. You can definitely budget out your design hours early on. This is established as separate from the print budget. But both the print budget and design budget should be factored in. At this stage, you can make a stab at what you can do with the given number as it pertains to printing. This is easier for a seasoned professional, for example, I can assume that with a budget of $500 for a three-fold brochure, this immediately rules out any kind of special effects like die cuts or embossing. Depending on the quantity, it may even rule out full-color printing. Essentially this step requires making an educated guess as a foundation for the specs, and then once you send them off and see hard numbers from the printer, you can re-evaluate.
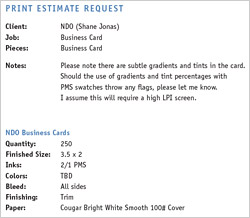 Now how about that spec sheet? That part is actually very simple, as you can see in this NDO spec sheet example. I just include some basic notes on the job and its associated print needs. Just enough for the printer to understand what he needs to estimate.
The last step is getting the print quotes, which we'll detail later in this lecture. If the quote comes back under budget, you may feel comfortable presenting your design concept to the client, knowing that the estimate's numbers back your decision making. If the quote comes back too expensive, you would need to  work with the printer to decide where cuts can be made in the production side of things, and if necessary, how the design itself needs to be adapted. Meeting the budget may be as simple as changing your paper selection, or as difficult as halving your page count and reducing the job by two colors.
This brings us to more discussion on the quality of your project as it relates to the budget... and of course to the deadline.
Quality, scheduling, and budget form the basis of the formula "Good, fast, cheap: Pick any two," a common mantra repeated throughout the creative community for all different types of projects. Try repeating it yourself now. Feels good, right? It's a neat way of summarizing the three issues you'll juggle in any print job. They're all interrelated, but let's look at each one for a minute.
Defining Quality Objectives
The quality of the entire project will be based on the parameters of the job, deadline, and budget.
Your job, as a designer and production manager, is to come up with innovative and creative concepts for how to print a project (including the paper, colors, size, other materials, and so on). Other factors to consider include working within the allotted time to get the project done and managing all the elements of the project so that it falls within the budget guidelines. No sweat!
Quality can be conveyed in many ways: through design, content, and print materials as well as though printing accuracy. The perceived quality of any project is greatly affected by the printing process. Knowing the degree of tolerance for a particular project in terms of quality is essential to addressing concerns about the client's audience, the integrity of the images, and stock and color accuracy.
Tolerance, of course, refers to the client's degree of flexibility on quality issues—are they prepared to cut to a two-color job, for example, to stay within budget?
The hallmarks of good print quality are kind of hard to quantify. Poor quality, for example, might be demonstrated by mis-registration, colors with shadows, fuzzy type, noticeable dot patterns, irregular gradients, and even areas of color with specks in them.
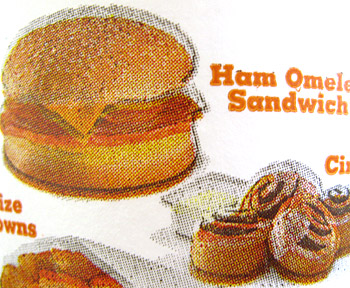 |
| This snippet from a fast food cup has it all: mis-registration (notice how the black ink doesn't line up with the others), noticeable dots, and specks around the typography. |
Good quality printing is rich in color, is accurate to your digital files, and typically well-adjusted by the designer and prepress team to look really sharp. Again, it's a little hard to quantify but you know it when you see it.
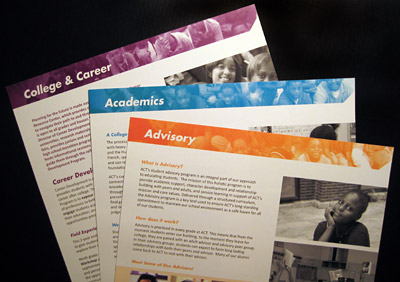
Other factors, such as paper thickness and smoothness, are easier to point out. This could be a premium bright white sheet that is sturdy in the hand and prevents show-through from printing on the reverse. Or the use of PMS colors to give the brightest tones where the piece really needs them. It could be the accuracy of scores and folds in a brochure. There are so many variables that it's impossible to give a comprehensive list, so let's look at a high-quality example.
 |
|
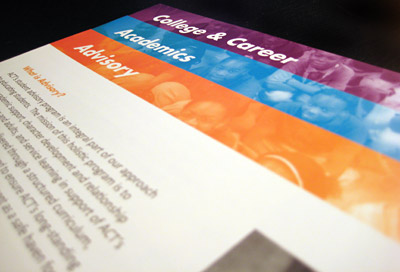
Bright color and accurate trimming really made this piece work. Notice how when stepped out (bottom), the titles all align perfectly with one another and the images form one large photo. |
Scheduling Your Job
As a designer working on print production, it's your job to get everything done on time. Every project has a deadline that targets when the project must be finished: printed, bound, and ready for distribution. Whether that deadline is flexible or fixed will determine the type and the amount of money spent on the project. For example, if your client can "wiggle" by allowing an extra two weeks for an out-of-town printer, you might be able to cut the budget in half!
The other main considerations are your project's internal deadlines. To hit the big deadline, you must hit a bunch of little ones first.
Suppose it takes you one week to complete a page design and layout project for your client, including all content and graphics. If you're printing the job too, you'll need to factor in other variables including the preflight process (the time it takes you to include and check all elements within a layout, such as color and fonts) and prepress and printer turnaround (the time it takes the printer to set up the job and then print and assemble the project).
So when building in time to complete a project, you should consider the following stages:
|
|
|
| |
1. The planning phase: client communication
2. The design phase: specs and approval
3. The editorial phase: client changes and redesign
4. The prepress phase: the printer's prep time
5. The proofing phase: for both designer and client
6. Printing time: turnaround for printing, finishing, and delivery |
|
|
|
|
To determine a realistic project schedule, you have to work backwards from the date that the client wants the job delivered, or "in-hand." A typical expectation for any print run is at least five working days. This can increase to two to three weeks if the job is more complex. Your printer should give you an estimated turnaround.
Once you have factored in your print turnaround, you must factor in time for proofing, which typically takes a week to get everyone on board. On top of this, you should factor in your design time, including deadlines for first draft approval, second drafts, final edits, content updates, and so on.
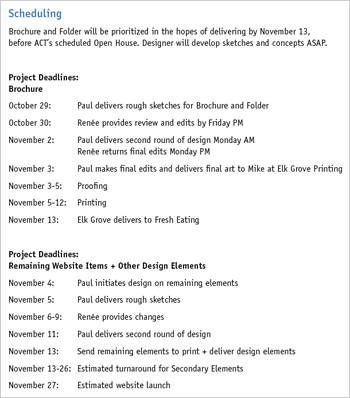 |
This project schedule, found in the creative brief, includes not only my tasks, but those expected of the client and printer. |
Beating the Budget
What will persuade your client to hire you again and again? Save him or her money with your resourceful decision-making, and you will have a client for life.
This fact underlines the importance of establishing a budget at the initial client meeting. (Hey, you can't save the client money unless you know what he expects to spend!)
So start by getting a firm understanding of the budget you are working within. These limitations (or excesses) will dictate how far you can go with your creative idea or vision. Generally, tight deadlines will force you to increase the budget for production—if the normal turnaround of a job needs to be shortened—but may cut creative time too.
It may be pretty difficult to anticipate the pricing of certain papers, binding services, and inks if you haven't been down this road before. If there's no one in your workplace who can offer suggestions on where to start, you should definitely use your print rep as reference. Based on your quality and budget needs, the printer should be able to recommend a set of options that meets your requirements.
Cheaper paper will be fine for basic use, but won't always give you the best ink holdout or photo quality. Ink holdout refers to the way that the ink spreads and diffuses on the surface of the page—high ink holdout means consistent image quality. Poor ink holdout would be expected with materials like newsprint, which is highly absorbent and causes the dots to grow when they hit the page.
Beyond paper, how else can you control the budget? Printing with fewer than four inks is always a possibility. This can be a challenge, but it's not the end of the world.
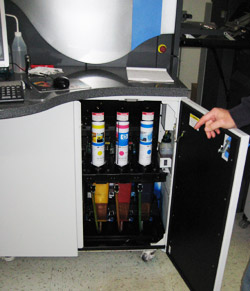 |
Digital offset could save you money on certain types of jobs. |
Also ask your printer about digital offset, such as with the HP Indigo press. If there are savings to be had, it will most likely be when dealing with quantities under 1,000 that can be printed on 17" x 22" sheets.
Highly common binding options like saddle stitching will tend to be the least expensive, but you should explore your options whenever possible. This ensures that your project reaches the best level of quality for cost, and also helps you get a sense of what is out there for future projects. Every designer goes through a lot of trial and error at first. Be patient, listen hard, and take notes. Pay attention to those who have been doing this awhile.



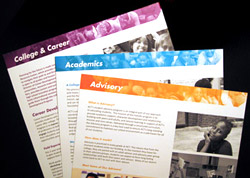
 Learn the components of creative brief and print specs documents.