Learning to draw with Photoshop's vector tools takes time and patience because they work very differently than any tools you've used so far. But taking the time to master them sets you on the path (pun intended) to becoming a true Photoshop guru.
In fact, once you get the hang of these tools, you can use them to add elements to your images that don't exist and can't be photographed (think ornamental shapes and embellishments) and to create precise selections that you can't make any other way. You can also use the vector shape tools to hide parts of your image with a vector mask, which are more flexible than their pixel-based cousins.
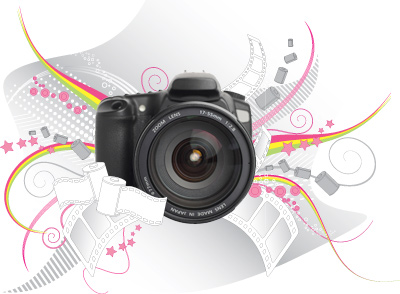 |
The camera in this illustration is surrounded by ornamentation created with Photoshop's vector tools. |
Before you dive into using the vector tools, you need to understand exactly what vectors are.
Pixels vs. Paths
The images you'll work with and create in Photoshop fall into two categories: those made from pixels and those made from paths.
Raster images are made from tiny blocks of color called pixels. The number of pixels in an image depends on the device that captured it (a digital camera or scanner) or the settings you entered when you created the Photoshop document. The size of the pixels depends on the image's resolution, which specifies the number of pixels in an inch. Usually pixels are so small that you can't see them individually, but if you zoom into a raster image, the pixels appear bigger, and the image starts to look like a bunch of blocks.
Vector images are made up of points and paths that form shapes, which can be filled and stroked (outlined) with color. You can create vector images in Photoshop, but they're also commonly made with programs like Adobe Illustrator and CorelDraw. The paths are based on mathematical equations that tell monitors and printers exactly how to draw the image. Because there aren't any pixels involved, you can make vector images as big or small as you want and they'll always have perfectly crisp edges.
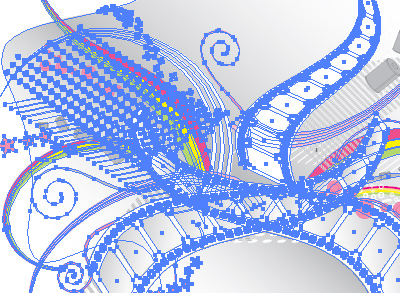 |
In this closeup of the earlier camera and vectors image, the many vector paths are selected. These can be modified—resized and reshaped—with no loss of their crisp edges. |
In the physical world, the word "drawing" implies that you're sketching lines and shapes by hand. Here in the digital world, drawing refers to creating objects using Photoshop's vector tools: the Pen tool and the various Shape tools. Drawing with these tools is more like drafting technical illustrations such as blueprints; you create precise outlines of shapes, instead of the more organic lines of a sketch or painting.
|
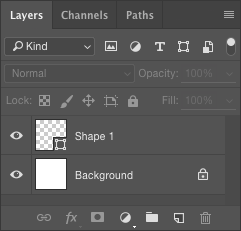
The Pixels mode is grayed out because you can only use it when one of Photoshop's Shape tools is active. |
Press P to activate the Pen tool. Your Options bar depends on the tool mode you select (right).
Photoshop has three different drawing modes that determine exactly what happens when you use the vector tools. Now it's time for you to follow along!

Shape Drawing Mode
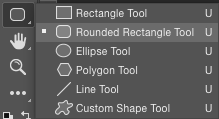 |
These are all vector drawing tools. |
Let's look at each of the three drawing modes before we start actually drawing. You can use any vector Shape tool you'd like to follow along. I'll use the Rounded Rectangle, but any tool shown on the right will work.
 Choose Shape mode from the Options bar (left). In this mode, your first click with the Pen or a Shape tool creates a new shape layer—technically, it's a vector-based object layer. Give it a spin by clicking and dragging with a Shape tool on your canvas while you're in Shape mode. Here's what our Options bar looks like in Shape mode:
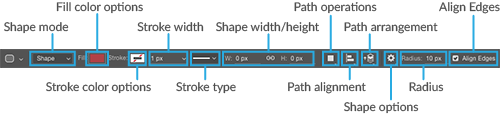
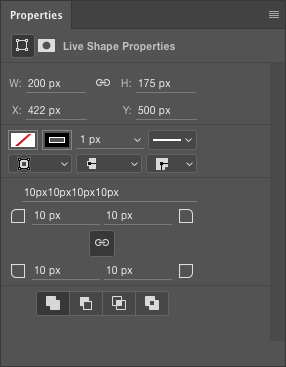
When you finish drawing the shape, Photoshop automatically creates a new layer for your object and auto-opens the Live Shape Properties panel. The panel features nearly the same tool options as the top bar, where you can also set three features for the stroke: align type, line cap type, and line join type.
 When you finish drawing the shape, Photoshop automatically creates a new layer for your object. You can use the Options bar to apply strokes and fills; try changing your shape's stroke to a dashed line or filling your shape with a gradient instead of a solid color. Drawing in this mode is like using a pair of scissors to cut shapes out of construction paper; these shapes can hide content on any layers underneath, where the layers overlap.
This mode is great for creating geometric shapes that you can use in your design or overlay onto your image. You can also use this mode to add a symbol or logo to a product in your image.
Path Drawing Mode
As you learned earlier, paths are lines and curves between points. Path mode doesn't create a new Shape layer or fill the path with color; it creates an empty outline. Try it now with your Shape tool.
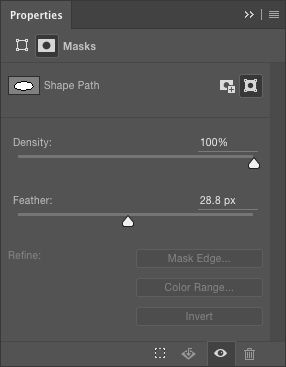
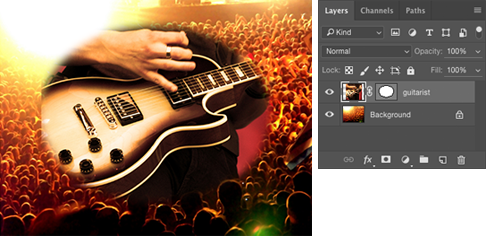
You can use this mode to make selections with the Pen tool by right-clicking (PC) or Control-clicking (Mac) and choosing Make Selection. You can also use this mode to create a resizable vector mask. For example, if you mask a photo with a shape—the Rounded Rectangle tool or the Ellipse tool, as shown at the end of this lecture—you can experiment with the size of the mask itself without losing any edge quality.

You can also fill these paths with color and give them a stroke, by right-clicking (PC) or Control-clicking (Mac). However, Photoshop doesn't automatically create a new layer when you use the Pen tool or a Shape tool in Path mode; you have to create a new layer first and then add the fill or stroke. The paths you create in this mode live in the Paths panel.
Pixels Drawing Mode
 Pixels mode works only with the Shape tools. Instead of creating a vector-based Shape layer or a path as described above, Photoshop creates a pixel-based shape filled with your foreground color. Like the Path mode, Pixels mode doesn't create a new layer for your shape. Try it now on a new, empty layer and notice the difference between this layer and the one Photoshop created for you when you used Shape mode earlier.
This mode is handy if you need to edit a shape using tools that don't work with vectors, like filters, painting tools, and so on. That said, you could just as easily rasterize a Shape layer (Layer > Rasterize > Shape) and then use those tools. So unless you know for sure that you'll never need to change the shape of the object you're drawing, you probably won't use this mode very often.

The basic drawing process is the same no matter which mode you choose: You pick the Pen tool or one of the Shape tools, choose a drawing mode, draw the shape, edit the shape, and then save it for future use. In the following sections you'll learn how to do all that and more.
Now that you have a bird's eye view of the process, it's time to dig into drawing with Shape tools.
Photoshop has a selection of built-in, vector-based shapes, which are perfect for adding artistic embellishments or using as vector masks (discussed later in this lecture). These include a rectangle, a rounded rectangle (great for making round-edged selections or masks), an ellipse, a polygon, a line, and many custom shapes. These preset goodies are huge time savers; they keep you from drawing something that already exists. And since these preset shapes are made from paths, you can use the techniques described in this lecture to morph them into anything you want.
The Shape tools work in all three drawing modes, though this section focuses on the first mode: Shape layers. Just like any other kind of layer, you can stroke, fill, and add layer styles to Shape layers, as well as load them as selections.
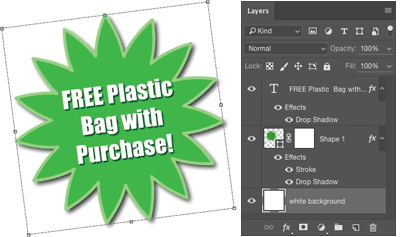 |
Straight from the factory, Photoshop's Shape tools are set to the Shape drawing mode so Photoshop puts each shape on its own Shape layer (circled). You can resize and rotate a shape using Free Transform; both the Shape and Type layers are activated here so they'll rotate together. |
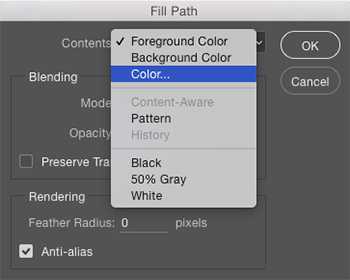
You can change a shape's color by double-clicking its layer thumbnail and adding embellishments like drop shadows with a layer style.
 You can select Live Shape Properties in the Properties panel to change the radii on rectangles and rounded rectangles (see the figure at right).
Let's say you want to create a starburst shape to draw attention to text in your ad. There's no sense drawing the starburst from scratch because Photoshop comes with one. Since the shapes are vector-based, they're resizable, rotatable, and colorable. For example, if you need to make the shape bigger, select the Shape layer, press Ctrl/Command-T to summon Free Transform, and then use the handles to make it as big as you want with no fear of quality loss.
Using the Shape Tools and Custom Shapes
You can customize how each Shape tool behaves by changing its settings in the Options bar.
You can also use the Properties panel to access shape options by toggling between the Live Shape Properties and Masks at the top of the panel:  .
.
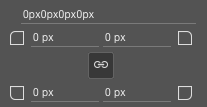
The figure below displays options for the Line tool (yep, a line is a shape!). These settings let you create shapes with specific sizes and proportions, specify the number of sides in a polygon, indent the sides to make a star, choose how rounded to make a rounded rectangle, and so on.
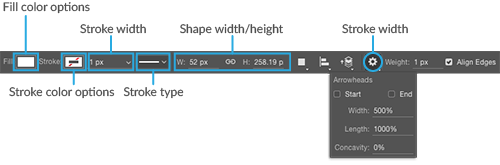 |
When you select the Line tool, you can use its options (shown here) to add arrowheads to either end of the line—or both ends—as well as determine line thickness (weight). To make sure that vector objects look as sharp as possible, select Align Edges at the far right of the Options bar to align your vector shapes to the pixel grid. |
To find useful shapes that come with Photoshop, you have to do a bit of foraging. Choose the Custom Shape tool (which looks vaguely like a lumpy starfish) from the Tools panel. Trot up to the Options bar and open the Custom Shape picker by clicking the Shape menu's downward-pointing arrow. As soon as the menu opens, click the gear icon circled below and choose All.
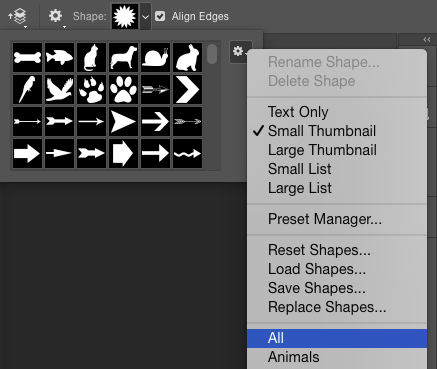 |
When you click All, a dialog appears asking if you want to replace the current shapes, so just click OK. |
Now you can see a preview of all the built-in shapes right in the Custom Shape preset picker. (Why Photoshop doesn't load these shapes automatically is anyone's guess.)
You draw custom shapes just like the basic shapes. You can also press and hold the Shift key to make the shape perfectly proportional, modify the shape by changing its fill and stroke colors, apply layer styles, and customize these shapes by using the Direct Selection tool to tweak their anchor points and control handles.
Creating Custom Shapes
The real power of using shapes, however, lies in defining your own, which can save you time. For example, if you have a piece of vector art that you need to use over and over, you can save it as a custom shape!
Let's create a custom Photoshop shape from an existing vector file: in this case an EPS. Download the files for this lecture, which include twirl.eps. Start a new Photoshop document and choose File > Place (you have the option to "Place Embed" or "Place Linked". Choose "Place Embed".) to import twirl.eps into Photoshop. The art will have a bounding box around it, so you can resize it. When you're finished resizing it, press Enter or Return.
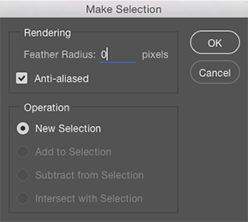
Now we want the vector art we just placed to be a selection, so Ctrl-click (PC) or Command-click (Mac) its layer thumbnail in the Layers panel. (It's important to click the layer thumbnail and not the layer name.) The shape is surrounded by marching ants, indicating a selection.
Save this selection as a vector path by opening the Paths panel (Window > Paths) and choosing "Make Work Path" from the panel's flyout menu. Leave the Tolerance setting at the default and click OK. Finally, choose Edit > Define Custom Shape and, in the resulting dialog, give your new shape a name and click OK.
From that point on, your custom shape appears in the Options bar's Shape menu any time you're using the Custom Shape tool. To draw the shape you added, just select it from the Shape Preset Picker menu in the Options bar and then drag to draw the shape in your document.
You can also use Edit > Define Custom Shape on paths that you've created with the Pen tool, and that's what we'll focus on next.
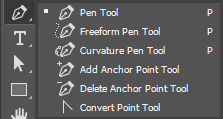 |
| The mighty Pen tool lives below the middle of the Tools panel. Other tools here let you tweak paths in order to create any shape you can imagine. |
When the Pen tool made its debut in Adobe Illustrator in the late '80s, it offered precision and control unprecedented by previous versions. The only problem was that the tool was (and still is) darn hard to use. It was met with resistance because it didn't work the way artists expected to work with digital graphics (not to mention pens and pencils). Instead of clicking and dragging to draw a line, the Pen tool creates anchor points and control handles, collectively referred to as vector paths or Bezier curves (named for their inventor).
With the Pen tool, you have to click twice to create a line: The first click creates the line's starting anchor point, the second click adds the ending anchor point, and Photoshop automatically creates the path in between. It's kind of like digital connect-the-dots: Each time you add a new anchor point, a line segment connects it to the previous point. If you click and drag with the Pen tool—instead of clicking once and then clicking somewhere else—you'll create curved line segments with control handles, as shown below.
 |
This boomerang shape is made from a series of points and paths. |
Anchor points mark the beginning and end of each line segment. In Photoshop-speak, a line segment is called a path. To change a path's shape after it's been made, you can drag the points, adjust the control handles, as well as add or subtract points. The control handles aren't actually part of the path; they're little levers you use to control each line segment's shape or curve.
You use two different kinds of anchor points to tell Photoshop whether you want a curved or straight path:
Once you have, well, a handle on points and handles, you can create any shape you want. So now let's get some practice...
Drawing Straight Paths
The easiest thing you'll ever do with the Pen tool is draw a straight path. Start a new Photoshop document and press P to activate the Pen tool. In the Options bar, choose Path mode. Though you could use Shape layers mode for this example, Photoshop would automatically fill your path with color as soon as you start clicking which could be confusing (mastering these tools is tricky enough as it is!).
Mouse over to your document and click once (and release) to create your first anchor point. Photoshop puts a tiny black square where you clicked, and that's it. Move your cursor to the right of the first anchor point and click to create a second anchor point. Photoshop adds a straight line that connects the two points. Each time you click, Photoshop adds another anchor point, and connects each point with a path that forms your shape.
 |
Notice that the active anchor point is black. Previous anchor points are white. |
Now, move your cursor down an inch or so and click to create another anchor point. Photoshop continues to connect the points with paths after you place each point. When you're finished drawing your lines, press the Esc key or Ctrl-click (PC)/Command-click (Mac) elsewhere in your document. The anchor points you created disappear and a thin gray line represents the path you just drew.
 |
You'll learn more about these tools when you edit paths later on. |
If you want to move an anchor point and change the angle of your line, grab the Direct Selection tool by pressing Shift-A until the white arrow appears in the Tools panel.
With the Direct Selection tool active, click and drag one of your line's anchor points. As long as you hold your mouse button down, you can move the point wherever you want. When you get it positioned just right, release the mouse button. Press Esc when you're finished editing the path.
Drawing Curved Paths
Drawing curves with the Pen tool is more complicated because you'll use the control handles mentioned earlier to tell Photoshop how big you want the curve to be and in what direction you want the curve to go.
 With the Pen tool, click to set your first anchor point and—without letting go of your mouse button—drag to the left or right to make the control handles appear. (They pop out from the last point you created.) These handles indicate the direction your path will take: if you drag to the right, your path will curve right when you add your next anchor point; if you drag left, your path will curve left. For this exercise, drag upward and to the right about half an inch, and then release your mouse button.
About two inches to the right of the first point, click to add a second point and, while holding your mouse button down, drag the new handle downward and to the right half an inch and then release your mouse button.

As you pulled the first handle upward, the curve obediently bent upward. By dragging the second control handle downward, your next curve will head in that direction too.
Create a third point by clicking and dragging upward and to the right. The path that appears when you click to add this third point curves downward because you pulled the control handle downward in the previous step. Drag the third point's control handle upward and slightly to the right to make the curve shown below.
 |
The direction in which you drag the control handle determines the direction of the next path; you can watch the path between two points twist and bend as you drag the handle. |
Notice that the two opposing handles are connected and they move in tandem. If you pull a handle farther, the curve gets bigger.
When you're finished, press the Esc key to let Photoshop know you're finished drawing your path.
This is complicated stuff, so watch the animation below to see another curve being created. Can you replicate this curve?

Congratulations! You've just drawn your first curved paths. With practice, you'll get the hang of using the control handles, and determine the direction and size of the curves with ease. There is more to drawing in Photoshop, so brace yourself as we we're about to dive in deeper!
Converting Anchor Points
As you learned earlier, there are two kinds of anchor points in Photoshop: smooth and corner. To draw complicated paths, you need to know how to switch between point types so you can create curves within a single path that go the same direction, as shown below. To do that, you start by creating a series of curves, and then convert some of the smooth points to corner points. With smooth anchor points, your paths curve in the direction you dragged the control handle of the preceding anchor point.
 |
| Once you convert smooth anchor points into corner points, you can adjust each control handle separately to create a series of curves that bend in the same direction. |
Create a new Photoshop document several inches wide, so you have plenty of room to play. With the Pen tool, click and hold your mouse button to create your first point Drag the control handle up and away from the anchor point to set the direction of your next curve. Release your mouse button when you're ready to create your next anchor point.
 |
Step 1 |
Move your cursor an inch or so to the right, and click to set your second point to the right of the first, and drag downward. When your path has the curve you want, release your mouse button.
 |
Step 2 |
Move your cursor another inch to the right, and click and drag downward to create a third point, as shown below.
 |
Step 3 |
Hop to the right another inch or so and then click and drag downward again to create a fourth point.
 |
Step 4 |
Now, we'll start converting points, so you'll need to switch tools. Head over to the Tools panel and grab the Convert Anchor Point tool  , found inside the Pen toolset. Click and drag the bottom control handle of your third anchor point, and drag it up so it's close to the opposite control handle on the same anchor point:
 |
Step 5 |
The Convert Anchor Point tool "breaks" the bottom half of the control handle away from the top half so it can move all by itself. This converts the anchor point from a smooth point to a corner point, and changes your path from a smooth curve to a sharp angle. Once you break control handles, they behave much like the hands of a clock; you can move them independently to adjust the angle and curve of your path.
Next, use the Direct Selection tool  to grab your path's second point from the left. Unfortunately, you can't select points with the Convert Anchor Point tool, so to see the second anchor point's control handles, you have to use the Direct Selection tool. Grab the Convert Anchor Point tool, click the bottom control handle that just appeared, and drag it upward next to its partner, as shown below.
 |
Step 6 |
If you move both parts of your control handle so they're on top of each other, you can only see one handle (like the third anchor point shown here), just as you would see only one hand of a clock at noon. If that happens, grab the Direct Selection tool to drag one of the handles out of the way so you can see them both.
Curvature Pen Tool
Another kind of pen tool called the Curvature Pen tool can be found grouped with the standard Pen Tool in the toolbar. The Curvature Pen tool was designed to allow the user to create curves without the need to manipulate control handles.
While the pen tools are designed for a different approach, both of them are pretty similar since they are creating a vector path in the end. The vector path from the Curvature Pen tool is no different from the vector path created from the standard Pen Tool. Many of the techniques used to edit or manipulate the path will work. When creating a path with the Curvature Pen tool, the control handles are not visible but they will be revealed if the Direct Selection tool is activated and an anchor point is selected.
The standard Pen tool is great when learning the behavior of a path and anchor points. Once mastered, other tools related to vector parths such as the Curvature Pen tool will become easier to control.


 The paths you've seen so far have all been left open, meaning that the starting and ending anchor points aren't connected. If your goal is to draw an arc, you want to leave your path open. But if you want to fill your path with color, you need to close it to create a


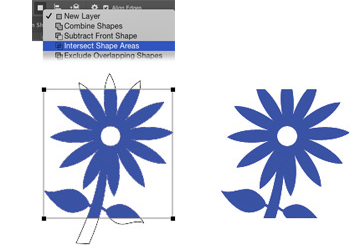
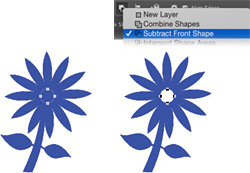 Subtract Front Shape