Adobe Bridge and the Creative Suite
For the past six lectures we've explored how Photoshop works to help you manipulate, change, create, repair, and embellish images. But then what? How does Photoshop fit into the larger digital workflow? Remember, Photoshop is not an island. Photoshop works hand in hand with Illustrator and InDesign, as well as Dreamweaver and other Adobe Creative Suite applications. Each application has its own specialization, and purpose.
In this final Context Corner, I want to introduce you to a "bridge" between those applications...Adobe Bridge, which is an application itself that never gets its due. Bridge is the unfortunate stepsister that no one really talks about, but when put in to action, can save you time and help you to get a better understanding of what your images look like, how they were made, and even how to use them in conjunction with other applications. Play the following video or read below to continue.
(CC users, note that this video deals with the CS6 version of Bridge. We'll be discussing how Bridge is different in CC below the video.)
Navigating Adobe Bridge
In Photoshop, select File > Browse in Bridge. Adobe Bridge CC is a standalone application installed through the Adobe Application Manager. If you do not already have Bridge CC installed when you select File > Browse in Bridge, you will be taken to the Application Manager to download it.
Once you have Adobe Bridge installed and open, we'll leave Photoshop for now. Adobe Bridge is a single window workspace with a number of "panes". It's very customizable, allowing you change the order and sizing of each pane as you like.
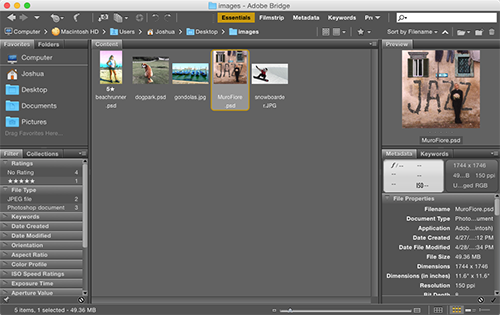
In the Essentials workspace, I have a number of handy panes that I can arrange and size as needed. Here I'm looking at images from a specific folder, and details on a selected image.
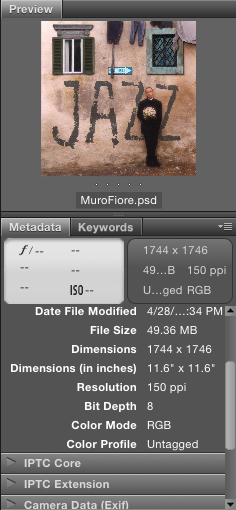
An image and its Metadata tab.
The main function of Bridge is to let you see your files, which professionals like to call assets. On the top you will see a breadcrumb listing that will show the location that you are currently viewing. But if you look at the left-hand pane, you'll also see a familiar hierarchical navigation system. You can dig down through the folders on the left to find the folder where your assets reside. In the example above, I'm looking at the folder I used while creating this lecture. You'll see a bunch of original images, and some we may have worked on.
If you select one of the thumbnails in the "content" pane in the center, that image's preview will appear on the right in the Preview pane. Take note of and scroll through all the information that also appears below the preview image. That information, called EXIF data or metadata, details an image's creation, format, resolution, and really quite a bit more (like extensive camera and location information), even though it is invisible while you're working in Photoshop. You can also assign information if it's not already there, like artist's name, copyright, comments, and more.
Take a moment to drag the tabs in your workspace so that the Preview tab is in the large, center area and the Content tab is below it. As you select one or multiple thumbnails, they will appear in the main Preview panel above. Selecting multiple files in this arrangement will let you make direct side-by-side comparisons of images. If you are deciding which images work well together, or which would be the best to work on in Photoshop, this is where you could do that. Informed visual choices.
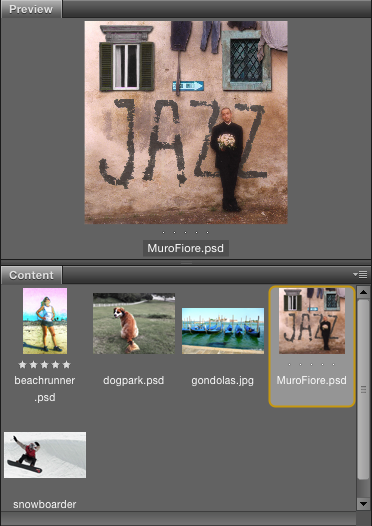
Once rearranged, your main center pane should look something like this.
Bridge lets you preview a whole folder of images before you even open them in Photoshop. Once you choose your images, you can open them in Photoshop directly by double-clicking the selected Content pane thumbnails.
Creating a Contact Sheet

Contact sheets compile as many images as you like into a one-page PDF.
We use Bridge for more than just sorting and choosing images. Bridge is like the back office for Photoshop, where you get your paperwork in order. We can use it to automate many different tasks, from renaming a whole batch of photos (Tools > Batch Rename) to creating contact sheets to display many photos in a single document.
Let's look at making contact sheets now, a process we'll use again in the exercise.
First we need to make sure that we're equipped to save the contact sheets we make.
Unfortunately, when Adobe Photoshop CC came out, Adobe dropped the ball and didn't include the Adobe Output Module, which allows you to export PDFs of the contact sheets you'll be creating. Thankfully, Adobe Output Module is now available for Bridge CC. Please use the following link to Adobe.com for instructions on how to download and install the Adobe Output Module: Adobe Output Module.
Once you've got that installed, select Tools > Photoshop > Contact Sheet II, which will bring up the contact sheet dialog in Photoshop. This is an automated script that will set up a contact sheet according to the settings you want.
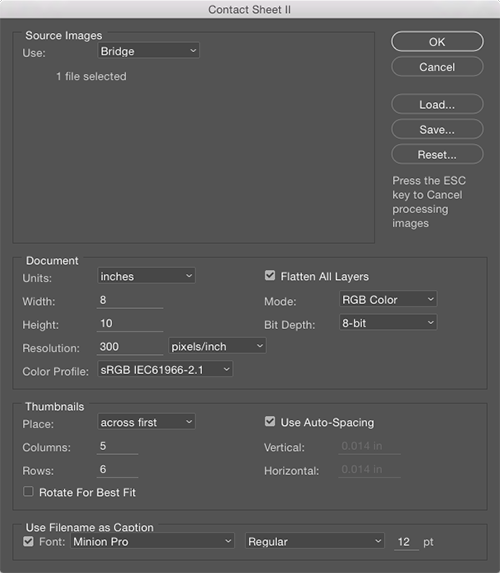
You'll use Photoshop's automated script to create a contact sheet.