Photo Setup | Assistant Crew and Specialized Lighting


Assistant Crew and Specialized Lighting

Assistants and crew can help you complete the scariest setup tasks.

In this course so far, you've learned how to be a Jack (or Jill) of all trades, setting up amazing shoots on a shoestring. But what if you had a bigger budget—and some helping hands?

In this lesson, you'll learn how to work with various on-set crew members. Working with other pros such as second shooters, photographer's assistants, and digital technicians can help you achieve your project goals.

As you do more professional work, you might be given a client budget that allows you to hire a crew, or you may find yourself hired as part of a crew on a large production. Many of these jobs are great for beginning photographers; you get experience and usually get paid to learn!

In the second half of this lesson, we'll continue our exploration of lighting techniques with a look at Avedon lighting, high and low key photography, and reflective objects.

In this lecture, you can expect to:

Learn about assistant crew roles and how they can contribute to your photo shoot.
Learn some do's and don'ts for working with assistant crew.
Learn how to create two advanced lighting setups: Avedon lighting, high and low key photography.
Learn how to photograph reflective objects.


A second shooter makes sure that important events are captured from multiple perspectives.


A second shooter can protect you against equipment failures or missed moments.


Use a contract to outline any specific expectations for a second shooter.


A photographer's assistant is your right hand man or woman: there to help your shoot in any way.


A digital technician helps you with photo management and editing.


If you are starting out, taking on assistant crew roles can be a great way to learn.


Be professional in how you treat everyone on set. Your crew may refer you!


Avedon lighting combines pure white backgrounds with shadowless portrait lighting.


High and low key photography consists of creative use of over and under exposed photographs.


Working with Behind the Scenes Crew


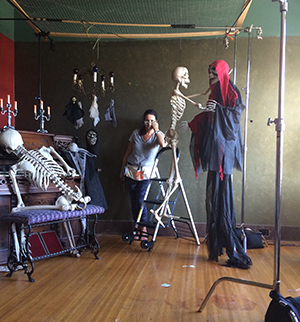
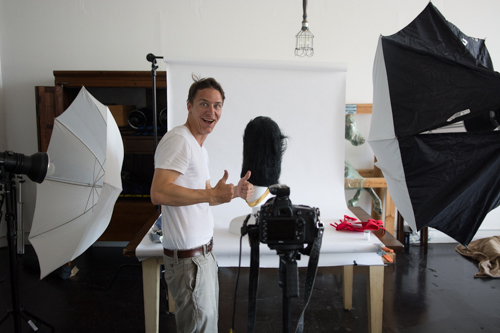
The more ambitious projects you tackle, the more you'll discover that many hands can make light work. Who's going to hold that expensive light stand or talk to the nervous bride while you take your bathroom break?

Hiring additional crew members can be the solution and in this lesson I want to discuss some of the roles crew members can play behind the scenes, as second shooters, photographer's assistants, production assistants, and more.

You are never too amateur to need these helpers and rarely too professional either. I hire many second shooters and assistants, and sometimes I still perform those roles on other people's projects.

Second Shooters

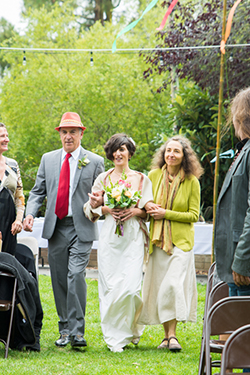
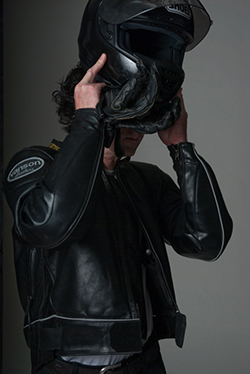
In this wedding, the bride walked down an aisle with her parents at the same time that the groom walked down another aisle with his friend.
Photo by Felicia Kieselhorst.

A second shooter is simply another photographer hired to make sure that important events or moments are captured from multiple perspectives.

A second shooter is especially helpful for wedding and event photography. A second shooter provides back up for important moments or camera failures. He or she can also be in a location when you cannot (covering the cocktail hour, for example, while you shoot romantic photos of the bride and groom).

A second shooter allows you to capture two angles at once. For example, you may need her to catch the groom's reaction to seeing the bride walking down the aisle while you are capturing the bride walking down the aisle.


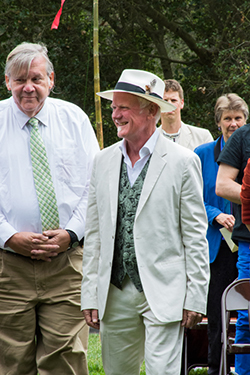
My second shooter was set up on the groom's side while I focused on the ladies. Photo by Michael Shelton

When hiring a second shooter, be sure to discuss responsibilities and expectations ahead of time, ideally outlining them in a contract.

Do you expect the second shooter to hand over unedited RAW files and their copyright? Do you expect them to edit their photos for you? Will your "second" retain portfolio usage and/or full copyright?

What is the timeline for when you expect the photos returned to you? Also, be sure to prompt your second shooter and your assistant on the level of professionalism you expect. Is this a jeans-and-tees gig or a black tie affair?


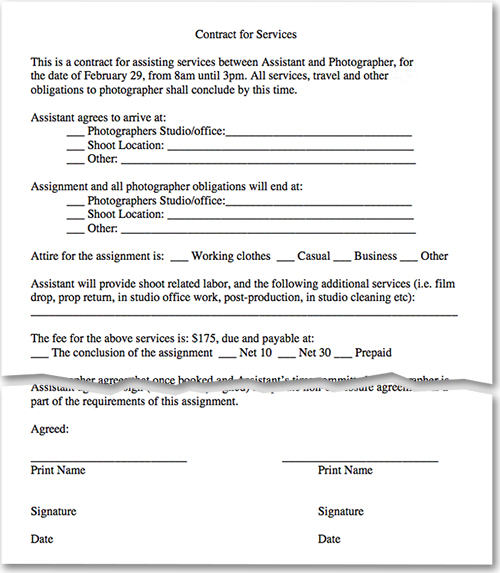
The above image represents a sample contract between a photographer and their assistant. The Web site, Photographers Toolkit, provides modestly-priced contract kits and can be found here.

Photographer's Assistants and Production Assistants

A photo assistant is your right hand man (or woman). Your "assist" will not be working a camera (except perhaps to grab behind the scenes shots at your request). Your assistant is there to help you unload and move equipment, stand in as a light test model, and any number of other things during a shoot.

You'll need to be direct in asking your assistant to get things done quickly and to your satisfaction.

Do not abuse your photo assistant, however. Definitely do not yell at them for not doing something the way you would do it. You can and should ask them for any sort of help, whether it be lowering or changing the angle on a light or grabbing a different lens from your bag. Above all, remember that a photo assistant is likely much less experienced than you are.

A good assistant will quickly learn how to operate your lights or the order in which to pack up your car. Although it's not required, it's a nice gesture to thank an assistant with a bit of a mini-lesson on the drive home. Let them ask you questions about the shoot or share with them what went as expected or what diverged from the plan.

Production assistants (PAs) are typically found on film crews, but occasionally you'll see this person on a photo set.

The job overlaps with the job of a photo assistant in some ways. A PA is generally an extra pair of hands on set—someone who is more focused on managing people or props than the camera.

A PA may answer phones, feed parking meters, grab lunch, help the stylist steam clothing, run out to buy a needed prop or tool, or just about anything else. A production assistant needs very little, if any, knowledge of photography. For a terrific in-depth description of a PA job, visit this page at the Virginia Film site.

When hiring a photographer's assistant, or PA, make sure that you are comfortable allowing them to represent your brand. Photographers often get work based on referrals and you don't want your good reputation tarnished by someone who leaves a bad taste in the client's mouth.

Be sure you are hiring someone who can take direction and critique without anger or defensiveness. There is nothing worse than having someone question every thing you ask for, especially in front of your clients, or someone who causes a scene while you are trying to run all the other elements of a shoot.

You obviously want to hire someone with experience who can do the job they were hired to do. You may be compelled to provide someone their first start in the business, however, it might not be in your best interest to bring in someone who is unprepared to help out with the job.

Digital Technicians

Digital technicians (digi techs) play a specialized role at a photo shoot. They deal with the technical/computer aspects of things. If you are shooting tethered, your Digi Tech will operate the computer while you shoot, warning you of potential exposure errors, renaming and adding metadata to files, backing up to your external hard drive, and so on.

If you are not shooting tethered, your digi tech might be responsible for importing your cards, backing up, and reformatting. In either case, your digi tech will have the skills to quickly retouch or mock up a layout in order to give your client a better idea of the finished product.

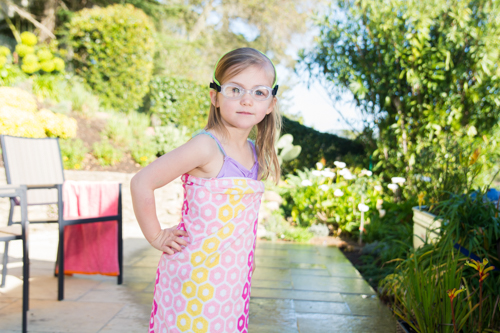
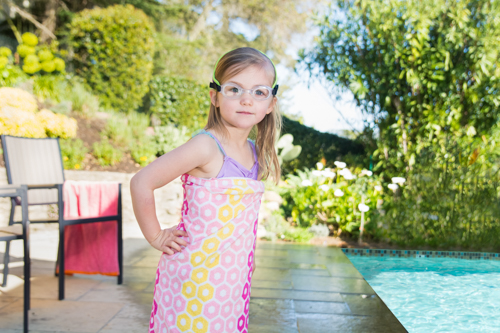
My client was having a hard time visualizing this scene without a pool so I quickly grabbed one online and dropped it into the shot. If I had a digi tech on set that day, they could have whipped this up while I worked out other aspects of the shot.


This final version uses a pool photo I had from another shoot. Attention to detail is key to creating merges like this…I had my assistant water the cement just moments before I took this shot, to emulate a real pool deck.

How the Crew Fits Together

In this section, we've met a few different types of assistants and crew members. Here's a summary of their roles and how they interact with the photographer's role:

Photographer Everything inside the camera and oversight of the whole shoot.
Photographer's Assistant Everything going on in front of the lens, under the photographer's direction.
Production Assistant Everything going on in front of the lens in a movie or photo shoot.
Digi Tech Everything that happens behind the camera, after capture.

Any of these roles are potential gigs for you as an emerging photographer. In some markets, you can assist full time and make a respectable wage. In others, you might find yourself in a mix of lead, second, and assisting roles.

My regular assistant, Kent, has helped me in various roles. While always a hard worker, he keeps the set fun and upbeat for everyone.

In any assistant role, act professionally and be attentive and respectful to the photographer who hired you. By working all aspects of a set, you'll get to earn money while you learn. You'll watch other photographers in action and learn what to do (or not to do). You'll make connections within the industry and move up the ranks.

Here are some important do's and don'ts:


  • DO pay attention, anticipate needs, and DON'T play on your phone.
  • DO ask about the dress code and wear what is requested.
  • DO be professional. You are representing someone else's business.
  • DO exchange cards with other crewmembers and express interest in referrals.
  • DO ask questions, especially if using equipment that you don't understand.
  • DO take care of yourself. Days on set can be long…stay hydrated.
  • DO come prepared. Pack a small bag with tools or snacks you might need.
  • DO be friendly, positive, and personable.
  • DON'T steal clients. You are representing someone else's business.
  • DON'T be unreliable or late. You'll ruin your reputation quickly.
  • DON'T be overly talkative. A photographer should not need to wait for you.


If you are hired as an assistant, be professional, and your reputation as a good assistant will grow exponentially. You'll get callbacks and referrals. I refer my assistant Kent to anyone who asks me for a recommendation, and to many people who don't ask!

Advanced Lighting Techniques

Avedon Lighting

Photo by Richard Avedon

The late American fashion and portrait photographer Richard Avedon developed a lighting style that was so characteristic that it simply came to be known as Avedon lighting.

Avedon lighting combines a pure white background with shadowless glamor lighting on the subject.

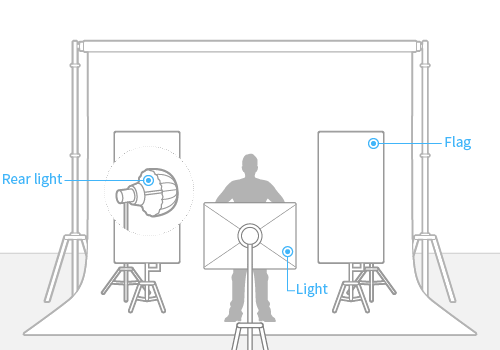
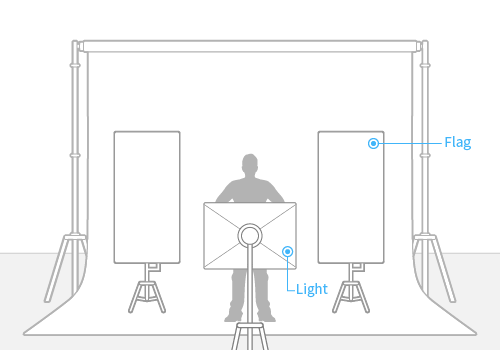
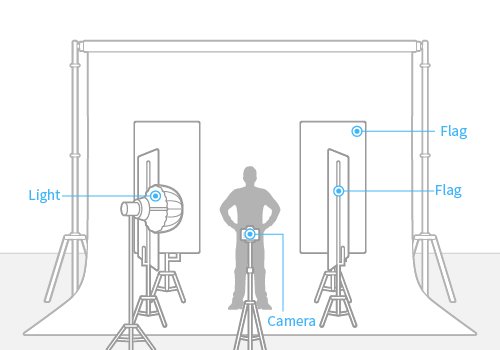
There are many ways to create an Avedon style set. First off, you'll need a minimum of two lights on your background. You don't want these to spill onto you subject, so you'll also need some large flags.

To light your model up front, a single close, centered, and soft light source might do the trick. You might also work with a pair of lights, balanced on either side.

This schematic shows two background lights flagged to avoid spill, a model quite a significant distance from the background, and a single key light in the butterfly position. Variations on the number and position of lights can create the same effect.


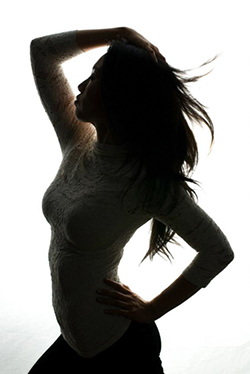
You can create a different effect with the same set up very easily. Turn off the lighting in front of your flags, leaving on only your background light. Now you've got a dramatic silhouette.

Lit only from behind, the portrait to the right is about shape and line. It uses the same background light and flag setup as Avedon lighting. Here I've moved my model a bit closer to the background to give hints of detail in the shadows.


This silhouette technique is very similar to backlighting your subject but involves setting up flags.


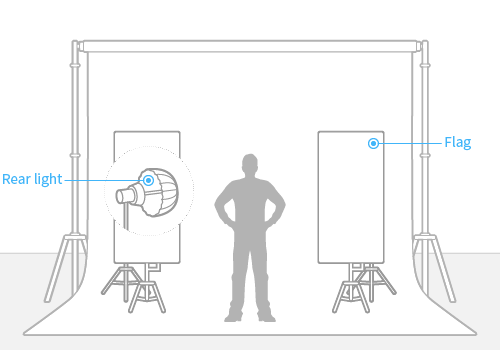
The same set, minus the background lights, can create another look. The farther your subjects are from the background, the darker your background becomes.

In this image, my background lights misfired, creating a different look. My model was far from the background and my lights were flagged so little light hit my white backdrop, turning it gray.


This setup removes the background lights and creates a darker backdrop.

High- and Low-Key Photography

High-key and low-key photographs aren't achieved with a certain arrangement of lights, but they do warrant mention here. Hig-key photos are primarily bright photos and low-key photos are primarily darker tones.

In your beginning photography classes, you learned the rules of photography, including what creates a proper exposure and the importance of having a balanced histogram. As you advance, you learn how to break those rules for creative effect.

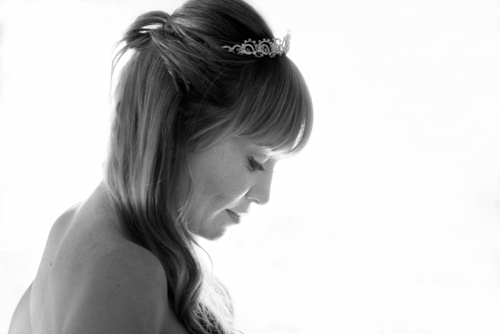
In many cases, high-key images are very over-exposed with shadow areas popping out of pure white backgrounds. This can be a useful effect in certain contexts.

In this case, my exposure is a little hot on the edges of my subject, but not so over-exposed that I lose texture in the rest of the bride's skin.
This setup for a high-key photo allows for brighter results.

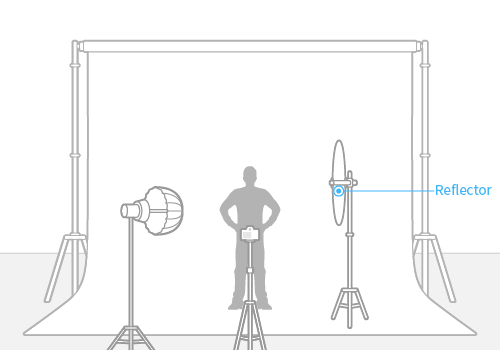
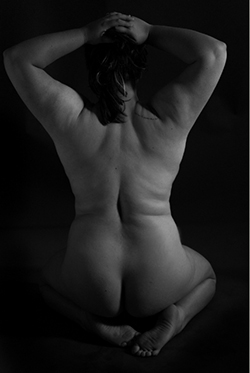
Low-key images achieve the opposite effect. Shadow areas can expand, taking over your image, creating interesting negative space and leaving parts of the subject in the dark.

I've seen low-key images so underexposed that eyes float seemingly without faces. In this nude photo, I chose to keep my exposure a little brighter.

In this setup for a low-key photo, the resulting image will have much darker tones.


Professionals work hard to avoid glare or reflection when photographing metal, glass, or other reflective items.


A light tent is an opaque white box best used for photographing small items.


White box effects can be recreated on a larger scale in your studios, with white panels and sheets.


Since you can't remove all reflections, make sure they are in non-distracting or easy to remove places in your image.


Black and white line lighting are two classic techniques for lighting glass photos.


Adding mirror-image reflections to your image can be an appealing visual effect.

Specialized Lighting Situations

Photographing Reflective Objects

Highly reflective objects like metal, glass, or polished items require special lighting attention in order to avoid glare or evidence of your set in the item being photographed.

In this shiny crown (left) the dark reflection in the front is a big distraction. After some experimenting, I discovered the dark spot was mostly a reflection of my dark floor. It was corrected (right) by leaning a piece of white foam board against my tripod legs to block the floor and tripod. This added a little bit of fill as well.

The simplest solution to avoiding reflections is patience and attention to detail. Everything will reflect onto a shiny subject: the ceiling, the floors, your equipment, your face. If you are shooting a white or light colored object (like a silver ring), you'll want to be wearing light colored clothing and perhaps even wrap your tripod and light stands in white sheets. The reverse is true in a dark shiny object. If you are wearing a white shirt, your reflection will stand out in a dark object.

A light tent reduces hot spots, glare, and reflection in shiny objects by creating even lighting on all sides.

A very easy way to reduce reflections and glare is to use a light tent. A light tent is essentially an opaque white box that you light from the outside with your subject inside. A light tent is a fairly amateur piece of equipment but incredibly useful in a studio.

When I began doing product photography, I shot the dog collar below in a light tent. The results were passable but the compositions were limited by the light tent strategy.


You'll notice the hotspots toward the left side of the collar and that some parts of the background are not fully white.

As you progress in your lighting skills, and if your subjects are larger, a light tent will prove impractical. However, you can usually create a similar effect using more sophisticated tools.

Most rental studios have white walls, floor, and ceiling as well as controllable lighting. As you can see from the photo below, my home studio has problematic black floors, lots of things hanging from my ceiling, and an uncontrollable wall of window lighting. My home studio serves as a shooting space as well as a space to meet and woo clients. Most of my clients book me based on my personality and style so I want my space to make an impression that reflects me.

My unique studio space is not always ideal for shooting but I've got all my furniture on wheels, allowing me to shoot in any spot I'd like.

When I shoot reflective objects in my studio, I box myself into a temporary seamless white room with foam core and scrims on all sides, including floor and ceiling, and then wrap my black equipment (and sometimes even my camera) in white material.

In this image, I wrapped my camera and tripod in white curtains and blocked all sides with either white foam core or scrims with lights behind. In the final set, I replaced the yellow-edged scrims with white edged ones and put a white board on top as well.

It is almost impossible to remove all reflections of yourself from an image, especially if you are shooting very close with a macro lens. Try to locate the reflections in a pleasing area of your composition or in an easily retouched spot. Just slight shifts of the camera or tilts of the object will often produce big changes.

In this image I found it impossible to remove the reflection of my lens. I took care to keep it off of any vital textures for easy retouching.

Photographing Glass (or Clear Plastic)

Glass objects pose a particular lighting challenge. Not only do you have to deal with the reflections we mentioned in the last section, you also have a clear object to contend with.

Lighting glass is usually referred to as either white line or black line lighting. Compositions with highlights emphasizing the edges are achieved with white line lighting. Compositions with dark/black edges are referred to as having black line lighting.

White line and black line lighting (left and right). Photos courtesy of sekonic.com

White line lighting is created by having a black background and white fill cards reflecting from the sides. Black line is created by using black flags reflecting from the sides. In either case, bouncing light from the cards rather than pointing light directly on your glass object will reduce reflections and glare.

Backlighting (bouncing light directly at your background and letting the background do the rest) or sidelighting (bouncing light to the side) also avoids reflections and creates nice edges on your glass.

This light test shows the effects of a single sidelight and a background light.

For this final image on the left, a dark tabletop combined with a sidelight and a background light creates a complex lighting style.

You might also notice that the above photos seem to be shot on a nice set. In actuality, a few whitewashed 2x4s create the background and some loose flooring panels create a tabletop. We'll discuss getting the most of of your props in the next lesson!

Adding a Reflection to Your Subject

Now that you know how to avoid reflections in your images, let's talk about how to add them! Adding reflection to your images is a fairly simple process and can take your photos up a notch.

This image builds on black line lighting by introducing another fun lighting effect: mirror images or reflections of your subject. The background was white, but the surface beneath the glasses was shiny black. Photo courtesy of popphoto.com

Creating a mirror reflection starts with shooting on the right surface. You'll need a high gloss surface like Plexiglas, acrylic, or glass. A black surface usually gives the most dramatic results.

To shoot glass, it's best to use side or back lighting, and luckily for you, this is the best light for creating mirror reflections as well! If you aren't shooting a reflective object, a little fill light in front will help.

For this subject, I shot on white Plexiglas with a white seamless backdrop. I was able to use fill light to open up the shadows, but lost some contrast in my reflection so I bumped that up in postproduction.
The un-retouched version of my above example.

Nice reflections can even be created with OCF in the right circumstances. At weddings I am often able to find super shiny countertops with ambient backlight.

A bit of fill flash and I've got an interesting shot of a ring or a boutonniere.

Understanding how to handle these lighting techniques can be very valuable to you professionally. In the following exercise, we will give them a spin. I'm looking forward to seeing how you do!

Three Light Setup

This three light setup required a lot of planning. Not only did I make a list of props to bring, but also how to set up the lights.

Although not technically any more advanced than many of the two-light setups we discussed, it's worth noting that three light setups can seem intimidating but can add quite a lot of pop to an image.

This image required quite a lot of preplanning. I used a rental studio and brought in props in order to transform it into a classroom.

I'm usually a fan of self-portraits, however, I was tiring of them this time. So, I hired a model, skipped the hair and makeup artist directing her to keep it natural. Wearing a long skirt, characteristic of my own style, she showed up perfectly dressed.

If you look closely, you'll see all sorts of elements that reflect my state of mind at the time when I was a frazzled graduate student.I have a soft key light coming from one side and a softer fill light coming from the other and slightly behind, spilling onto the background. On the back there is a hair light that is also giving the background some illumination.

     
Learn about professional crew roles.
Learn the roles that models, hair stylists, and make-up artists play in a photoshoot.
Learn techniques for shooting in the dark or creating lighting effects.
 

Discussion
Share your thoughts and opinions on assistant crews and specialized lighting in the Discussion area.

Exercise
Choose at least one specialized lighting technique to thoroughly explore.