Strobe lights fire in sync with your camera, popping off a huge burst of light while your shutter is open and remaining dark the rest of the time. These lights allow a greater output of illumination without heating up drastically or drawing large amounts of electricity for the duration of a photoshoot.
Most strobes have a built in modeling light. A modeling light is a lower wattage continuous bulb that allows you to visualize the angle and effect of your strobe before you fire it. Let's look at some of the different types of strobe you may encounter.
Studio Strobes
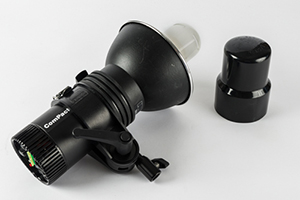 |
This is a monolight Profoto strobe (a Compact 600R) containing everything within the head. With a power cord and a stand, this unit is ready to shoot. (Notice the plastic bulb protector on the right? Always take this off before firing your strobe!) Photo by Felicia Kieselhorst. |
When we refer to studio strobes we may mean monolight strobes or strobes with external powerpacks. A monolight is a strobe with everything built into its housing or "head", including the bulbs and the power. Strobes with powerpacks have separate heads and batteries.
You'll usually find a monolight setup in a studio (although you can shoot outdoors using a portable generator).
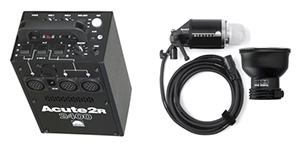 |
This Profoto kit has the bulb/head on the left and the powerpack/battery on the right. It does not need to be plugged into power to operate as long as your battery is charged up. |
Powerpack strobes are incredibly useful outside because you can run them off battery power rather than plugging them in or using a generator.
The disadvantages of powerpack strobes are their high price tag and also the heaviness of the powerpack (think about carrying around a car battery!). If you plan to shoot frequently outside or on location without power, they might be worth the investment. Monolight kits usually offer everything a studio photographer will need.
Shooting With Studio Strobes
Before you can actually fire a shot with your strobes, you'll have some set up to do. First, get your lights on stands and into the approximate position you'll want them in. If you are shooting with a powerpack, plug each strobe head into the pack (and if you are near wall power, plug in your powerpack too). If you are shooting with monolights, attach and plug in the power cord for each unit.
Select and install your lighting modifiers onto the light heads. You can change them later if you want to.
Choosing strobes and speedlights can be tricky. The SLR Lounge site has in depth articles on cameras and equipment.
Visit this article to learn more.
PC Cord or Remote Trigger
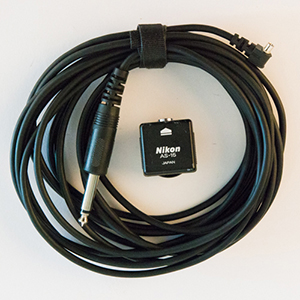 |
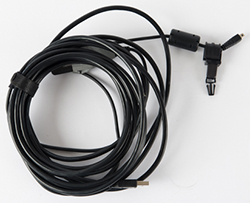
Here is a 12-foot sync cord that times the strobe flash to the camera's open shutter and a Nikon brand safe-sync adapter. Photo by Felicia Kieselhorst. |
When shooting with continuous lighting, you will operate your camera normally. When you use strobe lights, you need to time your light to fire exactly when your camera shutter is open.
The simplest way to do this is to connect your camera and lights to each other via a long sync cord. Some cameras, usually higher-end models, have sync ports built in. Others need an adapter that sits on your hot shoe, usually referred to as a safe sync.
If you are clumsy like I am, sync cords are tripping hazards. I prefer to use a remote trigger for my lights. The name brand for remote triggers is Pocket Wizard, and some lights even have a compatible receiver built in.
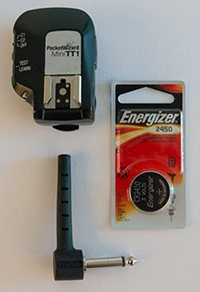 |
My lights have built in receivers, so I have just a transceiver for my camera. I always keep an extra battery on hand for each shoot. Some lights require the removal of an antenna in order to work in remote trigger mode. Photo by Felicia Kieselhorst. |
In any case, you'll need two parts: a transmitter and a receiver. If your remote is called a transceiver, it can actually do both! The transmitter part goes on your camera (usually on the hot shoe) and the receiver part goes on your light. You'll need a receiver on each light.
When the transmitter and all receivers are on the same channel, pressing your camera shutter button will fire all your lights.
Power Settings
As you can see in the example below, there are many buttons and controls on a typical light. We'll go over these in detail:
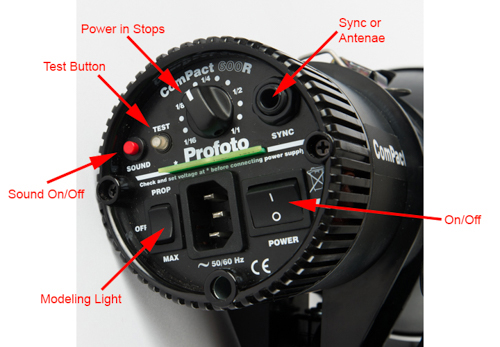 |
The controls found on the back of my lights. Photo by Felicia Kieselhorst. |
On/Off Button is fairly obvious, you'll see it on the bottom right.
Modeling Light (bottom left) has three settings: off, prop (low), and max. Some lights might have a dial rather than a toggle, power settings in terms of stops, or something else. Remember, the modeling light is a continuous, low watt bulb that allows you to see exactly where light is falling on your subject.
Sound Button (top left) is used to turn on or off the beep you hear when your strobe is ready to fire. We'll learn why this beep matters later in this lesson when we discuss recycle time.
Test Button (top left) will fire your strobe if you press it. This is great for getting a light meter reading or for checking your remote triggers. Later in this lesson, we'll learn another important use of this button in the section on capacitors.
Sync or Antennae port (top right) is where you would plug in your PC cord, receiver, or antennae.
My lights have a dial for output power. In this example photo, it is set at slightly under ¼ power. This particular head is a 600-watt head. One of my 300-watt heads set at ¼ power would not give out as much light.
You'll need to set the power on each head separately whether using a powerpack or monolight system. How much power you need depends on the size and color of the space, the light modifier you use, the distance to your subject, how many lights you are using, and especially, what kind of lighting effect you are trying to achieve. A good rule of thumb is to start with your lights somewhere in the middle of the scale. This way, you can add or decrease power as needed.
Hand held Light Meter
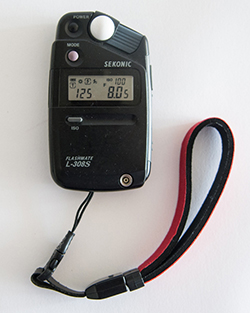 |
I prefer the Sekonic L-208 light meter. Affordable and compact, this meter is great for beginners. It also has features for the professional, like the ability to read flash through a cord or without one. |
Until now, you may have relied exclusively on your camera's built in light meter to determine proper exposure. With continuous lighting, you can keep doing this. With strobe lighting, you'll need a hand held light meter capable of reading flash.
When metering for strobe lights, be sure you've set your light meter to one of the strobe modes, press the button on the light meter that you usually use to take an ambient reading, and then fire your strobe(s) using the test button or your camera shutter.
If you are looking for an overall reading of the scene, you'll take this reading very near to your subject and set your camera according to what your meter says.
If you are looking to balance your lights to prevent hotspots, you'll actually meter the light falling from each light, in order to make power output adjustments as necessary.
Setting Exposure for Strobe Lights
When shooting with strobe lights, you'll want to operate your camera on manual. Start by setting your ISO (generally the lower the better). Using Auto-ISO will not work with strobes.
Finding proper exposure with strobes is a little different than with constant lighting conditions. Your light output power and aperture will be your main exposure controls. Changing your aperture will do more than increase or decrease your depth of field; it will also allow more or less ambient light to hit your shutter.
Your shutter speed will be relatively fixed during strobe shooting. If your shutter speed is too fast, the shutter won't be open long enough for the light to fire properly, and you might see traces of this mix-up. The exact maximum shutter speed depends on your camera and your lights. Generally speaking, 1/200 is the fastest usable shutter speed.
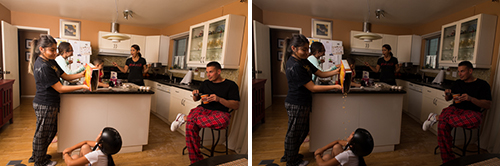
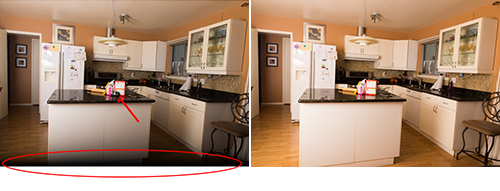 |
In the left image, I've circled a black fuzzy area at the bottom of my frame. This is an indicator that my shutter speed is set too fast. Bringing your speed to a slower setting will fix the problem (as you see on the right). Also notice in the left shot, my light meter is on the counter taking an overall reading of the scene. |
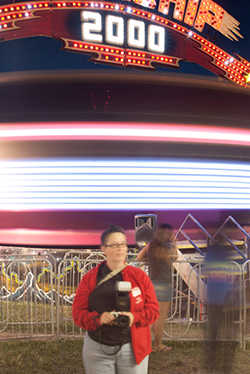 |
In this long exposure, the still part of the image (the 2000) is totally sharp. The fast spinning carnival ride itself is a total blur. My friend Carol is mostly sharp, due to the flash freezing her in action for part of the shot. |
While speeding up your shutter speed has its limits, you can slow down as far as you'd like with strobes. The slower your shutter speed, the more you'll see ambient light such as light from windows or fixtures. With moving subjects, a shutter speed lower than 1/30 or so will show shutter drag, a blurring along the edges of the moving parts.
Now that your exposure is set and all your equipment is ready, you are ready to shoot. While you are shooting, there are two things to keep in mind: recycle time and your capacitor.
Recycle time is the amount of time it takes for your lights to be ready to shoot again at their full set power. If you shoot rapid fire, your lights will not have time to recycle, the strobe will put out less light, and the exposures will be too dark. If you wait until your light beeps before firing another shot, your lights will have recycled and you'll have consistent exposure every time.
 |
During these rapid exposures, my lights didn't have time to recycle fully, causing my second exposure to be a little dark. |
A capacitor is a device on a strobe that holds an electrical charge. As a safety precaution, you should "dump" your charge after turning off your light (before unplugging) by pressing the test button. If you have a capacitor, the light will fire one final time even if the power is off. The capacitor has an effect on your actions during a shoot as well. If you turn your power output up or down, the change doesn't happen until you've dumped the higher or lower charge by firing the lights again.
Here is a checklist that encapsulates the typical workflow for using strobe lighting:
 |
|
 |
| |
- Put your lights on stands and position them where you want them
- Plug into power
- Install light modifiers
- Connect your PC cord or connect and turn on your remote trigger system
- Turn on your lights
- Set output power
- Meter your current setup
- Set your exposure
- Tweak your settings, light locations, and modifiers as needed
- Sand bag your lights, tape down cords, and prevent safety hazards
- Shoot!!
|
|
 |
|
 |