Manipulating the quality and direction of light within a portrait is one of the most effective ways to create a mood or feeling. Soft diffuse lighting is often used to create a calm and pleasing image, while harsh direct lighting can generate drama or a sense of uneasiness.
Let's explore how to use lighting in a portrait shoot...
High Key vs. Low Key Imagery
When people refer to an image as high key or low key they are referring to the overall brightness of an image.
 |
 |
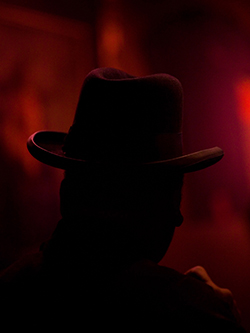
This is an example of a low key image.
Photo by Matthew Ryan Williams |
This is an example of a high key image.
Photo by friiskiwi |
In portraiture, photographers use a bright light source to fill in most of the shadows on the subject. High key images usually also have bright or
slightly over exposed backgrounds that emphasize the subject. Creating high key imagery can be a powerful stylistic choice to emphasize the upbeat, happy, or lighthearted nature of a subject.
Low key imagery, on the other hand, emphasizes the dark areas or shadows within a scene. When used in portraits, the use of low key imagery can be combined with hard directional lighting to create an image with high contrast to emphasize texture or the wrinkles on someone's face, for example.
Quality of Light
For many photographers, the quality and direction of the light within a portrait is one of the most important factors in its success. Light not only sets the mood of the image, but if used effectively it can further the narrative being told within the composition.
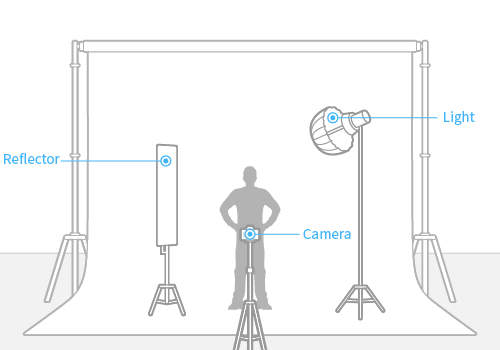
Diffuse light can be found naturally from the shade of a building or an overcast sky. Or you can create it by placing a softbox on a strobe.
Many photographers approach portraits with the idea that simple is better, using one or two lights at the most, and oftentimes utilizing the natural light of the scene when at all possible. This lets your subjects relax and also lets you focus on what's important without fussing with a multiple light setup.
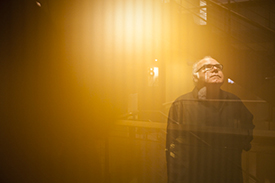
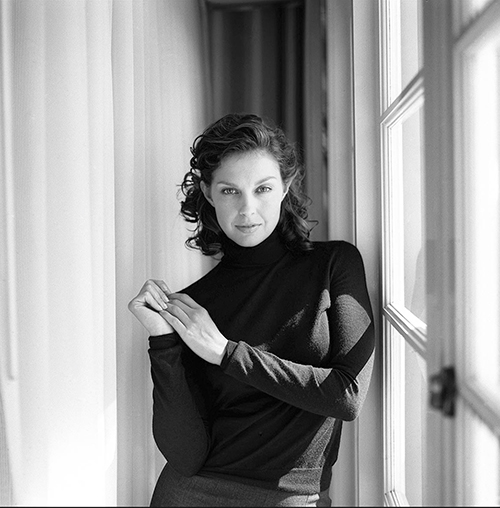
What are some of the qualities of light in this image?
How do you think they were achieved?
The light in the image above is soft and directional, most likely coming from a window, but also could have been achieved with a strobe and softbox.
Direct light, such as the sun shining through a window or the harsh light of the noontime sun, can sometimes be used effectively, but most of the time, photographers will choose to look for softer light or some kind of fill light from a reflector or external light source.
Direction of Light
The direction of light can have a huge impact on the narrative of a portrait.
In portraiture, light can be used to create moods within an image or to highlight certain areas more than others. For example, extreme side lighting will create a much more "contrasty" image compared to frontal lighting. (If the light in a scene isn't working for you, remember that you can either move the light, change the quality of the light, or move yourself or your subject to create the look you are going for.)
Front Light - The sun or direct camera flash are common light sources for a front light situation. The sun, however, is a high front light, which may cause your subject to develop deep shadows under their eyes or "racoon eyes." To deal with this, either move your subject into the shade or use a fill flash to fill in those unappealing shadows.
The direct flash from your camera offers another type of front light. It can light the entire subject, but it can be a bit boring as it is a very flat lighting scenario. To get around this, many photographers use a TTL (Through The Lens) cord or sync cord while photographing people. This allows them to either put their flash on a light stand to the right or the left of the subject, or hold the flash in one hand and the camera in the other.
Photographers often use front lighting to create a butterfly lighting pattern in portraiture. This lighting pattern creates a butterfly shaped shadow under the subject's nose, created by placing the light source directly behind the photographer. It produces a very flattering look that can be used for a variety of situations.
Side Light - As we mentioned earlier, positioning your light source to the right or left of your subject emphasizes texture, shapes, and the contours of the subject. Don't be afraid to play around with the angle that you position your light source in relation to your subject. You'll notice that some positions are much more flattering than others!
Rembrandt and loop lighting are two of the most commonly used lighting setups in portrait photography. These two lighting patterns are achieved by placing the light source at about a 30-45 degree angle to the subject.
Rembrandt lighting creates a triangle of light on the cheek that is not directly facing the light source. Loop lighting creates a small shadow on the cheek created by the nose of the subject. Loop lighting is just a less dramatic angle in comparison to the light. Remember that as the subject moves, the lighting pattern will change. Depending on the mood you are trying to achieve, don't be afraid to move your subject, yourself, or your light source throughout the shoot.
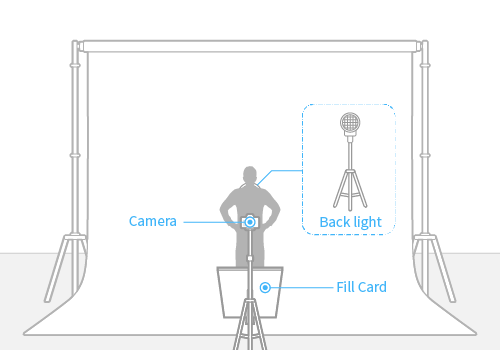
Back Light - Back lighting takes practice to master, but can be an effective way to create a dramatic portrait. Many times in a backlit scenario the subject will either be too dark or the background will be overexposed.
Sometimes this is OK, but if this isn't the desired aesthetic, feel free to bounce a little light on the subject with a reflector or fill flash.
Natural and Artificial Lighting
The question of whether to use natural or artificial light is not only based on the style of a specific photographer, but also on the parameters of the shoot. Sometimes using a single flash or natural light is the only option because of where the shoot is taking place, or how much time you have with your subject.
If a subject only has ten minutes, and you can't arrive early, setting up lights may simply not be an option. It would waste precious time you could be using making photographs.
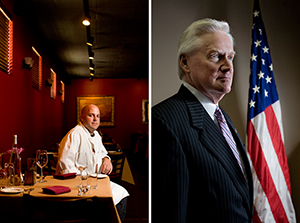
On the other hand, when you have some time to set up, scout locations, and work with your subjects, it's nice to use several light sources to have options to send your editors. Many times I will shoot five or six different setups and compositions for my clients to give them several options when deciding on how to lay out the images in their publication.
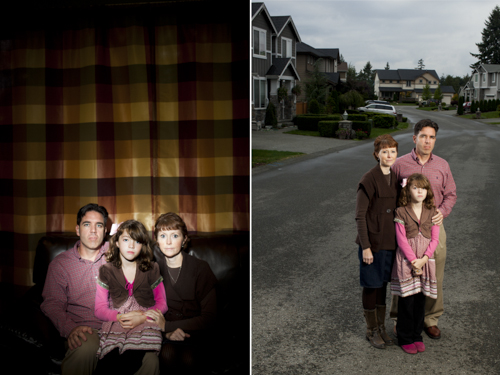
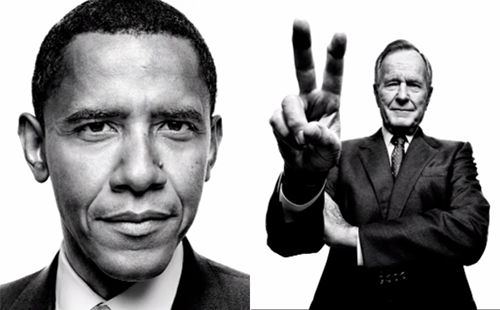
|
These two portraits have very different lighting setups. The one on the left uses a single light focused tightly on the family, almost like using a direct on-camera flash. The image on the right uses two strobes with soft boxes to light the group. (Photo by Matthew Ryan Williams for AARP) |
Some portrait shoots for high profile politicians, celebrities, or sought-after musicians will last mere minutes, while other shoots will be more relaxed.
Each portrait shoot requires a slightly different approach depending on the complexity of the lighting setup, the amount of time you'll have to work with your subject, and how comfortable your subject is in front of the camera. Learning to work with your subjects to achieve a successful image means learning how to position, pose, and relate to them during your shoot to create the visual narrative you are hoping to achieve.
One of the most common questions subjects ask is "What do you want me to do?" As a photographer and visual storyteller you should be able to answer this. Do you want the subject to smile? Do you want them to be serious? Sitting? Standing? Turned slightly to the right or left? All of these questions should be running through your head before a shoot.
Remember that the prospect of posing your subjects can be as unsettling for them as it is for you. As a photographer it's your job to get your subjects to relax, coaxing moments and genuine expressions out of them throughout your shoot.
When approaching a portrait shoot the most important thing for me is to get my subjects to relax. Sometimes this happens through natural conversation during the shoot and sometimes it happens by distracting your subject. If my subject is not loosening up I will have someone else talk to them or engage them while I try to capture a natural expression (or at least, a more natural expression than that cheesy grin they keep producing for me).
Sometimes just taking a break from pressing your shutter button and fiddling with the lights or reflector gives the subject time to relax a little as well. Generally, with a little simple conversation, subjects will slowly relax throughout the course of a shoot. Don't be afraid to ask your subjects to give you certain expressions or change their position during a shoot. A successful portrait shoot is in many ways like a dance.
The Portrait Series as a Narrative Device
While many portraits stand alone as single images, a series of portraits can be an extremely powerful way to tell a story. It's also a great way to practice your portrait skills with a variety of subjects who may be more or less comfortable in front of the camera.
Several years ago I worked with a group of women in Nashville, Tennessee, who had survived prostitution, trafficking, and addiction. I wanted to give them a chance to tell their stories as well as work with them in a portrait setting. None of them were very comfortable in front of the camera so I decided bring a reporter along to talk with them while I took candid style photographs in a studio setting.
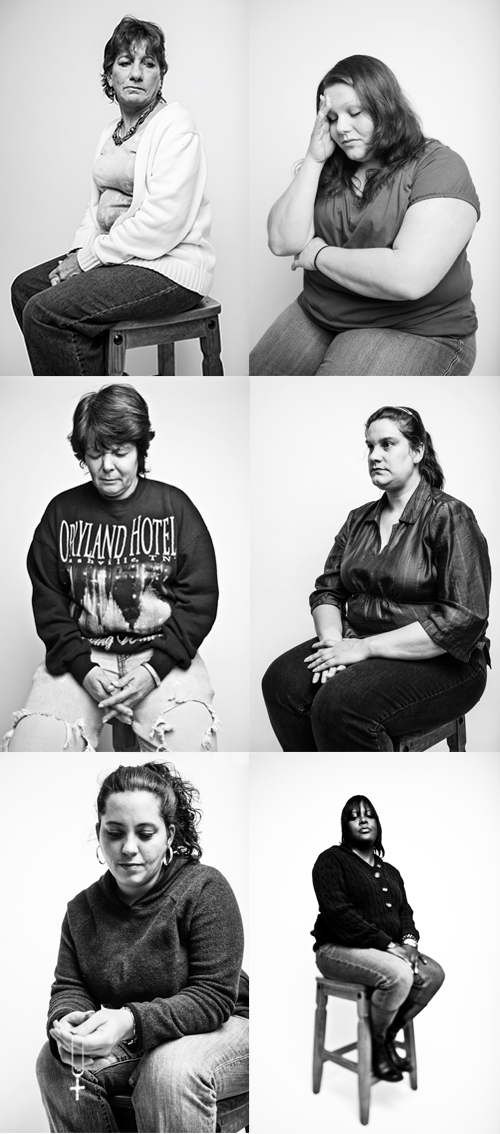 |
Photos by Matthew Ryan Williams |
I spent about 30 minutes with each subject trying to capture moments that spoke about the struggles that they had overcome. After the reporter was finished talking with each woman I spent an additional five minutes posing them. This approach worked well. By the time they were done telling their story, they had all but forgotten the camera was there. It's important to try different things when working with your subjects as you develop your portraiture skills.
The portrait series works well because it has a visual consistency that ties each image together within the theme. In the next lecture we will talk more about the importance of visual consistency when creating multi-image narratives.
As I mentioned earlier, portraits are one of the most common editorial assignments a photographer will get. They can vary from simple headshots to studio portraits and environmental or editorial portraits.
Knowing how to create pleasing portraits of all kinds will make both you and your editors very happy. Most portraits have some things in common, including posing, setting up your lighting, and making your subjects feel comfortable to create an image that satisfies the subject or client.
What sets an environmental portrait apart from a studio portrait? In an environmental portrait, the objects, shapes, and details within the frame can supply the information necessary for the viewer to gain an understanding of what this person may do, what they have accomplished, and how or where they live.
|
This is a great example of an environmental portrait. The pastor is posed in an appropriate and natural way and the background adds supporting information.
Photo by Anacleto Rapping |
In an environmental portrait, the background elements can become as important as the subjects themselves. For example, a portrait of a world-renowned chef will look much different than a portrait of a coal miner or heavy metal guitarist. It's important to find the best setting for telling the story of your subject and incorporate props and background elements to create a storytelling narrative within your frame.
When thinking about environmental portraits many photographers will use a wide angle lens to incorporate more of the scene. This is an effective technique that allows you to show where your subject lives or works. Other times, however, less is more! Instead of trying to show everything in the subject's environment, try isolating an object or two that tells the story in a more dynamic way.
For example, instead of showing the chef in the kitchen, simplify the frame by finding a clean background and have the chef hold his favorite knife and a clove of garlic or another prop. By doing this, the photographer draws the viewer into the symbolic nature of the frame and instantly understands what the subject does in a more subtle way.
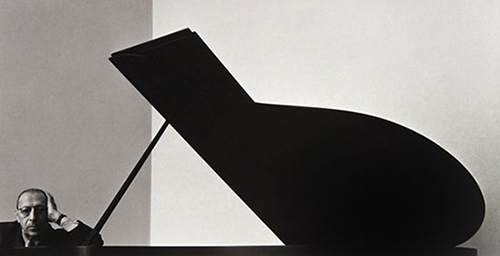
Arnold Newman, a photographer known for his sophisticated environmental portraits, said "I didn't just want to make a photograph with some things in the background. The surroundings had to add to the composition and the understanding of the person. No matter who the subject was, it had to be an interesting photograph. Just to simply do a portrait of a famous person doesn't mean a thing."
What does this composition add to the image?
Why would the photographer choose to have the person photographed be such a small part of the scene?
|
Russian Composer Igor Stravinsky seated at a grand piano. Photo by Arnold Newman |
In Newman's imagery, the background elements were as important if not more important than the subject. It's like he created his image and then dropped the subject in to create the narrative. Newman describes his subjects as an important part of the image, but always wanted to show their "relationship to the world."
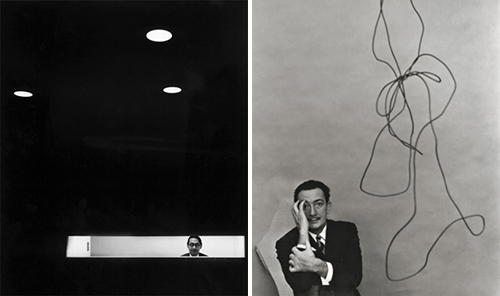
|
Left: I.M. Pei, Chinese Architect, 1967. Right: Salvador Dali, Spanish Surrealist Painter, 1951. Photos by Arnold Newman
|
Newman is a master of composition especially in his enviornmental portraiture. He uses most of the space within his imagery for the background to tell the viewer important information about the subject. By keeping the person relatively small within the frame he is able to weave a story about the subject through the background elements.