Traditional Animation vs. Computer-Based
In traditional hand-drawn cell animation, a lead animator will only draw a few poses of a character in motion. These main poses are called keyframes because they are the important frames that define the path and nature of the motion. The keyframes are then handed to a junior animator, who draws all the in-between frames.
|
|
|
Drawn in 1914 by a man named Windsor McCay, Gertie the Dinosaur is widely regarded as the first animated cartoon.
|
When working with the computer, you create the keyframes, and the computer does all the in between frames. Besides implying that you have your own subordinate to do all the dirty work, this means there are essentially two ways to control your motion: your poses, and the interpolation between your poses.
Time in traditional animation is decided by how many drawings, or cels, you have. One drawing = 1⁄24th of a second. On the computer, timing is a bit arbitrary. Once you make a keyframe, Maya stores that data for one moment in time. In order to make another keyframe, you must "move forward" in time. The timeline allows you to move through time, showing one frame at a time. You can specify which frame is the current frame, and how many frames fit into a second.
The Time Slider and Range Slider sit at the bottom of your main Maya window. If you don't see them, go to Windows > UI Elements > Time Slider and Windows > UI Elements > Range Slider.
Let's explore the controls.
|
The time slider and nearby controls allow you to navigate through the 4th dimension!
Click image for a larger view. |
 |
|
 |
| |
-
Time Slider: The visual representation of time. Click a frame to jump to that point in time, or click and drag to "scrub" through time. The black frame indicates the current frame. You can also enter numbers in the box to the right to jump to the corresponding frame.
-
Start and End time: These two settings control the overall length of your shot.
-
Playback range: This controls the range displayed on the time slider, as well as what will play with the playback controls. You can adjust this by dragging the ends of the gray bar in between them.
-
Playback controls: These automatically play through your animation in forward or reverse. You can also jump to the next keyframe.
Note: To ensure playback is real time, open the preferences (Window > Settings/Preferences > Preferences) and go to Time Slider. Set the Playback Speed to "Real Time [24fps]." This will skip frames (if necessary) when playing back to ensure no slowdown occurs, providing a more accurate representation of the timing of your animation.
|
|
 |
|
 |
The timeline has a unique advantage over cell animation: You can "scrub" through time, or play back your scene to see it as soon as you animate it. This gives you immediate feedback, while cell animators have to scan in and arrange their frames before they can see the motion.
Keyframes
Now that you are getting a little farther along the timeline, it's time to sit down and have a little talk... about keyframes. By default, Maya does not track the position of things over time. This is so you can move objects about while modeling and not animate them zooming around willy nilly.
In order to animate, you need to tell Maya where you want things and at what time. This process is called keyframing. Once you have keyframes placed you can move them, adjust them, scale them to make things faster or slower, and otherwise push, pull, and prod until someone finally wrests the shot from your cold, carpal tunnel-ridden hands. And that's when we call a shot "done."
Making Keyframes
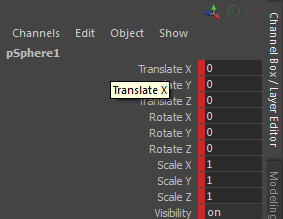
To make a keyframe, select an object, and press the S key. Let's practice this right now. Make a sphere, select it, and press S. In your timeline, a thin red line appears to the left of the 1 (look closely, it really is thin). This is a keyframe. It records the state of the sphere on this frame. Regardless of where the object is on other frames, it will return to this position on frame 1. Also, notice that in the channel box the channels turn red. This indicates they have been keyed.
|
Channels turn different colors for different states. Red means keyframed.
|
Now move the time slider to frame 24 (just drag the gray box along), one second later. Move the sphere 10 units up the X axis. Press S again. Now Maya knows your sphere must be at the origin at frame 1, but 10 units away at frame 24. It will automatically interpolate between these points.
To avoid confusion you will usually want to set keys for all the attributes on each keyframe. However, you can also set keys on a single channel. This is useful because it does not clutter up the other channels with extra data. To illustrate this, go to Frame 12, and raise the sphere 8 units up on the Y axis. Now, select the Translate Y channel in the Channel Box. Right-click it, and select Key Selected. This keys the Y position of the sphere, and only the Y position of the sphere. At Frame 12, the sphere will be 8 units high. But, this keyframe says nothing about the horizontal position. That is still determined by the keyframes at 1 and 24.
Go to Frame 24, and change the sphere to be 20 units away on the X axis. Don't forget to press S to keyframe it. Now, the sphere travels twice as far, and our middle keyframe is still halfway between the two.
The first clip shows the proper behavior. The second one is for reference. This is what it would look like if we had set a full key at Frame 12. As you can see, we would have had to adjust that middle point to prevent the lurching. Setting a keyframe in just one channel prevents this from occurring. When you
are starting out, it can be difficult to maintain smooth curves once you have them, and this is one way
to avoid that. Later on you'll probably want to explicitly control the path of your object and start keying all the channels.
Autokey
Speaking of extra keyframes, let's discuss a little feature called Autokey. Autokey saves you the trouble of pressing S until the key falls off your keyboard. Some people like this idea, or are used to this behavior from other packages. I personally never use this feature, as I prefer to explicitly choose when and where I want keys and don't want to accidentally create any. You will have to experiment with your own preferences. With auto key on, Maya will automatically generate a keyframe if a channel has been keyed previously and if the channel was adjusted on the new frame. It's important to note these
two requirements, as you can often think you have created a keyframe and move on, only to realize you
hadn't keyed some or all of your model and your pose is all kinds of mangled.
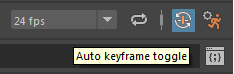
To turn on Autokey, click the key icon in the lower right corner of the window  . It turns red to warn that you may be generating keyframes.
Go back to Frame 24, and drag your sphere back to a translate X of 10. This will make some room for a new bounce. You don't need to press S this time--since autokey is on, it will just overwrite the original keyframe. Now go to Frame 48 (use the bar below the time slider to move ahead) and drag the sphere to about 20 on the X axis. Note that by dragging it using the center of the manipulator, you will surely move it on the X and Y axis, keying both directions automatically. Now move to Frame 36, and use just the Y axis of the manipulator to drag it up to about 4, or enter 4 in the channel box. By only adjusting one channel on this frame, we don't create keys for the X channel, preserving our middle
keyframe again. If you don't see your entire animation, check that your playback range bar, below the time slider, ranges from 1 to 48 (extend it if it does not).
Moving Keyframes
The beginning of a bouncing ball is beginning to form. However, our second bounce takes too long, it should be shorter due to the ball losing energy and not bouncing so high. Rather than create new keyframes, let's just move the ones we have back in time a bit, shortening the gap between them, and therefore speeding up the animation.
There are several ways to move keyframes. The easiest is to Shift-select the keyframe(s) in the timeline. Any selected areas will turn bright red in the Time Slider Then you can middle mouse button drag (remember, Mac users, Command-drag) them left or right.
Let's adjust the second bounce a bit to make it faster. Shift-select the keyframe at Frame 36, and drag it back to Frame 30. Now move the one at 48 to 36. This keeps the frames evenly spaced, but shortens the whole deal by 12 frames.
|
|
Moving keyframes. Click image for a larger view. |
If we play back our scene we can see the second bounce is faster. Perhaps too fast. Let's use another method to slow it back a bit: Scaling keyframes. You may have noticed when you shift select a frame, some arrows appear to the left and right. Dragging on these arrows scales out the selection. Do this to your keyframes by selecting 24-36 (Shift-select and drag) and then scaling them out 4 frames.
|
|
Moving keyframes. Click image for a larger view. |
Notice that the keyframes are now not on even frame markers. Because the timeline is arbitrary, Maya can store sub-frame information. This can be useful, but usually it's a pain to change. To fix this, right-click your selection and choose Snap. This snaps any keys to the nearest keyframe. Now, our bounce looks a bit better. Not great yet, but we'll get there.
Copying Keyframes
To add another bounce to our ball, we can copy and paste keyframes. Copying is fairly straightforward: Select a frame, right-click on it, and choose Copy. Move to the time where you want it, right-click and choose Paste. Don't use Ctrl+C and Ctrl+V in the timeline, as they will copy and paste your model, not your keyframes.
A neat ability of copy and paste is the ability to copy sets of keyframes into a new range. This means we can add a shorter hop to our bounce. Shift-select all but the first keyframe of the second bounce, and copy them. Then Shift-select the 10 frames from 41-51. When you paste, it pastes the 15 frame long data into a 10 frame long space. A quick snap, and we have another bounce.
Continue on in this section using the animation you just created or my bouncing ball available in the course download area.
You'll notice the third bounce has some issues. The ball is moving right at a good clip, but then suddenly stops at the last bounce. Depending on how you have your settings, it may even keep moving and return. To get into fine tuning the motion of our ball, lets look at the motion of the ball a little differently. Remember at the start I said that you were setting the keyframes, and Maya was doing the hard work of the in betweens? Like any good employee, you can direct Maya to do those interpolations just the way you want.
Enter the Graph Editor. Go to Windows > Animation Editors > Graph Editors. The Graph Editor shows each channel, and the change over that channel as a curve. It's a visual representation of the position of your object, but sometimes the Graph Editor can be a bit hard to read.
|
The Graph Editor is a powerful visual tool, but it can be overwhelming and even distracting. |
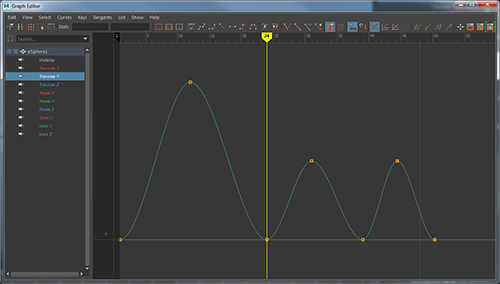
As you can see here, the graph is currently displaying the channels for our selected object, the
sphere. The channels are nicely color-coded for clarity, so we can see that our X axis has keyframes at
1, 24, 40, and 50. In between 40 and 50 we can see the curve flattens out entirely. A flat curve indicates
no movement and thats no what we want.
You can use any of the transformation tools on the keyframes. Press W and then select the keyframe at 40. You can now drag this keyframe around using the middle mouse button. Notice how the curve changes. Holding down Shift and dragging up and down prevents you from moving the keyframe forward and back in time.
|
Now the curve eases in to the final bounce, slowing to a stop. |
Tangents
You'll notice when you have a keyframe selected, little handles will appear, like the gray ones in the picture above. This is something called the tangent. The tangent is the angle at which the curve approaches the keyframe. Adjusting these tangents helps you control the path of the object at and between keyframes without needing a ton of keyframes all over.
Since the graph shows position over time, the angle tangential to the curve is velocity (ugh, calculus). A
steep curve means a faster change, while a flat curve means no change. Thus, a curve that starts steep and gets flat is a curve that is decelerating. (This is what I meant when I said things can get tricky with tangents.)
Remember to press the play button in the main Maya window often as you work so you can see the graph changes you made in action.
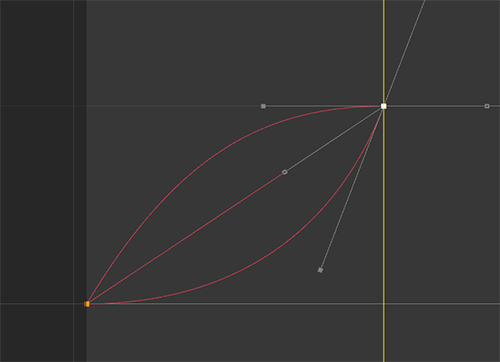
Each sphere arrives at the same time, but has a different path:
|
Top: Fastest acceleration. Mid: Even acceleration, Bottom: Slow acceleration |
Maya now defaults to something called "Auto Tangents" which attempts to guess what you want the tangent to do depending on where the adjacent keyframes are. If the keyframe is the same value or almost the same value, Auto tangents will make the curve flat, which is why the ball just stopped at our last bounce. Auto tangents are usually pretty good, but you can adjust them manually by manipulating the gray handles and watching the effect on the curves. Notice the gray handles in the above photo are all facing different directions.
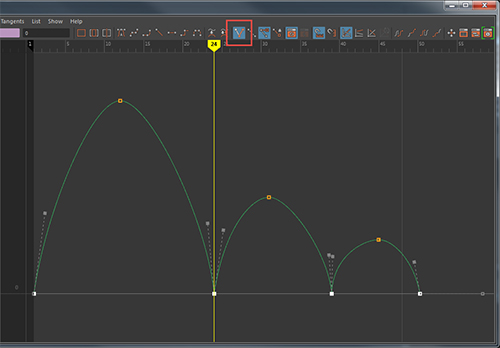
Now, let's tackle another problem: The bounces are kinda like a fluid sine wave, not sharp impacts.
|
Note the smooth wavelike form of the curve. |
Looking at our Y axis curve, we can see why. The curve is smooth at the bottom of each arc, meaning its de-accelerating and then taking off slowly. We want it to be sharp and pointed--a quick change in direction when the ball hits the surface. We also want the ball to hang in the air a bit at the top. It'll take a bit more adjustment of the tangents to do this. Select the points at the bottom, and click the Linear Tangents button at the top. This changes the tangent interpolation to point directly at the adjacent keyframes, making the bottoms of the bounce sharp.
|
Changing the tangent mode for some or all of your keyframes can control the look of your animation. |
Rarely you need even more control than changing the type can give you, and for that you can break the
tangents so that you can move each side separately. To do this, select the keyframe and click the Break
Tangents icon in the top of the graph editor. Now the tangents can be dragged closer together and each
side of the bounce adjusted separately.
Do the same for each point across the bottom. Also, our last bounce should be slightly shorter again than our second bounce. So let's drag the second to last Y keyframe down. Now our Y axis looks kind of like the proper path of a bouncing ball: It hovers at the top, and move fastest at the bottom.
|
Y axis, adjusted: Sharp points mean quick changes. |
A quick render of our shot now shows it to be much improved.
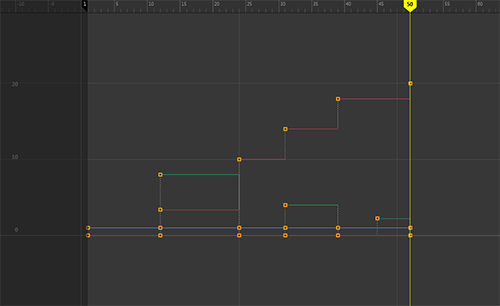
Before we move on, I want to mention one other kind of tangent besides Auto and Linear, and that is Stepped. Stepped tangents have no interpolation. Instead, each key holds until it is overwritten by a new key. Great for creating a few still poses of your animation to get the timing down, and then converting to some other kind later. Also good for "jumping" a model around without crossing into view, or creating a camera cut. Keyframing all channels helps to ensure predictable behavior with stepped keys.
|
Stepped tangents are used to work out animations without having to worry about how the interpolation
is going to work. |
Putting the Strings on the Marionette
Animating a mesh or group directly is OK for very simple animations, but for characters, vehicles, and everything that bends the most common approach is to use a set of objects in Maya that control the mesh more precisely than animating it alone would. This set of objects is called an animation rig.
|
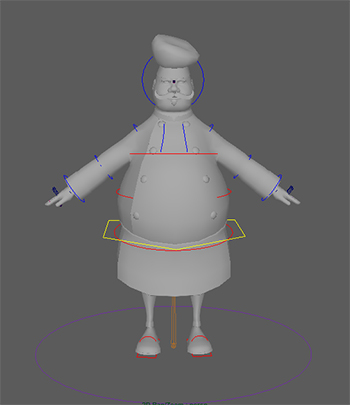
The Chef from Exercise 5 with his control rig, in his resting pose. |
Rigging a model is a huge topic that would take a course or two of its own to cover, not to mention
differences in opinions about what makes the best rig and so forth. I do want to introduce the concept
though and lay out the parts of a common rig. In the exercise you'll encounter your first very basic rig, and you'll have a heads up when moving on to your first character animation.
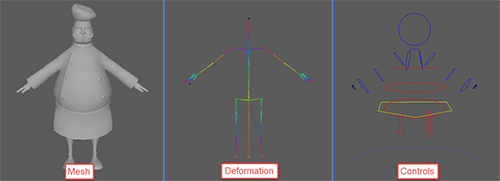
A rig is usually made up of three kinds of parts, the geometry, the controls, and the deformation.
|
|
|
| |
- Geometry: The geometry is what we have been working on and with so far: the actual poly mesh of the character. Sometimes referred to just as "the character mesh" or "the mesh".
- The deformation: The inner workings of the rig. Commonly consists of joints (alternatively, bones) which influence a deformer. The deformer or deformers change the shape of the mesh in repeatable ways. Often there will be internal parts or rules restricting and directing the position of the bones.
- The controls: Often made up of NURBs curves or any non-geometry object, these objects are what the animator actually uses to pose the character.
|
|
|
|
|
|
The chef with the parts of his rig shown and hidden. Not pictured: All the many connections between these three parts. |
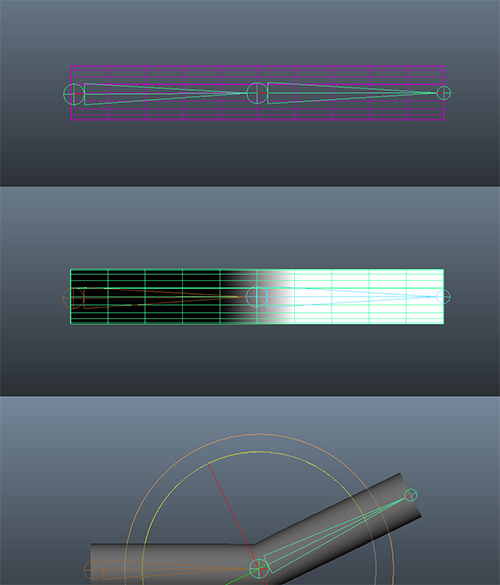
The general idea of the rig is that the controls move the deformer, which moves the geometry, and results in a pose. But how exactly does that middle step work? Well, there are many deformers in Maya, but the most common type of deformer is called a Smooth Skin Cluster. The skin cluster takes joints as inputs, assigns each point in the model a percentage of influence from that bone, and applies whatever transformations to the model as happen to the bone as shown below.
|
Top: The joints and mesh are assigned to a skin cluster deformer. Middle: Each joint has adjustable weights associated with it to determine how the mesh moves. Bottom: The mesh moves when the joints are manipulated.
|
Once the deformer is set up, the controls are added so that the animator has access to the right set of manipulators to get the results he needs. Sometimes a control will adjust a whole chain or group of bones in special ways, and other times it will just be an easy handle to grab.
|
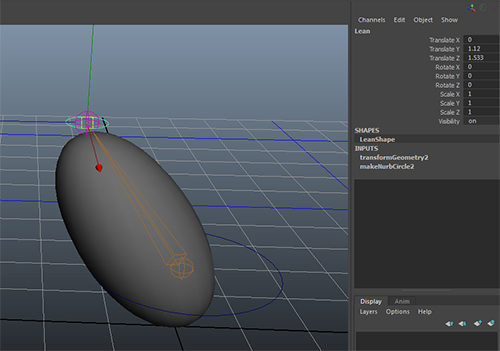
Here is a ball rig from the exercise. The lean control is adjusted, which in turn moves the top bone around and distorts the sphere.
|
Now, let's address several fundamental animation principles that have remained true since the early days of Disney animation. These aren't so much rules as observations about what makes good animation successful. While several of them apply specifically to character animation—something we won't get into at the moment—most can be applied to animating anything, even basic objects.
Timing
Timing is everything, they say. In animation, timing is obviously critically important to success. It is the tendency of new animators to make everything too slow. We call this "the underwater effect" because everyone looks like they are moving around under water. The number one way to get your timing right is to get a stopwatch and get someone to time you doing various actions.
Another good tip is to take your animation and make it twice as fast by scaling the keyframes. Does it still "read?" Cut the timing down again. Do this until it doesn't read anymore, then go back one step. Now you know you have it at the right pace.
Squash and Stretch
A more cartoony principle, squash and stretch is used in varying amounts all over. By distorting your character/object, you can continue lines of motion or energy through a change in direction. It also lets you put arcs in an otherwise linear motion. This is illustrated well by altering our bouncing ball from earlier, so let's do that here.
Select your ball on frame one. This is the start of a bounce, so let's scale it down a bit, like a person bending to jump. In order to preserve the bottom of the sphere touching, I move the center point to the bottom of the sphere, and then scale it down.
|
Things should dip in anticipation or on impact... |
Now the ball needs to stretch out as it "leaps" off the ground. At Frame 6, I rotate it in the direction it's going, and scale it up taller and skinnier. I'm trying to preserve volume a bit here, but that's not really important in squash and stretch. Motion will look better and looser even if the object warps terribly on a single frame.
|
...and stretch during fast motion. |
At the peak of the motion, I return the ball to its normal round shape. I'll then repeat this throughout all the bounces, making the effect a bit less with each smaller bounce.
Anticipation
Anticipation is a little movement before an action that is usually counter to the action. It is the preparation for the action. Anticipation gives the viewer time to prepare for an action. If the viewer knows what is coming, the action will read better because we have expectations that color our perceptions.
Good examples of anticipation are the wind up for a throw, or the dip before a jump. In cartoons, characters will even throw their weight way back before sprinting off.
In this example, a bit of stretch and a hop can give some anticipation of a sprint.
Follow Through
Anticipation's evil twin, follow through is completing each action with the preservation of momentum. A throw doesn't just end when the ball is released from the hand. The arm continues, the weight of the body continues to rotate, and so forth.
Here our balls come back from their run and stop suddenly, again using the elasticity to show the principle (due to a distinct lack of limbs, poor fellows).
Weight
Objects in Maya have no inherent mass. They can pass through each other, zoom about with no preservation of momentum, and break all sorts of physical constraints. In order to give them real mass, it's important to preserve these constraints in your keyframes.
Big heavy objects will keep moving even after force is applied to them. They will bounce less high, come down harder, and change direction slower. Light objects will behave more erratically, bouncing higher, changing directions more.
If you are interested in pursuing these principles further, there are a few great books available: Richard William's The Animator's Survival Guide, Preston Blair's Cartoon Animation, and The Illusion of Life from Disney Animation are all good text references. Classic Disney films, especially Fantasia are great, clear, examples of these animation principles in action.
Now that you've had fun with animation, it's time for something completely different—a discussion of how to organize your projects without losing hair.
Imagine a scenario: Client wants an ice cream cone prop. You make a model of an ice cream cone, call it "ice cream cone.mb" and mail it off. Then they change their mind, they want a sundae, so you alter it, save it as "ice cream sundae.mb."
They want a few changes, so you start iterating versions: "ice cream sunday_4.mb" Now they want a scalloped bowl. So you figure you'll cut down the return and make a few bowls, you save 'em in a new folder to prevent confusion, so now you have "/bowl options/ice cream_4_ripplybowl.mb."
Only now it's time to start coming up with color schemes. "/bowl options/ice cream_4_ripplybowl_neopolitan2.mb" which turns to "/bowl options/ice cream_4_ripplybowl_final.mb" which becomes "/bowl options/ice ream_4_ripplybowl_final_adjusted.mb"…
This can go on, and sadly, this example isn't out of line with projects I've worked on. The problem here is that what makes sense to you in the moment doesn't make sense to anyone else, or even to yourself after a few weeks away and a drink at the bar. Which version did you send the client? Where did you store the final output? Which computer did you work on, your laptop or your desktop? Ugh.
The solution to avoiding these issues is to come up with a file structure and naming convention when you start. We are about to get into generating many more files, files that will need to be kept in various locations, so this isn't just theoretical.
Naming Conventions
Naming conventions are just that: rules about how files are named that should be followed by everyone working on anything in a project. Don't want to get handed a folder full of files called "temp thingy3.mb" or "eye export_no twist.ase"? Make a naming convention.
Some good guidelines to conventions are as follows:
|
|
|
| |
-
A section should be reserved for the nameof the file. Names should be concise and descriptive, or proper nouns.
-
Include a section for versioning. Versioning should include at least three digits (_001) so that you won't run over the version numbers and lose your alphabetical sort (that is, _01 and _11 will sort alphabetically, but _11 will come in between _1 and _2)
-
Include a section for the current state of progress in the file. Things like _model, _texture, and _rig are nice descriptor categories that help people know what they can expect to find.
-
Include a section for alternate versions if said versions are planned (for example, if a texture file might have _team1 _team2 versions, but should not have a _tweak1 or _biggerhead version). Leave tweaks to the versioning numbers.
-
The convention may vary depending on the file type. Texture files may have a spot for map type (_bump, _diffuse, _normal).
-
For clarity, separate the sections of naming with underscores (some programs don't like spaces). Start each file lowercase (for the sake of unix/linux systems) and capitalize any other words to distinguish them. Stay away from abbreviations unless they are standardized.
|
|
|
|
|
A common naming convention that I use is as follows:
Model files: fileName_status_version.mb
Texture files:fileName_type_version.tga
Exported files: fileName_sourceFile.filetype
File Structure
Naming conventions work best when combined with file structures that make sense. It stinks to have your work split up in different locations. File structures help keep your work files organized and easy to find. Maya comes with a default file structure, but rarely do you want to actually work in the Maya folder, so it helps to make your own.
One thing I often do is make a "WIP" or "work in progress" folder under every model or task. I do all my work in there. Then, when I'm done, I take the most recent version, and put it in the main folder.
Here's an example of a file structure with some example files.
|
|
|
An example of a nice, organized file structure from an upcoming project on a PC.
|
This is just one way to organize your work. The precise needs of each project dictate slightly
different structures sometimes. In this case, separate folders for all the model assets was a good choice.
If there were game engine files, we could insert them in the model folders as well, or in a new folder
called 02_Games, within the larger hierarchy. One advantage of the above structure is that it allows for
a separate folder to hold all the final files. This means that programmers can rely on a simple, clean
structure to pull data from (and usually, they will tell you how and where to put the final files even if
you wanted to do otherwise).
Storage
Where and how you save your files matters. A maya file can represent hundreds of hours of work and
also take up a lot of disk space. Losing a file to corruption or accidental deletion is a tragedy I wouldn't wish on anyone.
The best solution is to save your work in a folder that is backed up to a cloud storage system. These
systems ensure your data is backed up, and many of them save previous versions of files in case you do
something unspeakable to your work and decide to backtrack a bit.
Another advantage of cloud solutions is of course the ability to work from anywhere, and to share it
easily with collaborators. It's very rare for anyone to do all the steps in any sizable project alone, and if
your data is on the cloud its already halfway to the folks who need it.
If you can't use cloud storage, please use a backup system of some sort. It can seem like a big data hog,
but it's worth it. When using backups, not every system allows walking back file versions, and that's a
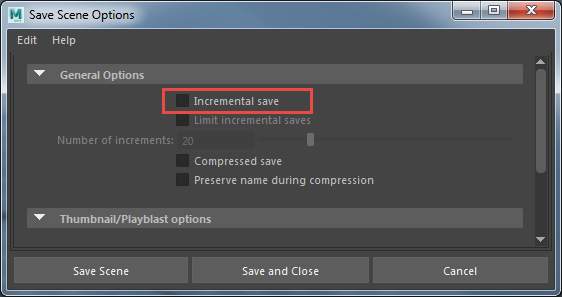
pretty scary prospect. Maya comes with an option when saving to turn on incremental save. This saves
the old version of your file in a subfolder and appends a number to it. It's a real space hog, but the
alternative of losing work is worse.
Now you know everything you need to to create a full scene in Maya. So, let's get to the exercise and do just that!