Maya is a full 3D software package, an industry standard in 3D modeling for both film and games. Sounds like a fancy pedigree, but how does it actually work?
Well, Maya combines tools for many of the major areas of 3D content creation: modeling, animation, texturing, and rendering. To use real-world analogues, Maya provides the tools for sculpting, posing, painting, and filming an object. Of course, the whole point of using a 3D software package is that you can generate content that you could not easily create in the real world.
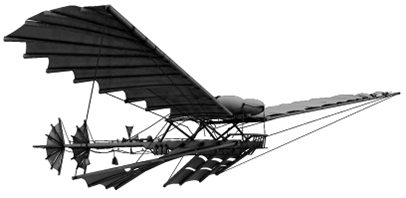 |
Example of a 3D object. This aircraft is a bit of a 3D "sketch" I did in Maya for pre-production on a short film. |
There's a lot more going on in the above picture than meets the eye. In order to represent an object, 3D applications such as Maya create a coordinate system with three axes: X, Y, and Z. You can think of X as typically representing left to right (horizontal), Y up and down (vertical), and Z, front to back (depth). The coordinate system these make up is referred to as the "world space" and the origin at 0,0,0 is the center of your scene or object.
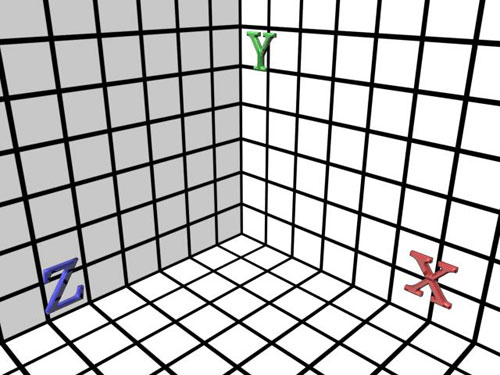 |
You can think of 3D space as a three-dimensional sheet of graph paper. It extends in both positive and negative directions. |
At the most basic level, 3D applications use two things to represent an object: vertices and polygons. A vertex is a single point somewhere in our world space. A polygon is a surface that is defined by three vertices. (You'll remember from geometry that a plane is defined by three points. Never thought you'd use that again, did you?) Because vertices are one-dimensional, they do not usually display in your model—although they can be displayed by Maya in certain modes. The polygons between them are instead what is shown.
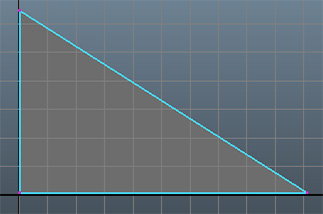 |
A simple polygon (in dark gray). The pink dots at the corners are vertices displayed here for clarity. |
By combining many of these planar polygons, we can make objects look smooth and snazzy. An object might just need one poly, or it might need millions. Games tend to use fewer polygons than film due to computer or console performance issues. Films tend to use more polygons so that objects don't look faceted (meaning you can see the individual polys) when they are displayed at the SuperMegaPlex. As computers and consoles get faster, however, that gap is becoming less important. Later, I'll show you how designing for games can get more complicated than points and polys, of course.
But enough overview: Let's get into Maya!
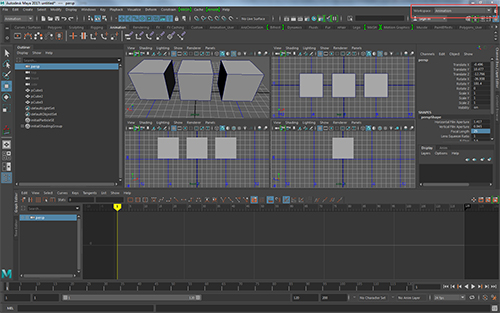
When you start up Maya, the first thing you'll see will be this, minus the ugly labels I put on it:
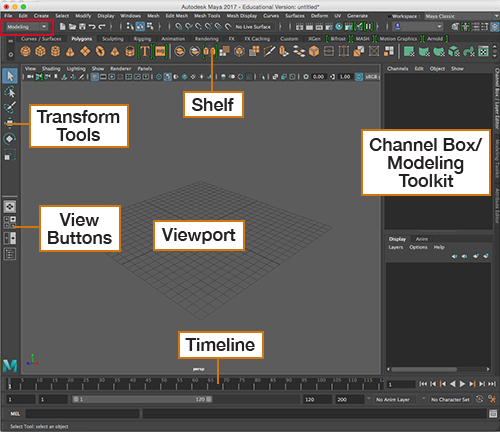 |
Maya interface with callouts. Click to enlarge. |
Choose Modeling in the upper-left dropdown menu, highlighted in red. And if you don't see the same items on your shelf as mine, click the Polygons tab (near top left) or choose Polygons from the tiny tab menu to the left of the shelf.
Let's briefly go over the main elements of the interface so you'll know what I'm referring to later in the course. We'll start with the center pane then work our way clockwise from left to right:
 |
|
 |
| |
-
Viewport – The central panel shows the view from a camera looking at your scene. Above, it shows a perspective view.
-
Transform Tools – The tools most frequently used to manipulate the positions of objects.
-
View Buttons – These change around your view windows to some common presets.
-
Shelf – The shelf contains tools from different menus. You can click these to perform actions and save yourself a trip to another menu. You can change what's displayed on the shelf by clicking the shelf tabs right above the icon images. (Mac users, you may not see the tabs. Click the tiny tab icon on the left to display your shelf options.)
-
Channel Box – When you actually have something selected, this displays information about it, and can be used for data input and the like.
-
Timeline – The various bars down here have to do with adjusting the timing of your shot. We'll get into this more in the animation lecture.
|
|
 |
|
 |
Mousing Around Maya
Keystrokes and mouse clicks are important in Maya, and many of the shortcuts you'll need as you work require more input than just the left and right mouse button (or the only mouse button on a Mac). A three-button mouse is recommended for all users of Maya, and is required for Windows Maya users. This course contains instructions for three-button mouse users.
Mac OS X users with one- or two-button mouses can get away with these for now, as Maya has come up with some helpful workarounds:
In the Mac version of Maya, go to Maya > Preferences. At the bottom of the Interface preferences, select the type of mouse you use. This will set up certain key commands for you to use in place of the middle mouse button (and the right mouse button, if applicable).
If you have set up your preferences for a one- or two-button mouse, please read over the cheat sheet to understand the clicks and keystrokes you'll need to use. In general, one-button mouse users need to Control+click when I tell you to right-click. One- and two-button mouse users will need to Command+click when I tell you to middle mouse button click. These key commands will not work until you have selected your mouse in the preferences.
Customization and View
Now that you know where everything is, let's talk about customization. There's a lot of information here, and a lot more you'll need later. If you have two monitors, you can display more information and windows, but if you don't, managing the interface will be important.
Clicking the little grids  will let you move any of these elements. If you don't generally need them, this is a good thing. It frees up workspace. If you do need them, or you accidentally closed them, you can get them back in the Display > UI Elements menu.
 Now let's adjust our view a bit. Go ahead and click the Four View button.
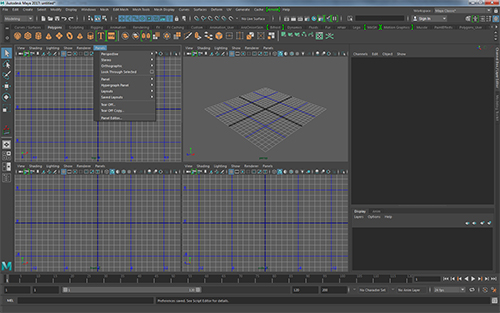 |
Four
View. Notice that each view has more options in a menu bar. |
Now you have one view from each of the default cameras. In Maya (and other 3D applications) your view of the world is through a virtual camera. These cameras are not quite like the your old camcorder, but they have similarities. Every camera in Maya has a view direction, a location in your virtual scene, and a few attributes that determine how it "sees" things. A view panel in Maya is always a literal view from one of these cameras.
In order to display something, Maya takes a few steps (somewhat simplified here): A 3D camera essentially starts at the camera, and "looks" out. When it sees an object, it determines the properties of that object, such as the amount of light on it, the angle of the surface relative to the camera, color, and so on. Then Maya (or technically your computer's graphics card) draws the appropriate display in your view.
The upper right is your Persp or perspective camera—the view that you had before. You can see below that the persp camera is represented like a real film camera, to show that it is a "real" object in your scene.
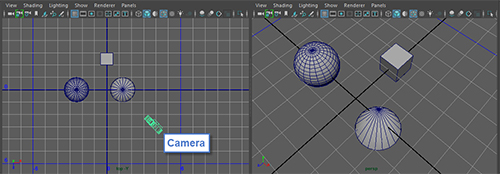 |
Persp Camera and Persp View. The view from the perspective camera on the right, and a view of the scene from the top, showing the same objects as well as the Persp Camera itself. Click to enlarge.
|
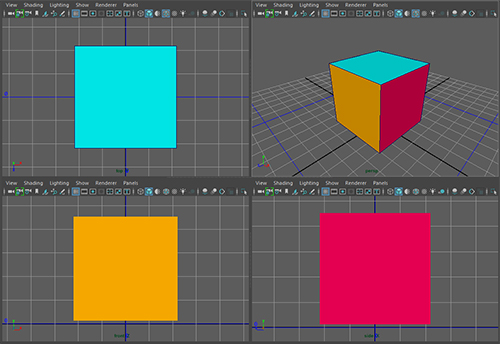
The other three cameras are orthographic, meaning they don't have perspective. This means there will be no distortion in objects that are different distances from the camera. Orthographic cameras are very useful for working in, because it is easy to line objects up in a view without distortion. Notice how the lines recede towards the center in the perspective view, while the same cubes look quite square in the orthographic view.
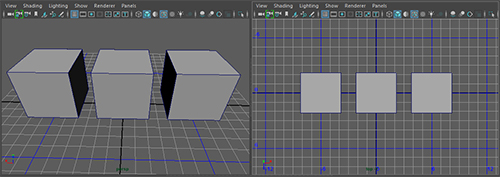 |
Orthographic View vs Perspective View. On the left, perspective. On the right, orthographic. Click to enlarge.
|
You can choose which camera view is displayed from any view window by clicking on the Panels menu to pick different windows or cameras. You can even "tear off" views into a whole new window.
Go ahead now and check out the other view button presets and the Panels menu. Come back when you are comfortable selecting windows and have a layout you like. I use all sorts of different layouts depending on what I'm doing.
Maya now includes Workspaces, which are preset layouts focused around particular tasks. If you like these, you can use them to quickly re-arrange the interface depending on what you need to be doing that day.
 |
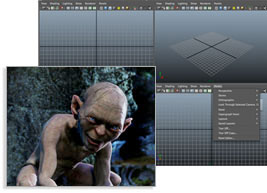
| Here is an example of Maya's workspace for Animation. Click the image to enlarge it. |
Here's a handy trick: You'll often want to work with your view as large as possible so you can see what you're doing. If you want to switch to another view but preserve your layout, you can do the following: Tapping the spacebar while your mouse is over a window will maximize that window. If you tap the spacebar again, Maya will shrink it back to your original layout. Try this now. You can also press control-spacebar to hide most of the interface and just focus on your view window.
Navigation
Now that you understand everything in your layout, you need to learn to navigate. Moving around in the 3D space can be a bit annoying at first. As a matter of fact, I find navigation the most frustrating thing about learning any new 3D application. So go ahead and remove any delicate objects from your desk in case you get frustrated too. I found that using the standard four-view layout and sticking to orthographic views helped me at first. Now I usually use the perspective view and swap to the orthographic views for specific tasks or selections.
Before we move around our views, let's recap the axes to help orient you in 3D space.
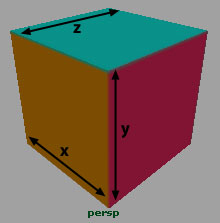
The cube below is shown from the top, perspective, front, and side views. If you compare the top, front, and side to the perspective view, you should start to see how the axes work. Additionally, there is a legend in the lower-left of each view to help guide you.
 |
| This six-sided cube has three sides visible in the perspective view, and one in each of the orthographic views. Click the image to enlarge it. |
Please note that the models you'll work with will be gray until we discuss textures later in the course. The colors on this model are to help you see each side independently.
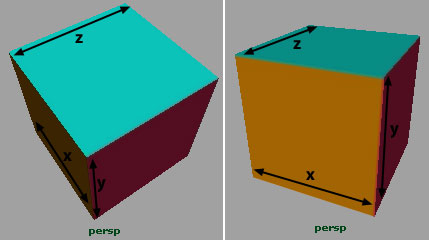
Compare the marked-up cube below to the legends above to see how the top, front, and side views are formed.
 |
| Remember that the X axis represents horizontal width, the Y axis represents vertical height, and the Z axis represents depth. |
Now let's get moving! Maya uses the mouse buttons and the Alt key (Option on a Mac) to control movement of the camera.
 |
Let's practice zooming and panning. With your mouse over a view, hold down Alt and the middle mouse button. Now drag around. Voila! It pans. (Remember: Mac users with one- or two-button mouses, set your preferences and use Option+Command+click instead!) |
Here is a quick cheat sheet:
|
|
|
| |
- Alt+left mouse button: Turn.
- Alt+middle mouse button: Pan.
- Alt+right mouse button: Zoom.
- Shift+any of the above: Restrict to one axis.
- F: Focus the camera to be centered on the object you have selected.
- A: Zoom out to reveal everything in your scene. (Use this to return to the starting view if you've zoomed or moved around too much just now.)
|
|
|
|
|
Keep in mind that turning, panning, zooming and other such movements do not change your model. They only change your view of the model. I've changed my view of the cube two different ways below.
 |
| The cube does not change, but the views do. The axes follow accordingly, which is also shown in the legend for your view. |
You can also access some of the view controls by going to View > Camera Tools in the menu bar of your view.
In order to talk more about A and F (zoom and focus), we need to move on to my favorite part: Making stuff!
Back to Basics
No, not the kind with a club and loincloth. Sorry to disappoint. Before we can make cavemen, we need to make some basic shapes. In Maya, the word primitives refers to the basic geometric solids:
 |
| Maya contains eight basic poly primitives now. From left to right: Pipe, Pyramid, Sphere, Cone, Helix, Cube, Cylinder and Torus. |
Primitives are a great starting place for most models. They are efficiently constructed and can be used to form more complicated shapes. Often people will use primitives to block out geometry to form what is called a proxy. For instance, when designing game levels, it's easier to use primitives to get a sense of space and shape and later go in and replace them with the final models. In games or even movies, primitives are sometimes all that's needed when combined with a nice texture.
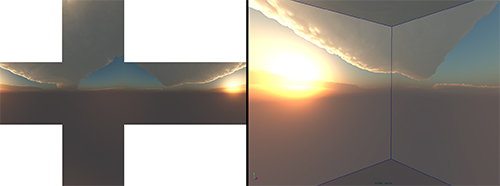 |
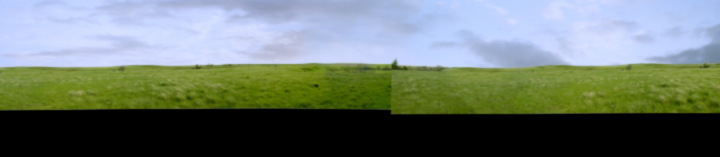
Here a simple cube provides the background for an in game scene. The texture is designed to be mapped to the inside of a cube to provide a seamless horizon, commonly called a skybox or cube-map. |
The easiest way to create primitives is with the shelf. With the polygon shelf visible, go ahead and click any of the first eight icons. By default the object will appear at the origin. You can press Delete to remove it and try out the other seven. Do this now.
If you turn on Create > Polygon Primitives > Interactive Creation you get a little more control over how the primitives are formed. In this mode the primitive is created where you click the mouse, and if you click-drag you can control the size of the object. Give it a go as well.
You'll notice, however, that all your objects are transparent: They just look like a few green lines (or blue when not selected). This is because they are viewed in wireframe mode. Wireframe mode displays the vertices and edges between them, but does not display the polygons. Wireframes are much faster to display, and won't get in your way, but can be confusing to decipher (here, the view window has been changed to a plain gray for visual clarity).
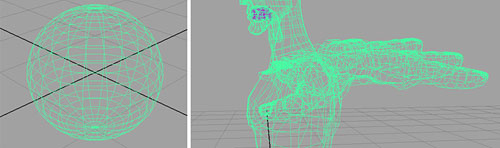 |
Objects in wireframe mode. Click to enlarge. |
We can change the display mode by pressing the 4, 5, 6, or 7 keys:
|
|
|
| |
- 4: Wireframe
- 5: Shaded
- 6: Texture Shaded
- 7: Hardware Lighting
|
|
|
|
|
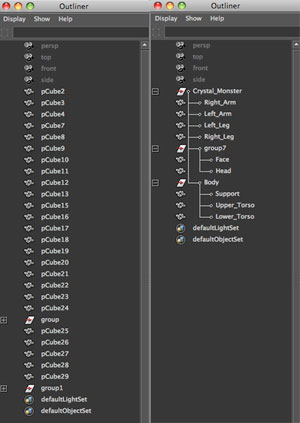
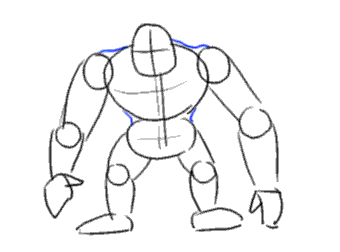
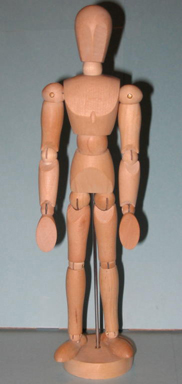
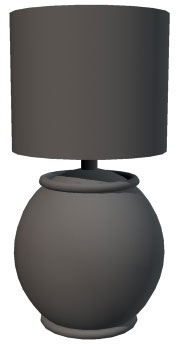
If we use shaded (5) for our cryptic wireframe above, you can see we have a sphere and a view of a humanoid figure.
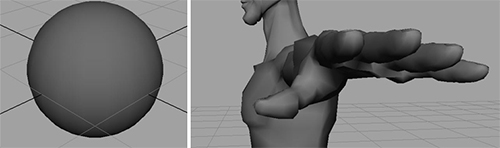 |
The sphere and a humanoid image in shaded mode. |
Wireframe views (4) are good to use when you need to make a selection through or around an object, or when your scene is very complex and is becoming slow to respond. Shaded view (5) is what I normally work in—it shows enough information, but keeps things well lit and clear.
If you need to see a preview of your texture on your model (for example, if you need to line up some geometry with a textured feature) you can use texture shaded (6), but for now, we're not dealing with textures. Switching into texture shaded loads all your image maps, so this can take some time when you first press the key. I generally don't model in this mode due to the higher memory requirements, but it is good for animation and spot checking what your object may actually look like.
If you require even more detail, you can see an approximation of your scene lighting by using the hardware lighting mode (7). This mode is even slower to respond, but is useful when making moody sets or animating an object so that it comes into a specific light.
Adjusting Inputs
Well, having a cube in my scene is all fine and dandy, but it's not going to get me very far in making a scale model of New York. We need to tweak these things. And tweak 'em a lot. As a matter of fact, most poly modeling is just primitives and tweaking. So, let's get to it and start making a city.
If you create a cube you'll notice that on the right, in the Channel Box, there are three sections. Go to Windows > General Editors > Channel Box/Layer Editor if you lost this box, or click on the tab to the far right if the Modeling Toolkit is displayed instead.
The name of the cube is pCube1, and the Channel Box contains its Transform settings. We'll cover those in a moment. Below is a SHAPE and INPUTS tab. Clicking polyCube1 in the INPUTS tab displays some attributes. These are the attributes used to create this cube. You can either adjust them here, and click Create or Apply to make a new one—or you can make a cube and adjust it using the input node. Handy!
Go ahead and make some primitives and mess with their inputs. Although you'll notice that tweaking can make things look smoother, you'll want to stay away from cranking up the subdivisions for a few reasons: More polys are harder to deal with. They slow down display, and they take longer to render. Additionally, more isn't always noticeably better.
Take a look at these shapes:
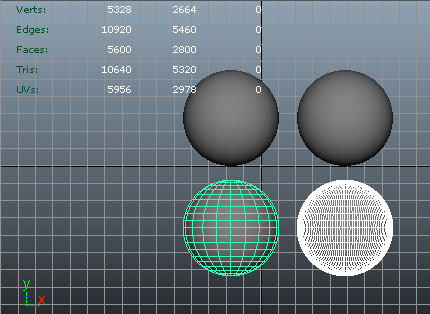 |
| Poly counts shown shaded and in wireframe. The difference is only really visible when you can see the wireframe, meaning it's an unnecessary difference. |
Can't tell much of a difference between the shaded versions, can you? But the one on the left has 1200 polys and the one on the right 28,000 polys. One of these is just wasting a whole bunch of resources.
If you've made more than one primitive, you'll notice that it soon starts to get a bit crowded at the origin. In order to really make use of anything, we need to be able to move it away, rotate it into position, scale it up or down, and so forth. Despite the fact that these actions do not change your model into anything new, they are called transformations. While adjusting the inputs for a primitive changes the shape of your model, the transforms adjust the position, orientation, and scale--in other words how
your object is located in the scene.
All the transformation tools are available on the left of your view (hovering your mouse over one will tell you what it does). And for those of you enjoying mousing over there right now, not so fast! You'll need to use these tools a lot. Millions of times. If you go there every time you need to use them, you might finish one model in your lifetime. If you hurry. In order to get things built lightning fast, we need to use the power contained in your Qwerty keyboard. Here's how...
Maya maps the keyboard shortcuts from the Q, W, E, R, T, and Y keys to the basic transformation tools. While this means they are rather arbitrary and may take some getting used to, at least they are all at your fingertips.
Here is another cheat sheet for your viewing pleasure:
|
|
|
| |
- Q: Select
- W: Move
- E: Rotate
- R: Scale
- T: Show manipulator (we'll be skipping this for now).
- Y: Last tool used (if it's not one of the above).
|
|
|
|
|
(You will notice that R does not correlate to Rotate. I still get this wrong, after years of using Maya.)
With these tools, we can move objects about to our heart's content. Which, unless you have a goal in mind, should be pretty brief. We need a goal here. I'm going to make a London city block. Feel free to follow along, or pick your own city. In my case, I'm going to take a few cubes and move them about to various places to represent some buildings. I select my cube by clicking it, and it turns green. I can then hit W, and a few arrows pop up.
This is the Move tool. The arrows correspond to the axes: red = X, green = Y, blue = Z. This a universal Maya coloration. If you click the center box, you can move the object wherever you want. If you click one of the arrows, the object will only move along that axis. The little squares restrict movement to within the two axes that they fall between.
Since I want my buildings to stay on the same "ground," I must go to my top view and drag them about to various locations, or use one of the axis restricted modes for moving them, like clicking on the green square.
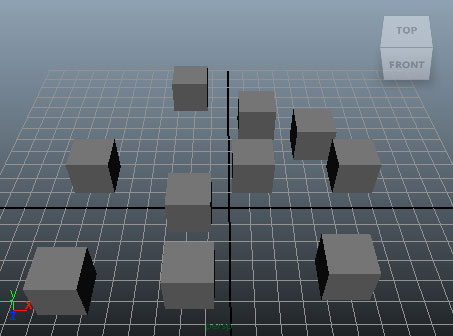 |
Creating buildings from cubes. Remember to press the 5 key to display them in shaded mode. |
My cubes are all the same size though, so I'm going to hit R to scale (not rotate) a few of them up. Scaling works the same way: The colored blocks correspond to the axes, and the center will scale everything uniformly. Once I've scaled things around, they will no longer sit on the ground plane, so I need to go to my side view and move them up again. Now I have some buildings of different sizes and shapes.
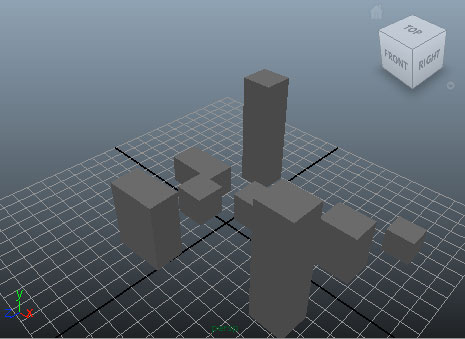 |
Scaled buildings |
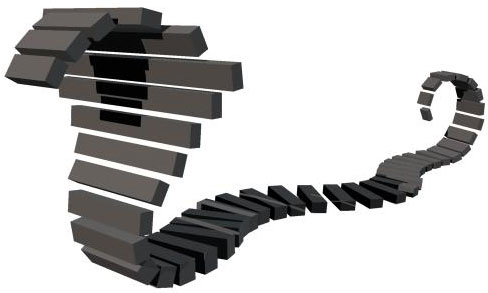
Now I want to add some decoration to a building. These cubes are boring. So I'm going to make a cylinder and scale it down on the Y axis (remember, double-click to get to the inputs, access them in the Channel Box, or scale them with the R key) to make it look like a poker chip. This is going to be the face of a clock, like Big Ben. I press E, rotate the chip so that it's standing on edge, scale it down to fit on one of the buildings, and then translate it (that's another term for move it over) so that it intersects. It's OK to have objects intersecting. As a matter of fact, objects don't care at all if they go through other objects, so it's up to you to put them precisely where you want.
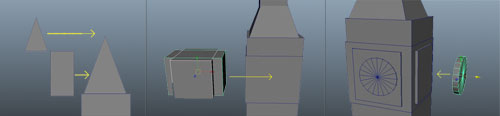 |
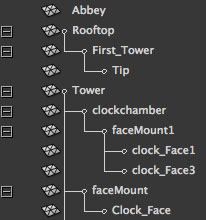
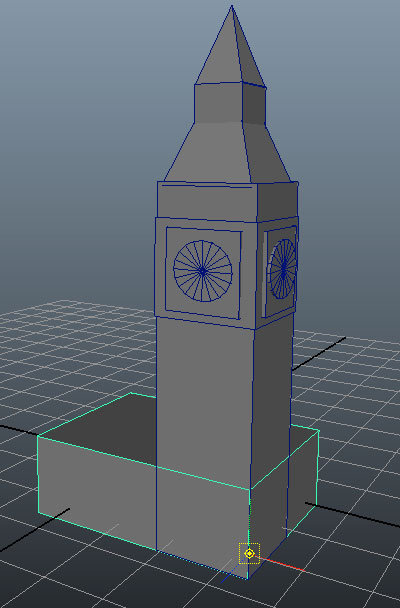
| A few steps in constructing this clock tower (click to enlarge). First I made some square pyramids and some cubes, and dragged them on top. Then I overlapped some boxes onto the middle. Lastly, I made four cylinders and pushed them into the sides. It's a bit rough, but it's recognizable at least. |
In order to place things precisely, you can use the Channel Box. If you've noticed, when you use a transformation tool, the numbers in the Channel Box change. These show you the actual coordinates of the object. You can click the box to enter in values, and when you hit Enter or click off the selected object, the object will reflect the change. This is good for numbers people who like things clean, or for any time that measurements and dimensions need to be precise. And don't be afraid to use all four views as much as possible.
Since we are talking about precise units, the default units in Maya are centimeters and degrees. This is rather arbitrary, though if you wish to change the units to correspond to your favorite real world measurement, you can do that in Windows > Settings/Preferences > Preferences. Units are found in the Settings area of the Preferences dialog. I'll refer to them as units, since for the purposes of this lecture, it just matters that everything is relative to itself.
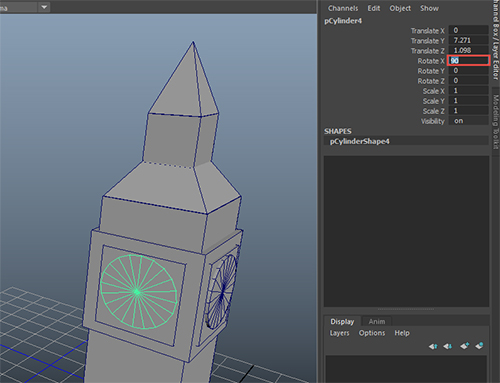 |
| In order to fix this imprecise rotation of the clock face, I can select the rotate X channel and enter 90 instead of 92.67. |
You'll notice I put some more decoration on my building here: A few cubes make the shape more interesting, and a square pyramid completes the top.
There are a couple other tricks for getting objects precisely aligned. One of the most useful is to use the snap tools. By holding down the X key while using the tool, or pressing the Snap to Grid toggle button highlighted below, the translate manipulator will jump to your grid markers. The box in the middle of the manipulator will turn into a circle to show a snap mode is on. This is great for evenly spacing objects, or quickly returning an object to the origin without making a trek to the Channel Box. If you click and drag on just one of the translate manipulator arrows, the snapping will only occur on that axis. This is useful when you have objects positioned properly in one direction but not another, or need to get an object to the middle for mirroring purposes.
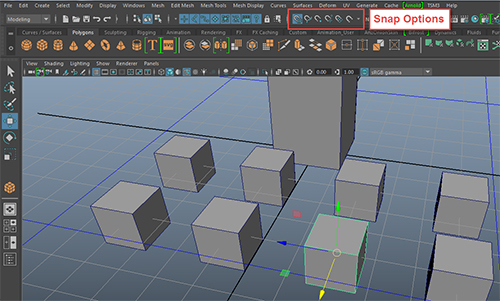 |
| Snap to grid is an easy way to line up objects in a regular fashion, or zero objects on an axis. |
You can also use these tools to snap to other objects in your scene. Holding the v key will snap
to vertices, which is great for aligning an object with the surface of another one, or to get two objects in
the general area of each other from way across your scene.
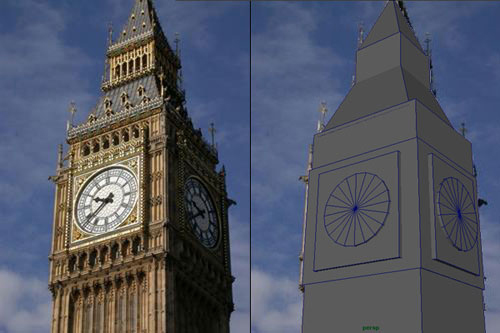
You may have noticed that the clock face in Big Ben above wasn't quite centered in the building. It also isn't conveniently located near any grid points. We could change the grid settings, but that is cumbersome. The other major way to arrange objects is by using the tools found in the align subsection of the Modify menu. There are a number of these, which I wont get into right now, but the most useful is the Align tool. When applied to a selection of objects, this tool creates a bounding box with some little square icons around the sides. If clicked, these icons will snap the objects all to the center of the selection, or to one of the extents. Try taking a moment and experimenting with the various options here, or try out some of the other align tools as well.
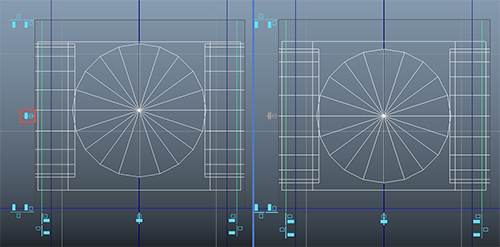 |
| Before alignment on the left, and then after aligning to the middle of the selection on the right. |
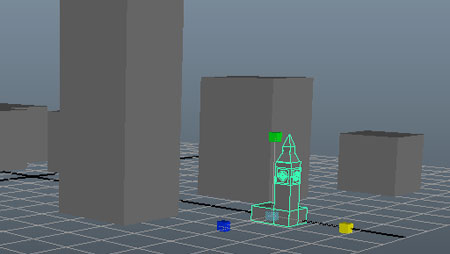
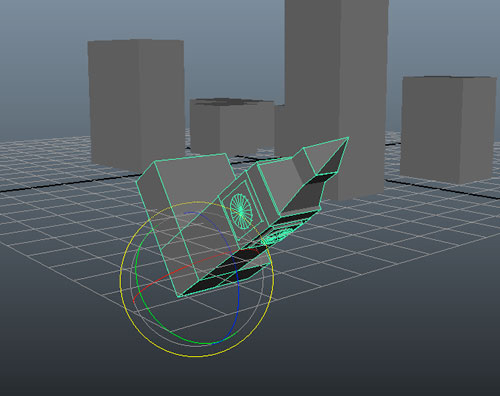
It's all well and good to move one object at a time, but now that we have all our objects precisely
located just where we need them what if I want to move, or worse, scale, this whole building? Adjusting everything individually would be a pain in the neck. Which leads us to our next topic...