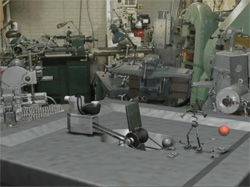
You are the director now. You have full control over all the elements of your scene. Decide what your goal is here. Are you animating a Rube Goldberg ball machine? Telling a story about love or bravery?
Your scene should support your story first.
In your animations, you should include squash and stretch, anticipation, and follow through. At the end,
your jumps should look something like the ones you saw earlier, but with a bit more personality and lead in, related to the type of ball each one represents. Use tangents in the Graph Editor where appropriate to create these effects.
If you wish to re-use an element from a previous assignment, that may influence your choice. For instance, if I wished to use my bicycle from Lesson Two, I might model a garage, or a shot of a workbench with bike tools and parts on it. It helps to have your scenes indoors, as it tends to keep things simpler, but the right outdoor setting can work as well.
Pick something in the scope of what you can accomplish. This is your final project, so stretch yourself a bit, but stay realistic. Intricate or epic backgrounds, such as scaffolding, futuristic cities, and so forth are very time consuming and difficult. So is photo realism. Stylization is your friend: Cartoony or simplified models can look good and be forgiving to flaws.
Once you've picked an idea, think about layout. Sketch a little view of your scene using basic shapes.
Think about composition and plan what your lighting and color will look like. Which element or elements will be animated? Only after you have a battle plan should you start work. This is always true and will save you work every time.
It is better to do a simple thing well than leave something complicated half finished.
Preparing for Animation
If at all possible, begin by studying objects at home to understand their movement, like a rubber bouncing ball and a bowling ball (though please don't destroy any floors for this project).
Although you can use your own sphere model in Maya (I realize it can take a very long time to model... really), I'm providing you with a file: Demo_Ball.mb. This contains a ball with some extra features that are ready to animate.
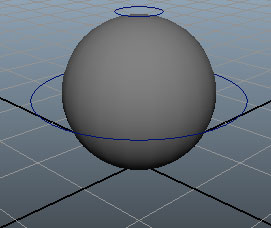 |
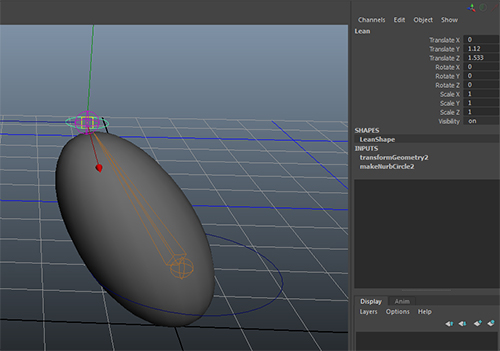
Ball with rig |
This rig here is pretty simple (as you'd expect from a sphere). Let me explain a bit how it works so
you can use it effectively.
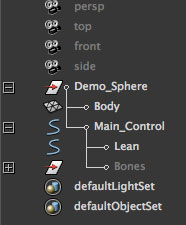 |
The Demo_Sphere group in the Outliner.
|
The sphere is grouped up under a group called Demo_Sphere. This is just to keep my Outliner clean. Do not move this group!
Our sphere is actually connected to the two circles: Main_Control and Lean. These are controls. To move the sphere, you just have to select Main_Control and drag it around. It will move, rotate, and scale normally.
However, to help you get the elastic effect I used in my movies in the lecture, I added something
extra. As mentioned in the lesson, the sphere has a smooth skin deformer attached to it, and Lean uses
that to distort the sphere. You can grab the Lean control and move it around and the sphere will squash
and stretch from the base. This lets you position it just how you want, without worrying about rotations
and scale numbers. If you don't like the provided sphere, you can just use a normal one like in the
lecture, but at least fiddle around with it. I think you'll like it better.
Modeling and Texturing
Your models should be simple and successful. Your focal object, or objects, should be at least as
detailed as your character assignment. It should be fully textured and posed appropriately. Now that
you are more experienced, any element you choose to adapt from previous exercises should be updated
to your most exacting standards.
Your background will also need to be fully textured. Background elements can be simpler than the
focus elements, by nature of being in the background. Think about what detail you want to model, and
what can be included in a texture or bump map. For instance, if your focal element were a keyboard,
you will probably wish to model each key. If you had a keyboard in your background, however, you might be able to get away with just a good texture on a keyboard-shaped block.
Animation
Animation should be done after your environment is constructed because you may wish to have your animated balls interact with the rest of your scene. Keep in mind the principles of animation we
discussed in the lecture.
Lighting and Rendering
Finally, you should light and render your scene. Scenes generally require more than a three-point rig, since there is more than one element that requires lighting.
If you have not yet already done so, make a camera to use as your scene view, and use this view to work on your lighting. It helps to lock this camera once it is in place. To do this, select the translation attributes (their names, not values) in the Channel Box, and right click. Choose Lock Selected from the pop up menu. The attributes will turn gray, meaning you can no longer change them.
 |
Locking (and unlocking) attributes prevents you from accidentally moving things in your scene.
|
The focus of your lighting should the the focus of your scene, your central object. It should be clear
and well lit as appropriate for the environment. In some cases (such as noir lighting) well lit may mean
"partially dark and obscured." Even in these cases, however, your lighting should be focused and precise, instead of generally dark or muddy (and it's reversed, washed out and overexposed). Lighting should highlight and clarify your object, not make it confusing.
Rendering
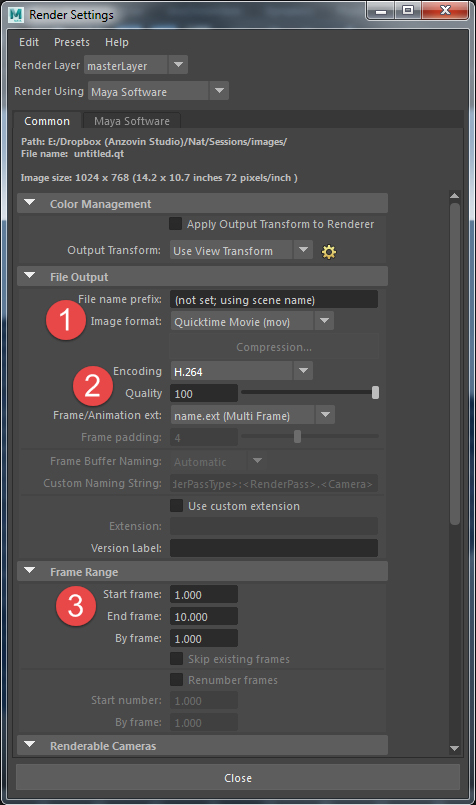
Rendering an animation is mostly the same as rendering a still frame. However, you need to do two things differently. First, open up your Render Settings (Options > Render Settings in the Render View window), and choose .MOV. This has the side effect of changing your output name and enabling the frame range settings.
Set the encoding to H.264, and the quality as high as you like. Generally, if your movie is short maximum quality produces a movie wit acceptable size, but if your your movie is long or high resolution you man need to decrease the quality (or re-compress afterwards) to get a file that Canvas will let you upload.
Don't forget to set the resolution if you havent already. Full 1024 or HD 720 are pretty good sizes,
choose what aspect ratioworks best for your scene.
Next, use the left hand dropdown in the main Maya window (or press F6) to select Rendering. From
the Render menu, choose Batch Render. Maya will now render your movie (you can watch the progress
in the script editor or command line). When it is done, you can open it up in whatever movie viewer you like.
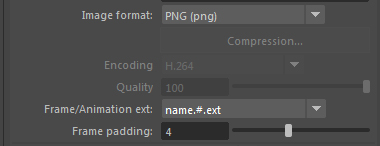
Note: Commonly renders from Maya are actually rendered out as sequences of images, and then brought into video editing software for final adjustments. This course doesnt assume you have access to such software, and so .MOV is the best option. If you do have video editing software you might find the image sequence method preferable. With long render times, rendering out frames lets you pause the render if need be, adjust and re-render partial sections, and so forth. Just choose an efficient image format and set the frame padding to ensure proper alphabetical order.
Once your render is done, review it and make any necessary changes before submiting. In total, you
should produce the following:
 |
|
 |
| |
- Model (or reuse and update) one central element. This could be a character, vehicle, or object.
- Model one background, or a background built from multiple elements.
- Create at least two animated balls with different attributes and/or personalities.
- Texture all your models using whatever tools you prefer in Maya. If you use image maps (as you should), you will need to produce those maps as well.
- Render out your scene in a movie, at least 800x600.
- Render out a still frame from your scene as a .JPG. 1280x720 (or whatever aspect ratio you have chosen) Pick your favorite frame, if it matters.
|
|
 |
|
 |
When you are done, put your Maya file (it should have your whole scene in it), your texture files and your movie into a .ZIP file. It helps immensely if you preserve the relative locations of your texture files, so that Maya knows where to find them.
Double and triple check that you have everything (try opening your file from a separate location).
Seriously.
Check out how other students handled this challenge. Click each image to view a video:
|
|
Joseph Florence |
Hilary Rhodes |