Tackling a new project can be daunting. I recommend doing this assignment in three stages: Planning, Roughing out, and Details.
Planning
The first step is to choose a good subject. Pick one object, such as vehicle, building, or character or
whatever suits your fancy, and model it out of primitives. Since your toolset is limited, you shouldn't be going for realism here. Instead, try to capture the essence of your chosen subject using the tools you
have.
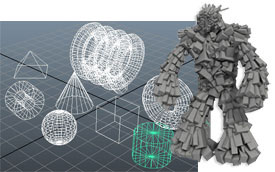
 |
| This is a crystal monster of some sort that I made for this lecture. It is made entirely out of cubes. They are just scaled, rotated, and translated into place. I used some groups to make things easier. |
The use of a simple style can make your model look interesting despite it being made from only
basic shapes. If the basic outline and design of your model is successful, it won't matter that parts arent
connected or some things are sharp or angular.
Think about your model: Is it sleek, is it realistic, is it cartoony? How can you get some real
personality or good details in? Make decisions based on these attributes instead of just placing objects
willy-nilly.
Roughing Out
This is sort of the test phase of your idea. Using only a few shapes, try to make the basic
outlines of your model. Try a few different primitive types if you are unsure what suits an area, scale
and position your basic shapes until you have a silhouette you like. This is the time to make big changes in design and proportion, while its still easy.
 |
An example of a roughed out character to test shapes and proportions. In the end I used this to decide
to make the monsters arms bigger and torso shorter.
|
Details
Like we did in the lecture, use primitive shapes to decorate your model, and be creative. In some cases
you'll want to re-construct a rough shape entirely, but with new parts. You can then group them up and
put the new more complicated shape where you need it. In other cases you can just add shapes to your
basic outline to break it up and start selling the model. This is your chance to build something fun and
interesting, not to mention impress your friends and family with how much you've learned already.
Little details like rivets or hinges can make a simple object go from primitive and clunky to
intentionally minimalist. Give your object history or personality with little details.
Be sure that your model looks good from every angle and looks like the object it was intended to
mimic or like your original plan. Carefully and thoroughly construct it so that unattached objects look
like they are supposed to be unattached, and that objects that are supposed to be attached aren't just
hovering about near surfaces. Use the channel box, align, and snap tools to augment your placement,
and groups and pivots to aid your workflow.
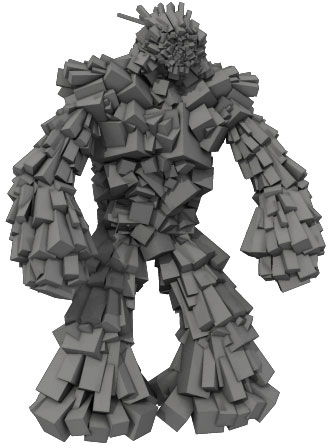
The level of detail should range from things like the monster above to the Cube-ra from the lecture.
It doesn't have to have a million parts, but it should be complete, and not just simple looking.
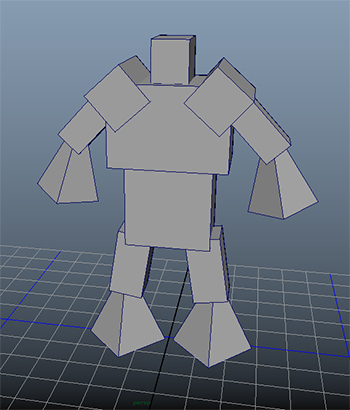
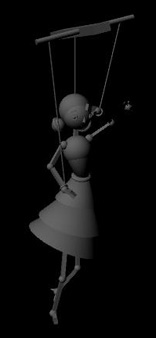
Check out how other students handled this challenge:
 |
 |
Erin Robinson |
Christine Creber |
Saving Views
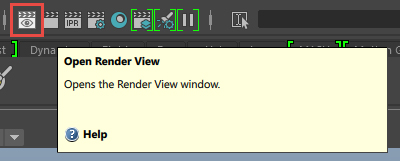
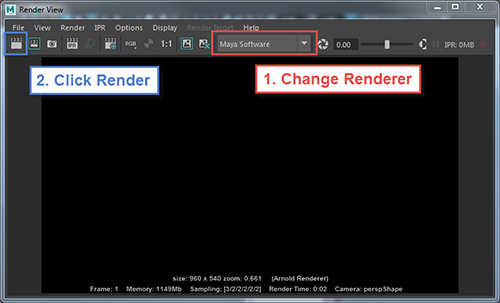
In order to submit your files, you'll need to also render out quick JPEGs. To do this, click the Render View button.
Maya defaults to the Arnold renderer now, which is way more complicated than we need right now. Swap to Maya Software by choosing it from the drop down menu.
To render, click the Render Current View button. When a scene is finished rendering, chose File > Save Image... and choose .JPG as the output. Name it Lastname_Firstname_Ex1.jpg and upload it with your
Maya file. Take any other renders that show off areas of your model you are proud of. You can adjust
the resolution and other settings in the Render Settings tab if you desire.
So I can provide the best feedback possible, when you submit to a Dropbox in this course feel free to include any questions that arose during your process that you haven't already asked. Mentioning areas you struggled with and your thought process or planning can also help let me know where to focus
when taking a look at your model.