Intro to Drawing | Making Sense of Space


Making Sense of Space

There's a lot to look at. Where do we start?

In today's world, we are inundated with an overwhelming amount of information. When we look around us, there is so much visual information to take in, it can seem daunting to make sense of it all.

So how do we communicate all of this information in a drawing? Well, the answer is that we don't. As artists, it helps if we abstract what we see into smaller bits. There is some logic to the world around us. Once we are able to break down what we see into smaller components it is much easier to represent the world visually.

In this lesson, we will begin to learn how to break down what we see by focusing on two theories used to organize visual space: linear perspective and positive/negative space.

In this lesson, you can expect to:

Learn how perspectives affects the way we see objects in the world.
Explore the meaning of concepts in perspective, including eye level, horizon line, vanishing point, convergence, and foreshortening.
Learn how 1, 2, and 3-point perspective are created.
Learn to identify the difference between the positive and negative space of an object.


Linear perspective and positive/negative space can play a role in how you construct all your drawings.


Linear perspective was discovered during the Renaissance but is still essential to today's 3D designers.


Eye level describes the vertical and horizontal relationship between your eyes and an object.


Tilting your head will affect your eye level.


Are you above or below your drawing subject, or is it at eye level?


The eye level should not be confused with the horizon line. The horizon line, like it sounds, is the line created by the horizon.


Objects in the distance seem to converge or appear closer together.


Far in the distance, perspective lines appear to meet and vanish at a place called the vanishing point.


Due to foreshortening, objects close to you can appear larger than they are.


Concepts in Perspective


Ultimately you will need to come to terms with the fact that the goal of drawing is not to recreate reality. Not even a camera can do that. Rather, your goal is to represent the essence of reality, using a composed set of marks to communicate some type of visual imagery. 

Different marks communicate different kinds of information. When artists use linear perspective, they can create the illusion of 3-dimensionality on a flat, 2-dimensional drawing surface. When artists use positive and negative space, they can break down 3-dimensional space into abstract, 2-dimensional shapes.

Once you master these techniques, you will find that linear perspective and positive/negative space each play an important role in how you construct all your drawings. Let's begin by exploring some concepts in perspective.

Perspective

You may have heard the term perspective when someone is telling you how he or she sees a situation. Pundits on TV talk shows are always telling us their "perspective" on a situation.

Similarly in drawing, perspective is used to describe how (and from where) a viewer sees the contents of a drawing. How we view the perspective of a drawing can influence whether we see the drawing as very flat, or as possessing great volume. It can also give our drawings a naturalistic look.

Examples of objects seen from different perspectives.

Linear Perspective

Linear perspective is a mathematical approach to breaking up space that was developed in the early Renaissance. Understanding linear perspective is particularly important if you ever create any artwork using a 3-D program such as Maya or use certain filters in Photoshop, Illustrator, or AfterEffects.

Linear perspective. The Antechamber of the Sala de Maggior Consiglio, Francesco Guardi (Italian, Venetian, 1712-1793)

Important concepts in linear perspective include eye level, horizon line, vanishing points, convergence, and foreshortening. We'll discuss each of these terms in this section.

Eye Level

The term eye level is a reference to the area where our vision is focused. Since we have two eyes (one on either side of the nose) it is possible to draw a horizontal line delineating our eye level.

Our eye level is determined by the angle of our head. If you lift up or lower your head, this will affect your eye level. The eye level can also be shifted if we tilt our head to one side or the other.


You can see in these diagrams how different angles of the head create very different eye levels in relation to our subject.

How Eye Level Affects How We See

The location of an object in relation to your eye level can greatly affect how much of the object you see.
Object at eye level.

If you see an object directly centered in your line of sight you may not notice the effects of eye level on perspective at all. But if you raise or lower the object above or below your eye level, you'll now be able to see the top or bottom of the object.
Object above eye level.

Notice how when the object rests above our eye level we can see the bottom of the object. When the object rests below our eye level we are able to see the top:
Object below eye level.

When thinking about eye level imagine you are in a swimming pool with your head half in and half out of the water. Everything out of the water is above your eye level. Everything in the water is below your eye level. The surface of the water is your eye level.

Convergence

When you look into the distance you'll notice that things appear to come together. The tendency of objects to seem to come together in the distance is called convergence. This term makes sense, as the objects appear to come together or "converge."

Convergence

Vanishing Point

If you look closely you'll notice as the objects converge that there appears to be a point where the objects disappear. This point is called the vanishing point. Objects in linear perspective appear to vanish towards anywhere between one to three vanishing points, which I'll explain in a bit.

Vanishing point

Foreshortening

Another phenomenon that occurs in linear perspective is called foreshortening. Foreshortening describes how parts of an object will appear to become larger the closer you are to them. The part that is closest to you will appear larger than the part that is farther away even though they might actually be the same size in real life.

You can see in this photo above that it is because of foreshortening that the figure's hands appear larger than her head. Don't worry; her hands are perfectly proportionate to the rest of her body. The hand appears larger than usual because the hand is closer to you than the rest of her, making it appear larger.

You can see in the example of a house below that the front of the house in the foreground appears larger than the back of the house, which is farther away.)


The terms 1-point, 2-point, and 3-point perspective refer to how many vanishing points are created in a scene.


1-point perspective is often seen in long corridors.


In 2-point perspective, perspective lines disappear into two points on the horizon.


In 3-point perspective, a third vanishing point is generally created by a very tall object such as a skyscraper.


You can see the effects of perspective even if the vanishing points are out of view.


Positive space is created by the mass in a space; negative space by the void surrounding it.


Positive and negative are complementary, like the pieces in a jigsaw puzzle.


Positive space can be created by connecting the outlines of objects grouped together.


Focusing on drawing negative space can be just as productive as drawing positive space.


Objects within the positive space can have positive and negative shapes, too.


Types of Linear Perspective

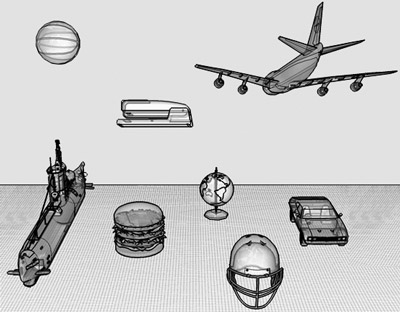
As I mentioned earlier, linear perspective can have multiple vanishing points. There are three types of linear perspective that use vanishing points: 1-point, 2-point, and 3-point perspective.

1-Point Perspective

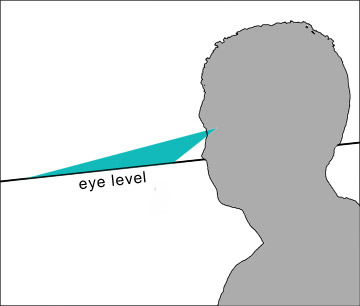
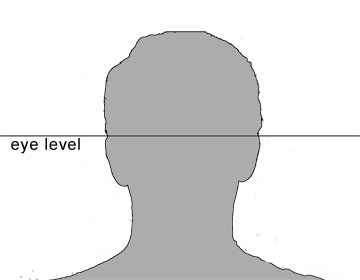
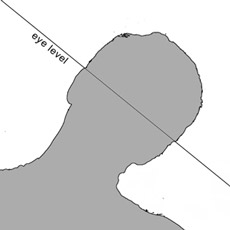
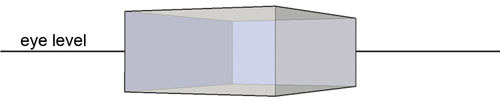
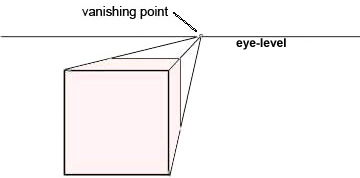
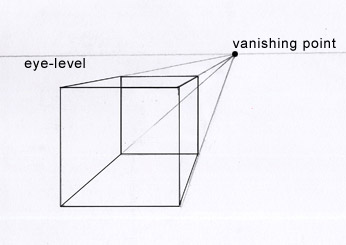
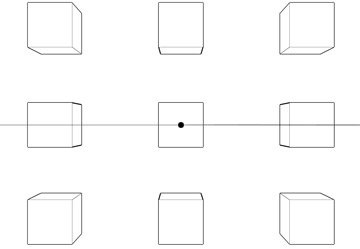
In 1-point perspective, every object appears to vanish towards one vanishing point, and every object either runs parallel or perpendicular to our eye level.

You can see the dramatic effect that changing eye level can have on objects in 1-point perspective:

You might experience 1-point perspective when looking down a very long hallway or waiting for a C train uptown:

Empty platform in 1-point perspective


2-Point Perspective

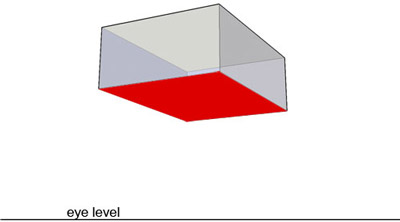
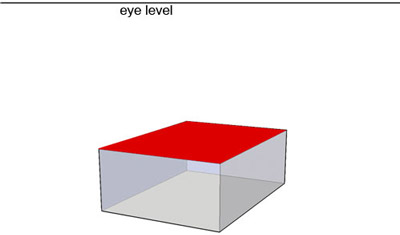
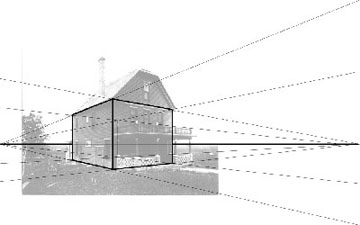
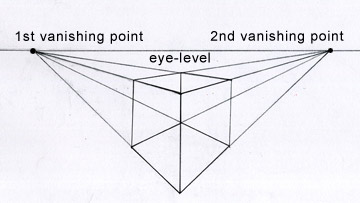
Ready for more points? The term 2-point perspective is used when objects are at an angle to the eye level other than parallel or perpendicular and there are two vanishing points.

In this case, each of the sides of the object facing you appear to be aimed towards different vanishing points located to the far sides of your eye level.

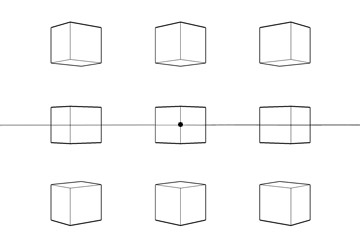
Notice the effect of eye level on objects in two-point perspective:

Depending upon how close you are to an object, you may not even be able to see the vanishing points, as they may lie beyond the range of your line of sight. This typically happens when objects are foreshortened.

See how foreshortened this car looks in 2-point perspective?

3-Point Perspective

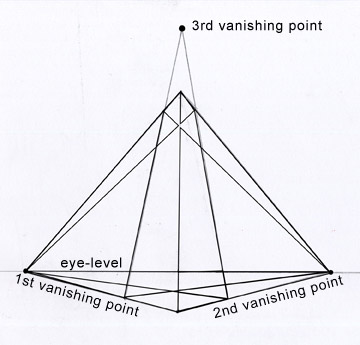
Time to lay a third point on you. The term 3-point perspective is used when an object is particularly tall or stretches very far below our eye level.

This phenomenon occurs when the object stretches so far to the end of our line of sight, or even beyond it, that the top or bottom of the object appears to vanish.

A good example of this is when you look at a skyscraper. See how the top of this skyscraper appears to get smaller as it recedes into space?

Positive and Negative Space

Linear perspective is just one way that we are able to organize objects in space. Another concept that will help you visualize (and represent) structure is positive and negative space. Let's start our discussion of positive and negative space by first talking about mass and voids.

Mass and Voids

Mass is any solid object. In the loosest meaning it is anything that isn't nothing. Mass fills space. Where there isn't mass there's a void. A void is nothing.

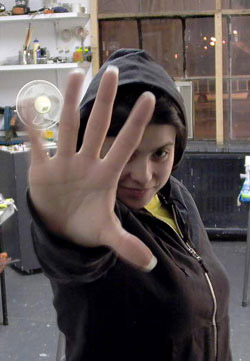
Stick out your hand. Your hand has mass. Now notice the air around your hand. Before you stuck your hand out, there was a void filled with empty space. When you stuck your hand out, you partially filled that void with the mass of your hand. The space around your hand is still an empty void though. This relationship between mass and void is referred to as positive and negative space.

My outstretched hand is a mass filling a void.

Now that might be easy to understand when you're dealing with your real hand in real space, but how do you translate this information in your drawing?

Positive and Negative Space: Two Pieces of the Puzzle

There are several different ways to determine the positive and negative space in your drawing. Remember that every situation is relative and it is how the pieces relate to each other that create interest in your drawing.

Another way to think about positive and negative space is to think of them as pieces in a jigsaw puzzle. When you are putting together jigsaw pieces you don't think of any one piece as more important than another. What is important is how the pieces interconnect to make up the larger picture.

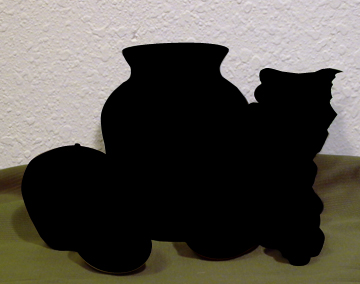
Positive and negative space is the same way. Let's look at the still life I set up with a few objects I had in my studio:

Each of the objects in the still life has mass and makes up the positive space. Below I have silhouetted the shape of the positive space in black.

You can see that it forms a very distinct shape in which separate objects are connected. When we draw the positive space of our objects we should focus on just the outer edge of the objects. Think of a cookie cutter. A cookie cutter is a great example of the shape of the positive space. It follows one continuous line around the edge of the objects, like an outline.

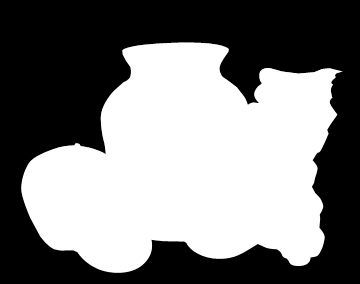
Let's not forget that the negative space has a shape, too. Here I silhouetted the negative space (the space around the mass) and filled it in black.

In this photo (as in any drawing), an artist must notice how the positive and negative spaces make shapes and how the shapes interconnect.

When you are busy focusing on the positive space in your drawing and the mass that fills it, make sure you also spend equal time focusing on the negative space and the shape around the void that the mass creates. Sometimes it might actually be easier for you to concentrate on the shape of the negative space when you're drawing something rather than focusing on the positive shape. Of course, once you have defined the shape of the negative space you have defined the shape of the positive shape as well; it's like two pieces in a puzzle.

Simply put, positive space is the space occupied by your subject. Negative space is the space around the object.

Positive and Negative Shapes

Now once you understand how to break up your drawing into the positive space of the object and the negative space around the object you can then further subdivide the space within an object into positive and negative by breaking your subject down into shapes.

That's right. You can actually have positive shapes and negative shapes within the positive space of any one object. Anytime you can identify a shape within your subject, that shape can instantly be considered the positive shape and the area around it a negative shape.

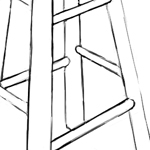
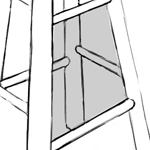
In the example of a chair below you can see how within the positive space of the chair we can actually further break down the chair into smaller internal positive and negative shapes.

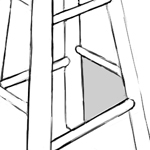
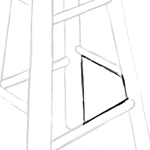
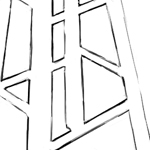
Remember that we are drawing on a flat piece of paper and at the end of the day we are ultimately drawing flat shapes. So learning how to see the positive and negative space and shapes in your subject will make it easier for you to translate that information onto your page.

Now let's try putting some of this theory to work!
     
Learn how light affects casts a shadow and affects the value in a drawing subject.
Learn about how the strength, angle, and position of a light source affects a subject.
Learn how to identify mid-tones, highlights, shadow edge, core shadow, reflected light, and cast shadow.
Learn how to use hatching and cross-hatching.
 

Exercise
Explore drawing cubes in various perspectives and rendering the positive and negative spaces of an object.

Discussion
Share your thoughts and opinions with other students at the Discussions board.