Behind every InDesign page there is a master page. The purpose of the master page is to imprint recurring objects—such as page numbers, footers, headers and guides—onto any page where that master is applied.
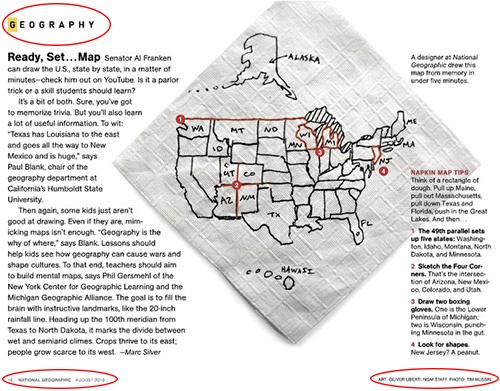 |
Even spreads with special, custom designs benefit from master pages. I've circled some of the elements—folios, headers, bylines—in this interesting spread from National Geographic that were most likely master page objects. Click the image for a larger look. (Image credit: ziniophile) |
As a rule of thumb, any repeating objects in a publication should be placed on a master page. Although this feature is tailor made for multi-page documents, it can also be used on a single page layout. For instance, even a data sheet or a flyer contain objects that repeat from one file to the next. Rather than create each one from scratch, you could place them on a master page and forget about them.

Creating Master Pages
Creating master pages in InDesign is quite straightforward. As a matter of fact, any time you create a new document (using the default settings), InDesign will include a default master page. Create a new one-page document and open the Pages panel to see this action firsthand.
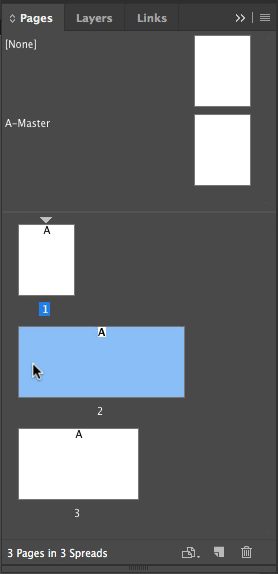
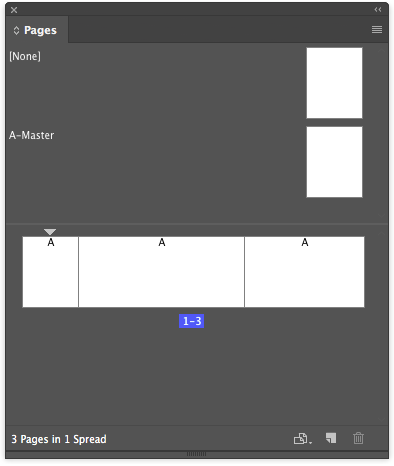
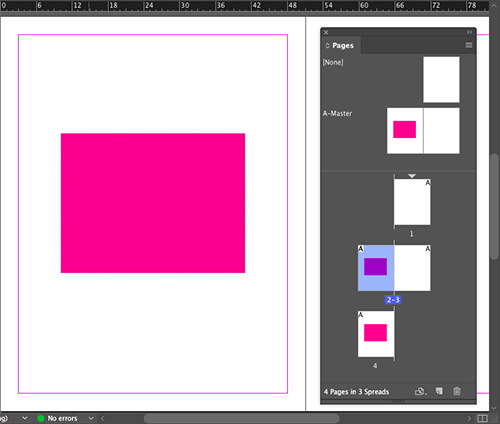
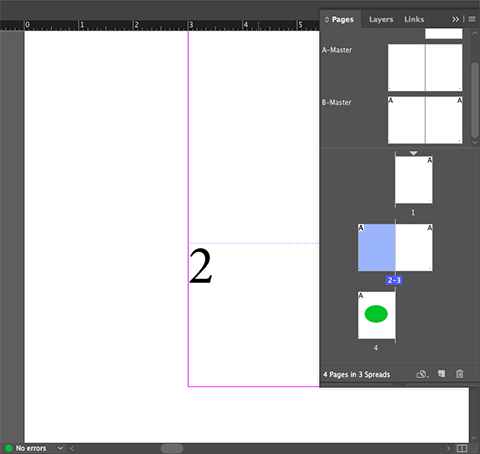
We can compare this panel to a two-story building. On the ground floor, you have your regular document pages, and on the top floor you will see your master pages. In this example, you have a master called A-Master and a [None] above that. Also note that the page 1 thumbnail is marked on the top right with a small capital A. This is InDesign's way of telling us that the A-Master page has been applied to page 1 of your document.
Select File > Document Setup and change the number of pages to four. What master page is applied to the new pages you added? Since we only have one default master page called A-Master, it is safe to conclude that this is the master applied. You can corroborate this by observing the A prefix on the thumbnails of the added pages.
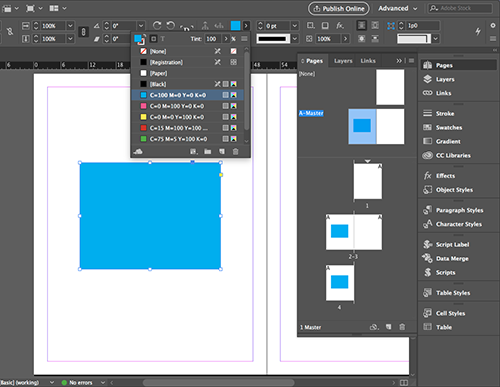
Double-click "A-Master" in the Pages panel to navigate to this master. In theory, anything you draw on this master will be projected on any document page where this master is applied. Use the Rectangle tool  to draw a square in the middle of the left page. Fill it with 100% magenta by selecting it with the Selection tool and changing its fill color chip in the Swatches panel or the Control panel. What happens? The object has magically appeared on pages 2 and 4. That said, it might seem curious that the magenta rectangle only appears on even numbered pages. There’s a very good reason for this. If you look closely you will find that master page "A" is made up of two pages, a left and a right one. Hence, anything we draw on the left page will only show up on even pages, and anything we draw on the right will appear on odd ones. (This would not be the case had we chosen to deselect the facing pages attribute when we first created the new document.)
 |
Any object you place or draw on a master will be reflected on any page where the master is applied. |
Now navigate to page 2. What happens when you try to select the magenta frame? That's right, you can't! Master page items you see on document pages are locked and can't be edited outside of the master. InDesign visually informs you of this by surrounding master page items with a dotted line. That said, go back to the master page and change the object's fill to 100% cyan.
 |
Ideally, you should not modify master page items outside of their normal habitat, which is to say, outside of the master page. |
Overriding Master Page Items
There are times that you will need to override master page elements on a specific page, and by override, I mean change them or modify them in some way. For example, you might have cyan boxes on each page of a brochure, but need to change one on the second page to magenta to highlight an extremely important piece of information.
For that, we can temporarily override the default behavior by using the very special Override All Master Page Items command, found under the Pages panel flyout menu. As the name states, this command will override all master page items, unlocking them and making them completely editable outside of the master.
Try this out by selecting page 2 in the Pages panel. Then choose Override All Master Page Items from the flyout menu. You should be able to edit the cyan box on page 2 now. Any other master page item on this page would also be editable because we have chosen to override all (master) items.
So, yes, this is one method, but the whole purpose of master page items is that you don't accidentally alter them somehow. Let's try something different. Undo your actions (Ctrl/Command-Z) so the box goes back to its non-editable state with the dotted line border.

I prefer a keyboard shortcut method that allows me to override a specific master page item instead of all master page items. The trick is to press Ctrl-Shift (Windows) or Command-Shift (Mac) and click the object you want to override.
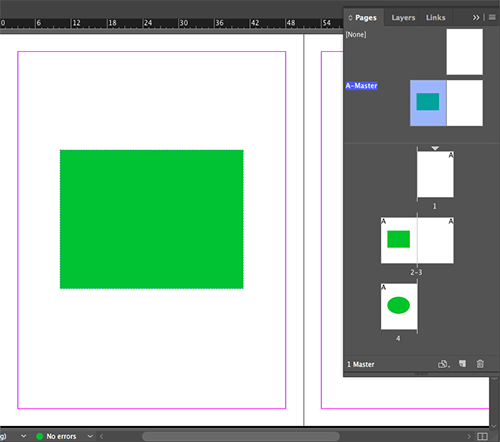
Try it out now by going to page 4. Ctrl/Command-Shift-click the cyan box and convert it to an ellipse (Object > Convert Shape > Ellipse). Notice that none of the other boxes in the document have changed to an ellipse, just the one you overrode. And because you overrode just a specific item, no other master items on this page would be editable.
It is interesting to note that even after you override a master item there's still a relationship between it and its master. It seems that emotional ties are the hardest to break and this may include master page items. Let me show you what I mean:
Navigate to the A-Master page, then change the frame's fill color from cyan to green. Observe that the frame has changed to green in all of the document pages where the master is applied, including the master page item that has the override.
 |
The master page item on page 2 still holds a bond with its master. |
To bring this relationship to a complete closure, further actions need to be taken. Select the ellipse on page 4. Then go to the flyout menu and choose Master Pages > Detach Selection from Master.
From this point on, the link between the two is completely broken. It's a sad ending to a beautiful relationship.
Parent-Child Master Pages
Here's another relationship for you, the parent and child relationship. In this analogy, the child will inherit some common traits from his parents. Likewise you can base one master page on another.
Imagine a catalog with the same general layout on all pages: a colorful header, contact info in the footer, and a large text frame. Now imagine you need a couple of price list pages. You want that same footer and contact info, but instead of a large text frame, you want a table. You'd create a new price list master page based on your original master page, but with a change to the text frame.
Please follow along in the document you've been using as I demonstrate this in the next steps:
 |
|
 |
| |
-
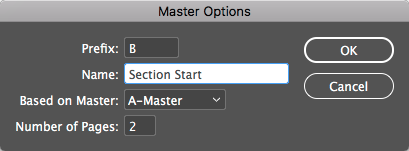
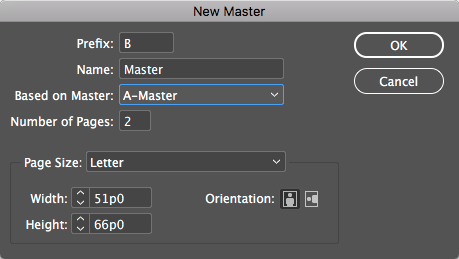
From the Pages panel flyout menu, select New Master to create a new master page.
-
Observe that in the New Master dialog you can name your new master page and base it on another master page. This option determines whether the master you're creating will be a parent or a child master. To create a child master select A-Master from the "Based on Master" dropdown menu.
-
Leave everything else with the default settings.
|
|
 |
|
 |
You now have two master pages named A-Master and B-Master, and the B-Master you just created is identical to the A-Master. B-Master has inherited all of the objects from A-Master. Of course, I realize that speaking hypothetically is not the easiest way to learn this stuff, so let's put it to good use.
In the next steps you will create the folio of a preliminary draft for a trip planner. Note that these techniques can be applied to any multi-page document. While the design itself is not nailed down, we will focus on setting up the folio. Here the term folio is used to define the area where the page number should be in a publication.
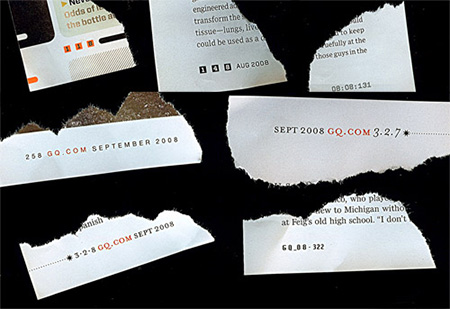 |
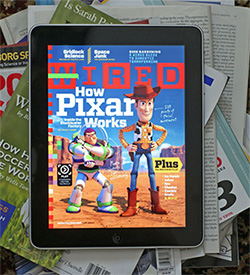
Even the humble folio can be a design opportunity, as you can see here in these folios from GQ and Wired, and as the designer who collected these and took this photo—Jandos Rothstein— discusses amusingly on foliomag.com. |
Because the folio is a repeating element, it is an excellent candidate for a master page element. Furthermore, there will be cases in which we will have the folio accompany other repeating elements, but these will vary. We will create parent and child masters to make the task easier to manage. Here are our steps:
|
|
|
| |
-
Double-click A-Master in the Pages panel.
-
Delete the green frame and, on that same page, draw a text frame with the Type tool that extends from the bottom left to the right. Make sure to stay within the margin guides.
-
Your text cursor should be inserted in the new frame. Go to the Type menu and select Insert Special Characters > Markers > Current Page Number. This command, as you might guess, will insert an automatic page number. On the master page, you'll see the our master page prefix ("A") as a placeholder.
-
Select the text with the Type tool active, and on the paragraph formatting controls on the Control panel, select the "Align away from spine" button.
 . .
-
Copy and paste the text frame to position a copy on the facing page.
-
Navigate to page 2 and observe that InDesign displays the correct page number, as you can see in the screenshot below:
|
|
|
|
|
With the folio now complete, you'll design a section header next. According to the art director, each section will begin with a wide colored strip at the top and a different image. Each section will have a different color, a design decision often made for lengthy documents with various categories of information.
Since we already have a master with the folio, all we need to do is to create a child master with the section header elements, and we'll do this next:
|
|
|
| |
-
Navigate to B-Master in the Pages panel. Observe that this page also has the folio. This is a direct result of the fact that when you created the master you chose to base it on A-Master.
-
Draw two rectangular frames (one on each page) at the top. Fill them with red using the fill color chip on the Swatches panel or the Control panel.
-
Draw two rectangular frames at the top right of each page, and fill them with paper (white). This is where the images will be placed. (The image frames are empty because the images will be different every time.)
-
Before we go on any further, we need to change the name of these masters to something a bit more descriptive and useful. With B-Master selected, choose "Master Options for B-Master" from the Pages panel flyout menu. (If this option is grayed out, double click the name B-Master in the pages panel.) Change the name of B-Master to "Section Start," but leave the prefix as "B." Do the same with A-Master and name it "Folio."
|
|
|
|
|
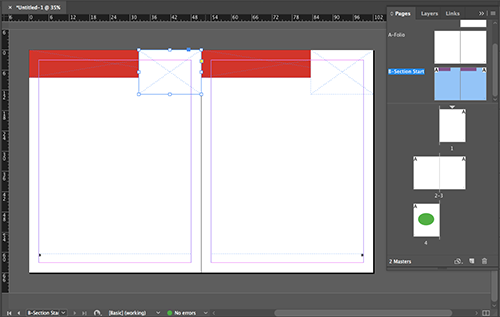 |
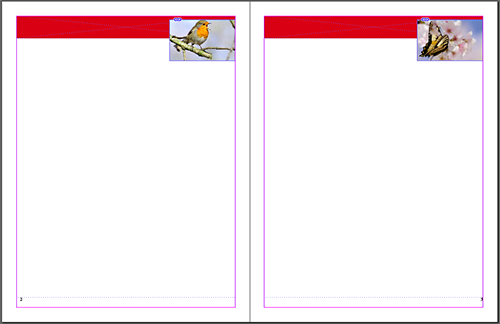
Here is what your document should look like with the "B-Section Start" master page complete. Click the image for a closer look. |
You will notice that although you created the master page, your document still looks the same. The reason for this is that you haven't applied the "B-Section Start" master to any document pages.
As you can see from the video, applying master pages is pretty intuitive. Here's a recap of the different techniques:
|
|
|
| |
- The easiest way to apply a master page is to open the Pages panel, click and drag a master page thumbnail over a regular document page thumbnail, and release your mouse button. Make sure your master pages line up with your document pages: drag a left-facing master over a left-facing page, a right over a right, and so on.
- Another way to apply master pages is to double-click a document page thumbnail in the Pages panel. Make sure both document pages are selected if you want to apply the master to the whole spread. Then, Alt (PC) or Option (Mac) click the name of the master page you want to apply.
- And the last way to apply a master page is to use the Pages panel flyout menu. From the flyout menu, select Apply Master to Pages. In the dialog, specify which master page you want to apply and to which pages. You can enter a range ("1-7", for example) or a specific series ("1,7" for just pages 1 and 7, for example).
|
|
|
|
|
Images and Master Pages
Now that we know how to apply master pages, we're going to learn how to load up our master page image frames with the images we want. Download your Lecture Five files and open the master_pages.indd or masterpages.idml file.
First, use this document to check your work: make sure that your master pages match up with mine. Next, observe that I have applied the "B-Section Start" master to pages 2 and 3, and again to pages 6 and 7.
You will also note that although we have image frames ready to be use, we can't really move them or edit them in these pages because they're master items. In order to place images, do we need to override or detach them first? This is a good question that is easily answered by doing a simple exercise. Take a look:
|
|
|
| |
- Navigate to pages 2 and 3.
- Select File > Place to pick images to place into the frame. Select any four JPEG images in the Links folder of your Lecture Four downloads. These four images will be loaded into your "Place gun," which as you learned in Lecture Three, allows you to preview the loaded files even before you place them on the page.
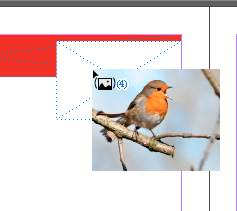 With your Place gun ready to go, hover over the first image frame on page 2. Notice any change in the appearance of your Place gun pointer? With your Place gun ready to go, hover over the first image frame on page 2. Notice any change in the appearance of your Place gun pointer?
The change is a little subtle but very specific. The parentheses around the icon tell you that InDesign has discovered a frame underneath the pointer and wants to know if it may place the file there. Click to give InDesign its answer: yes, place the image there!
- Place all four images in the image frames on pages 2, 3, 6, and 7. Resize the placed images as needed. Feel free to look back at Lecture Three for a quick refresher on how to transform images. When you're done, your pages should look something like pages 2 and 3 below:
|
|
|
|
|
The time that you've spent preparing these master pages is time well spent as it will significantly speed up production work, and will allow you to layout pages quickly. Now that you've "mastered" this topic, it's time to get serious with document page management.
Mastering master pages is key when it comes to keeping track of elements that appear throughout our document. But you'll often find that pages come in all shapes and sizes, even within the same project. Not everything will stick to the master page template. That's why it's important to have a good handle on InDesign's tools for managing document pages.
Often you will find that you need to design documents with different page sizes, or you may find that the content changes and you need to reshuffle pages around to comply with new client/editor requirements. In such cases you will need to manage documents efficiently and be able to change them on the fly: customizing page sizes, moving and duplicating pages, and labeling pages.
Custom Page Sizes
Imagine you were commissioned to do a major brand redesign. One great way to present a complete brand identity revamping is through a stationery kit. A stationery kit gives the designer the opportunity to show how their ideas would spread across a variety of scenarios while keeping the brand identity unified.
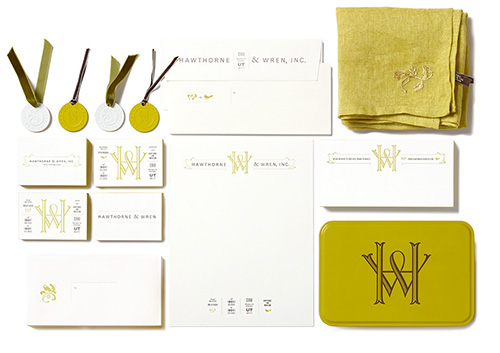 |
Kevin Cantrell's stationery kit design for Hawthorne & Wren, a company specializing in lifestyle gifts, does a great job presenting a regally understated identity in different document scenarios, including a few fun surprises like pendants and towels. |
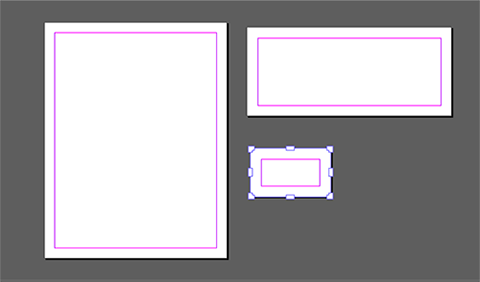
In a basic stationery kit design, you would present your proposals for various document sizes, typically a piece of letterhead, an envelope front, and a business card. These items need to have a cohesive look and contain the important details (like contact information) that the user will need.
One great way to accomplish this cohesive look is to create a single InDesign document with three different page sizes, one for each piece of the stationery kit. By having just one document, you could work more efficiently as you have fewer items to manage, and most importantly, you could very easily share common elements between pieces. Thus this is a great example of why you need to have a handle on document page management techniques. Let's take a look at how you would go about setting it up.
|
Note that Facing Pages is turned off for the three page document that we'll make for our stationery kit. |
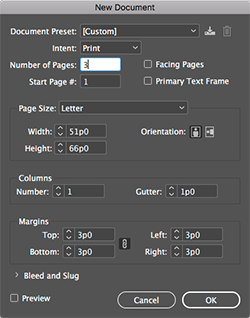
Go to File > New > Document and create a new three page document. Use the "Print" intent and deselect the Facing Pages option.
This document will be for print, which explains the intent, but why do we want to turn off facing pages? Well, since our pages won't be bound together—like they would in a book or magazine—we don't want InDesign to configure them facing each other.
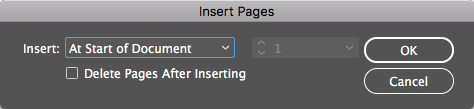
We're going to have three different page sizes: one size for the letterhead, another for the envelope, and one last one for the business card. InDesign will not let you specify different page sizes at the start of a document, so let's start with a simple letter size document (which takes care of the letterhead) and go from there. Select Letter for your page size in the New Document dialog, and click OK to create the new document.
Now, with our new document created, click the second page in the Pages panel. Then click the Edit Page Size button  at the bottom of the panel. Unfortunately, we don't have an envelope preset, but we can fix this by adding a custom size.
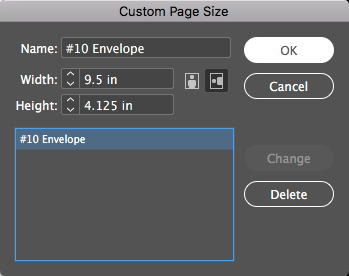
Select Custom, and in the Custom Page Size dialog, enter "#10 Envelope" for the preset name. Enter "9.5 in" for the width (remember that typing "in" will let InDesign know you want to use inches and not picas) and "4.125 in" for the height. Click the Add button to add the preset, and click OK to accept the modifications. Your dialog should end up looking like this:
Finally, we need to add a business card-sized page. We'll take this opportunity to learn how to do what we just did with our handy Control panel. First, select the Page tool from the Tools panel  , then select page 3 in the Pages panel. Now the Control panel presents you with options that will allow you to modify the page size, orientation, and more.
 |
The Control panel page options allow quick, easy, and robust control over sizes, orientations, and rules. Click the image above to get a closer look. |
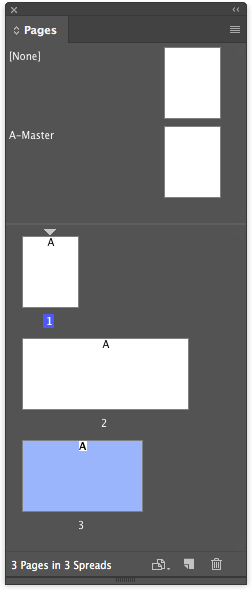
For width and height, enter 3.75 and 2.25 inches respectively. (Don’t forget to add the abbreviation “in” if your units of measurement are set to anything other than inches.) Also, make sure the orientation is horizontal. You will see your changes reflected on the workspace and in the Pages panel, where you can see all three of your differently sized pages together:
Now that you know the basics of setting up custom page sizes in a single document, I’m going to share a tip that will let you use the Page tool to further control the layout of your stationery kit:
|
|
|
| |
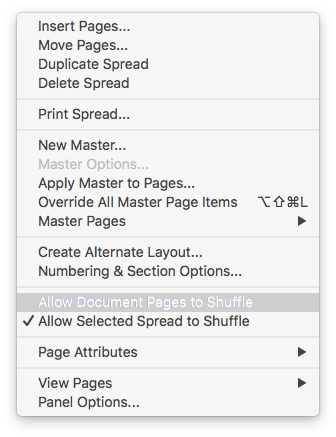
- Select “Allow Document Pages to Shuffle” under the Pages panel flyout menu.
- Still in the Pages panel, drag the page 2 thumbnail, and position it precisely next to the page 1 thumbnail. Only let go when you see a vertical line between the two thumbnails as shown in the figure below.
- Repeat the process with page 3.
|
|
|
|
|
After the previous steps, you should now have all three pages next to each other in the Pages panel.
We will now use the Page tool for presentation purposes.
|
|
|
| |
- Zoom out until you can see all three pages in your document window.
- With the Page tool selected, move the pages and arrange them as needed.
- Repeat the process with page 3.
|
|
|
|
|
Of course, your work has only just begun: you would still need to design the stationery kit itself! However, you have laid the foundation for this design. You can even reuse this document as a template. So go ahead and save it and store it away for your future stationery kit design jobs. Now that you've learned how to manage pages of customized sizes within the same document, let's move on to moving and duplicating pages.