
When I draw in Illustrator, I prefer to work in black and white initially and add color later. As such, I started with a white fill and a black stroke.
I also set my stroke weight to 2 pixels in the Stroke panel and clicked the Align Stroke to Outside option.
With all the preliminaries out of the way, I started with the robot's head which is simply a rounded rectangle.
Before I moved on to other body parts, I added in some color to give the head some depth. I drew a slightly smaller rounded rectangle that I filled with a shading color. I positioned this shape in the lower right of the original rounded rectangle as seen below. Notice there is no stroke on this second shape.

For the "surface" color of the robot, I made a copy of the smaller rounded rectangle (Ctrl+C or Command+C on Mac) and pasted it directly over the original using Edit > Paste in Front or Ctrl+F (Command+F on Mac). I chose a lighter shade of turquoise and modified the shape using the bounding box handles, as shown in the animation below.
With that set, I added in some eyes using the Ellipse tool. I set the fill to the same color as the surface color and set the stroke to black. On top of this circle, I drew a smaller white circle and positioned as shown.
I added in another circle. This time with a fill of black. Here's what we have so far.

The next feature I gave the robot was a mouth. I think he'd like to communicate this way rather than just pointing. The mouth is another rounded rectangle that features a gradient fill. Over this, I drew six vertical lines with the Line Segment tool.
Next, I gave the robot some ears made out of circles. I positioned the shapes, selected them and sent them to the bottom of the stacking order by right-clicking (Control-clicking on a Mac), selecting Arrange and then Send to Back. Notice the difference in the animation below.

I finished off the head by adding in a few more details such as an antenna. A close-up of this shows it's just a few lines and a circle.
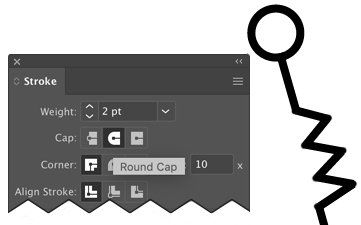
Admittedly, the lines look a bit disconnected and rough. To fix this, I selected the lines and clicked the Round Cap icon in the Stroke panel. This rounds the ends of the lines.
After completing the head, I drew the neck and torso of the robot. I used the same shading technique on the torso as I used on the head.
I added in some details on the torso using basic tools such as the Ellipse tool, Rectangle tool, and Line Segment tool.
Here's a closer look at how some of the details were made:
Time for the arms. I used much of the same tools on these body parts as I used for the torso details.
To create the shoulders, I drew a circle that I filled with the shading color. I then created a copy of the circle and removed the stroke and changed the fill to the lighter surface color. I resized the lighter circle and positioned it over the original as shown in the animation below.
One part of the arms you may be wondering about is the robot's left hand. To make that, I drew a five-sided polygon (with the Polygon tool, of course) and stretched it using the shape's bounding box. As for the highlight and shadow, I drew a rectangle and modified it with the Direct Selection tool to fit the contour of the hand. We haven't discussed direct selection yet (we will in Lecture Two), but you're welcome to experiment with it now.
One key point to remember when using the Direct Selection tool is that you want to have your shape unselected first and then click an anchor point with the tool. This ensures just one point is selected. The animation below provides insight into this.
To complete the robot, I added in the legs. The same techniques and tools that I used for the arms and torso details were used here, which I think you'll recognize.

Thank you for participating in this tutorial. Please close the window to return to the exercise.