
Project Goals
- Design an advertisement for a bus, van, or truck with specific focus on typography.
- Use Illustrator's various type tools to set the ad copy.
- Employ a clipping mask to constrain the ad design to the exact bus shape.

Notice the masking used in this airline ad, obscuring some of the type. Also notice the alignment, color, and size choices the designer made.
You have gotten a taste of the many tools and commands that Illustrator offers with regard to working with text. Using type in a design can be a simple way to add information or it can be an art form in itself. Illustrator provides the capabilities, type designers provide the fonts, but it's up to you to provide the creativity.
As with all design projects, you are tasked with working within specific design constraints, especially when it comes to text.
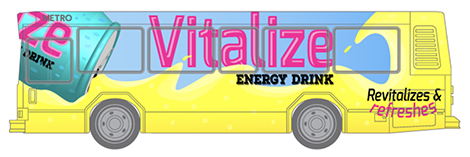
In this exercise, you will create an advertisement that appears on the side of a bus, van, or truck. Given that this ad is on the move, you need to think about how your design can have impact, entice potential customers and, most importantly, communicate effectively.
Note
Exercises will be evaluated for understanding of course concepts.
An ad that covers the side of a vehicle is known as a "wrap" in the industry. Check examples of such ads using Google Images with search terms such as van wrap, bus wrap, car wrap, ad wrap, and truck wrap.
On offer are three vehicle templates to choose from. See the Creating Your File section below for access. Each vehicle has different dimensions to display your work in. Instructions are included within each template to help you get your design applied correctly, how to make some small customizations to the vehicles, as well as with how to save your work.

The text you will work with can be found below. You have a choice of three businesses, each has a name, some descriptive text and a tagline. Your ad design must include the business name and secondary descriptive text to give context to the business. The tagline is optional.
HealthCheck Plus
Urgent Care Clinics
"Excellence. Every Day in Every Way."
SeaLife Adventure Park
Aquarium & Water Park
"It's a World of Adventures."
Universal Logistics
Package Delivery
"Future Delivered on Time"
You're free to create your own business to advertise rather than use one of the above examples. Come up with a name, descriptive text and an optional tagline.

You must ensure that you make use of various type tools or features you learned about in the lecture. Note that it's not necessary to use any graphics in your ad. If you go the all-text route, the design needs to be creative and compelling.
The biggest challenge in this exercise is to communicate your messaging quickly and clearly. Take into account that the ad would not be static, it's going to be moving through city streets. The ad must have impact so that people first notice it and it must be clear enough that they can also read and understand it.
Below are some bullet points to keep in mind as you develop and design.
Since Illustrator is a vector software app, you are highly encouraged to create all of your text and graphics in the program. If you use any pixel/raster based images, limit usage to no more than 25% of your overall design.
Refresh your memory on Illustrator's range of type tools with the following Review Kit:
If you have questions before uploading your work for grading, use the Inbox feature to get in touch with your instructor.
Choose a provided template file and open it in Illustrator. Follow the instructions provided within.
Important: In all Sessions courses, plagiarism is not tolerated. Plagiarism is the act of taking someone else's work and passing it off as your own even if it's only part of a larger design you are working on. Your ideas, inspiration, and creativity should be the primary focus of your work.
You are free to take inspiration from the work of others and create a design based off of that but copying directly from another source or designer is strictly prohibited. It should be understood that any plagiarized work will receive a grade of zero and you may be subject to disciplinary action as detailed in the Student Handbook.
Please consult with your advisor if you have any questions as to what constitutes plagiarism.
Back to Top
What your instructor is looking for:
If you have a question before sending your completed exercise for grading, send a message through Canvas to contact your instructor.
Back to TopI look forward to seeing your work!