
Project Goals
- Design two album covers using advanced selection, organization, and drawing tools.
- Provide consistency between the two covers as well as elements unique to each.
- Optional: Add typography to the cover designs.

Lecture 2 covered a number of freeform drawing tools from the pencil to the paintbrush. In addition, you became familiar with drawing aids that allow you to work more smoothly and precisely, such as the Direct Selection Tool, Guides and Layers.
You will combine these techniques with your knowledge of drawing tools from Lecture 1 to create two album cover designs that show a strong relationship to one another. You are free to choose the genre of music to portray on your covers. Each cover must be unique but they should share something in common that makes them unmistakably part of a series. A consumer should be able to see this relationship between the two covers.
You have already learned everything you need to put these together, so now you can practice what you've learned and get creative.
A music company has tasked you with designing two illustrated album covers for an upcoming compilation release. The client requires that the covers show a relationship to one another as they may want to release additional albums as part of this series. Perhaps you're using a common (but noticeable) visual element in each cover or using the same layout or it could be both or more.
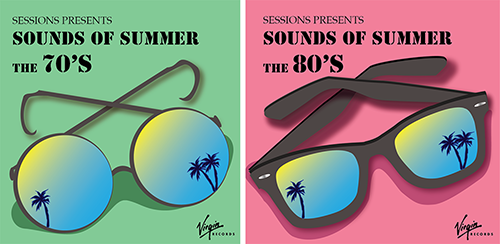
The connection is clear in these designs. The subject matter, theme, design style and choice of typefaces all make for cohesive covers. Designs by Sessions student Ilona Karme.
By creating two distinct but somewhat related covers, you demonstrate your ability to adhere to design standards while also letting loose your creativity—a quality that potential clients and employers will value.
These are meant to be illustrated covers, so use a mix of freeform drawing tools as well as brushes. Bear in mind that you can also use basic shapes and line shapes from Lecture 1 in these covers. If you want to make them look hand-drawn, apply brushes to the strokes or draw brush shapes within them. The imagery you evoke with these designs can range from smooth and sultry to bright and brassy—the choice is yours.
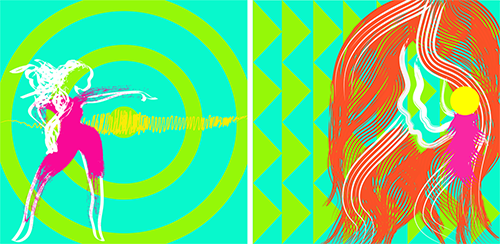
The vibrant colors, theme and similar brushes unite these covers as a series. Designs by Sessions student Valerie Aguayo.
As this is a vector basics course, you are to create your images entirely within Illustrator. If you use any pixel/raster-based imagery, you risk a reduction in grade for your assignment.
For ideas and inspiration, check out the web sites for record companies in the genre of your choice, or use Amazon.com to look up album covers. Both Spotify and iTunes feature covers to look over. Another good spot is the reviews section of Pitchfork.com.

A space theme, similar look and angled bar create cohesion in these cover designs. While a little tough to see, brushes are used to create pinpoint stars in the background as well as around the rocket's engine exhaust. Designs by Sessions student Kevin Enge.
Text in your covers isn't necessary as typography isn't discussed until Lecture 5. If, however, you wish to make the album titles and integral part of your covers or simply feel the covers are lacking, skip ahead to Lecture 5 for an overview.
Need to refresh your memory on freeform drawing (and the inevitable erasing) in Illustrator? Check out this Review Kit:
If you have questions before uploading your work for grading, use the Inbox feature to get in touch with your instructor.
When you're ready to start working in Illustrator, create a new document (File > New) that uses pixel as the unit of measurement. For width and height, use 700 px. As you'll be designing two covers, set the number of Artboards to 2. Be sure to name your file here or when you save it.
Important: In all Sessions courses, plagiarism is not tolerated. Plagiarism is the act of taking someone else's work and passing it off as your own even if it's only part of a larger design you are working on. Your ideas, inspiration, and creativity should be the primary focus of your work.
You are free to take inspiration from the work of others and create a design based off of that but copying directly from another source or designer is strictly prohibited. It should be understood that any plagiarized work will receive a grade of zero and you may be subject to disciplinary action as detailed in the Student Handbook.
Please consult with your advisor if you have any questions as to what constitutes plagiarism.
What your instructor is looking for:
If you have a question before sending your completed exercise for grading, send a message through Canvas to contact your instructor.
Back to TopI look forward to seeing your work!