Changing a Symbol's "DNA"
Let's turn to biology for our next metaphor. In the previous little
experiment, what you did was essentially "clone" the original symbol
into many instances, and then you made some external changes. Say you
had
identical twins—this is the equivalent of dying one's hair red. The
change is external, but the internal DNA is unchanged.
Unlike real-life biology, in Flash it's a snap to go in and change a symbol's DNA. To do this, you need to get "inside" of the symbol, which you can do in the following ways:
 |
|
 |
| |
- Double-click on an instance onstage.
- Right-click (Control-click on a Mac) on an instance and select Edit
in Place.
- Double-click on the master symbol in the Library.
|
|
 |
|
 |
All three of these will do the same thing: Put you inside the
movie clip master symbol. You can tell you're inside the MC when you
see the dot pattern rather than the blue rectangle around the outside
of
the
MC.
If you're
editing a symbol onstage (in place), you'll see the other Stage content
outside of the MC is faded back so that
you can clearly see the content of the symbol you're working on.
Also,
at the top left, you'll see a wayfinding tab that
shows your current location:
 |
Wayfinding information is at the top left of the Stage. |
Also, note that each movie clip has its own Timeline and layers, which
act independently of the main Timeline. This is tremendously important,
and understanding this will be very important to your future Flash
projects! We will cover this in much more detail later.
Now, select your shape's fill, and do something to change it (remove
it, change the color, whatever strikes your fancy), and you'll see
that every instance
of the symbol will change, because you've changed the internal DNA
of the symbol! (To get back out to the main stage, click "Scene
1" in the wayfinding tab.)
Nesting Movie Clips
Now, let's get back to creating the rest of our smiley face—you've
probably been doing all sorts of crazy stuff on the Stage, so it's
time to get back to the core task, and cut out the confusion—literally.
If you haven't already, go back to the main Timeline by clicking on "Scene 1" in the wayfinding
tab (in the upper left). Now select everything with Ctrl+A or by drag-selecting
all of the instances onstage and then hit the Delete key to clear
the
Stage. Don't worry, you still have the symbol in the Library to work
with! You just deleted the instances.
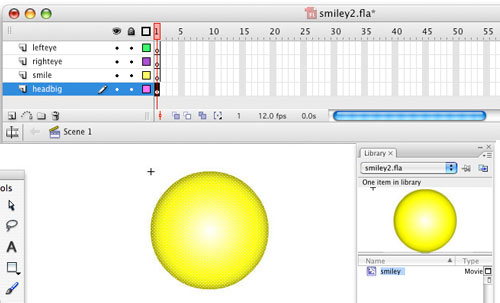
Now, double-click on the "Smiley" symbol in the Library
to add the rest of its features like you did in the first exercise
(every part on its own layer), matching my Timeline in the graphic
above. Go ahead and make three new layers. Making new layers is as
simple as clicking the little page icon on the Timeline. Double click
the layer names to rename them "left
eye," "right
eye," and "mouth." Name the first layer with the circle, "head."
To draw the mouth, here's a quick trick. Select the Oval tool,
with no fill selected (diagonal red slash) and a black line. Draw an
oval and then click away from it to deselect it. (Remember
to turn off Object Drawing in Flash 8 and CS3 as you did in Exercise
One.) Then use the Selection tool (black arrow) to drag-select the
top half
of
the
oval. Lock the head
layer, so you don't accidentally delete part of it. To do this, click
the dot below the lock icon next to the layer name on the Timeline.
Click again to unlock.
Once you've got
the top half of the oval shape selected, hit the Delete key to remove
it, and voila, a smile! (You can use the Free Transform tool or
other
transform tools to edit this shape to get it the way you like it.)
After you've done this, lock the "mouth" layer, and select
the Oval tool to draw the eyes (you can use whatever line and fill
you
wish). Here, I'll show you another way to take advantage of symbols...
Normally, you would draw the eyes as two separate shapes, and since eyes are normally symmetrical, you'd have to work to get the two shapes to look identical.
However, with symbols, you just need to draw one eye and turn it into
another movie clip by hitting F8 (don't forget to name the symbol "eye"
when you create it). Then, select the eye instance onstage, and hit
Ctrl+C
to copy it, select the "right eye" layer, and hit Ctrl+V
to paste it on to the right eye layer. (Copy and Past are also found
in the Edit menu.) You could drag an instance of the eye from the
Library, but copy and pasting
is a
much
faster
way to create instances, so practice it!
Notice one of Flash's key features here—inside the "Smiley" symbol,
you've placed instances of the eye symbol. These are called nested
movie clips. Double-click on an eye instance inside the Smiley
movie clip and notice the wayfinding line—you're now inside
two movie clips, and are two levels away from the main Timeline. This
is going
to play a big role in your future, so keep it in mind!
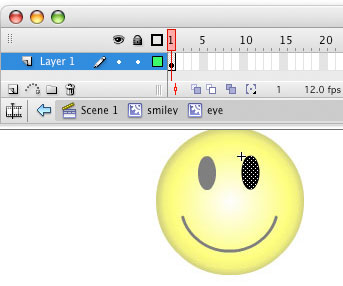 |
The wayfinding info shows the eye is a nested movie clip. |
Once you've done this, your Smiley is done. You've completed an entire
movie clip, with multiple layers and nested movie clips. Much more
than just a graphic, your smiley MC can be used to create multiple
instances onstage with no memory penalty. You have many additional
options for making changes to the individual instances, or you can
make a global change to affect the DNA
of all the instances simultaneously—that's the power of Movie
Clips!
Duplicating and Reusing Symbols
You want to get in the habit of duplicating your symbols where you
can so that you greatly reduce the overall file size of your Flash
documents. So let's take Mr. Smiley on a trip to the country
and take our newfound knowledge of creating and duplicating symbols
for
a test
drive.
 |
Mr. Smiley against a pastoral backdrop. This scene is created using many duplicate symbols. |
In the
course download area you fill find a Mr. Smiley (smileyscene.fla) complete
with torso and
chapeau. You'll also find the beginnings of a scene: a hill, cloud,
flower, plane, and rainbow.
What you'll want to do is take these symbols and duplicate and resize
them so that they create a complete scene like the one shown above.
So, try it out right now...
First create a new layer (Insert > Timeline > Layer)
and name it "Hills." Cut (Ctrl+X) and paste in place (Shift+Ctrl+V)
the hill symbol into that layer and continue to paste duplicates
of it
into
that
layer
as well. In the above example there are three hill
symbols.
Now you'll want to add visual variation to the hills so they don't all look the same.
 |
Here
is the hill symbol duplicated three times with the tint and
scale modifications. You'll notice here that the hill layers
are currently above the others—to get the hills to the
back, drag your layer names into the order you want.
|
You can scale the hills to different heights and widths so that there
is some visual difference. Or you can change the tint of each slightly.
For a sense of perspective, you may want the hills in the foreground
to be a lighter green and the hills in the background to be darker.
Click on each hill symbol and in the Properties panel
go to Color and choose Tint, then
give it a percentage of green (or whatever color you like) until you
have a variation on color.
Finally, you can horizontally flip the hill symbols
so that they reflect each other. Do this by selecting a hill and going
to Modify > Transform > Flip Horizontal.
In the example above, hill symbol 2 has been flipped horizontal so
that it faces the other two hills.
Next you'll want to take a similar approach with the clouds and flowers.
Cut and paste each original symbol into its own layer. Create duplicates
and then modify the duplicates using Scale, Tint, and Flip Horizontal
(or Flip Vertical in the instance of the clouds).
Once you are done adjusting your symbols, take the rainbow and
put it on its own layer below the cloud layer. And take the plane
symbol and put it on its own layer as well. Later on in the course
you may want to try and animate your plane so that it goes
across the sky—the sky is the limit!
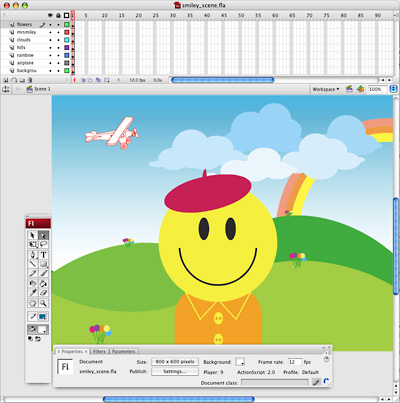 |
Here is the final movie with layers for each aspect of the scene. |
In this lesson, you've received an introduction to one of Flash's
key elements, and the most used symbols, which are movie clips.
In the following exercise, you will put the power of symbols to work
by building a cityscape that uses movie clips as reusable building
blocks. It's something for you to keep in mind for the future: Symbols,
especially movie clips, are the "building blocks" of Flash design!