Dreamweaver | Templates and Libraries


Templates and Libraries

Machines are supposed to automate work processes, make life more convenient, and reduce human error. Software programs (the best ones) have the same goal: to free us from the drudgery of repetitive tasks.

Ready to be liberated? In Dreamweaver, templates and libraries are the workflow automation tools that bring big projects to a speedy conclusion.

Templates make it possible to create numerous pages based on a common design. Libraries allow you to quickly update information that appears throughout a Web site, like copyright notices, tag lines, sponsorship listings, and business phone numbers.

In addition to smoothing your personal workflow, Dreamweaver offers a number of methods to manage collaborative work and team projects. To finish up this lesson, we will be taking a look at site synchronization and file check-in/check-out.

CC Users: Templates and libraries function the same way in Dreamweaver CC as Dreamweaver CS6, so you should be able to follow along in these sections. Contact your instructor if you have any questions.

In this lecture, you can expect to:

Discover how templates are created.
Learn how to update template-based pages.
Work with repeating and optional regions.
Discover how Library items are created and used.
Explore various ways to collaborate with other workers through Dreamweaver file management.


The trick to mastering templates in Dreamweaver is to think out your process ahead of time.


You do not have to create the Templates folder; Dreamweaver will do this for you.


Do not move .dwt files out of the Templates folder.


Using Templates


Here's an all-too-common Web design scenario. You spent weeks creating a gorgeous Web site for your new employer. Now, the work has become somewhat repetitive. Text here, graphics there. Sigh! When is lunch again?

And it's too bad you have all this grunt work to do because there's a new project you want to design. So how can you hurry through your tasks as quickly as possible? By developing templates for similar page layouts.

In this lesson, you'll get some hands-on experience using templates. Here's the scenario:


Your friend Mark is a dive master in Costa Rica. He wants to publish a series of essays featuring dive sites in Central America. There could be more than 30 all together. No problem—you can use templates to publish any number of pages.


Download the scuba folder from the course downloads. Define a new site in Dreamweaver (Site > New Site) and select the "scuba" folder as the local site folder. You don't need to fill out the server info. Just define the local info for this practice project.

Planning Your Page Layout

Start with a basic layout for the essay pages. Open essay.html.

First, identify the global elements that will appear on every page: the top banner, the navigation bar with the link to HOME, and Mark's email address.

The global elements are highlighted in red; these elements will appear on every page of the site.

Then, identify the editable content that will change on each page: the essay title, content, photos, and captions.

The areas highlighted in pink will change on each page.

Creating a New Template

Ready to convert this layout into a template? Go to File > Save As Template.

When the Save as Template dialog pops up, choose the "scuba" site from the Site dropdown to make sure the template is saved in the correct site.

Name this template "essay" (lowercase letters, no spaces). Dreamweaver will add the extension.

Entering a description of the template is optional, but it could be helpful if you are using several different templates.

When you click Save, Dreamweaver goes to work. A Templates directory is created inside your local site folder. The essays.html page is converted into template format and copied into the Templates directory. A dialog pops up asking you whether you want to update links. Click Yes.

After the dust has settled, you'll see a few changes in your workspace. The document is now titled essay.dwt.

Notice the new Templates directory in your local site folder, listed in the Files panel. It contains the essay.dwt template file.

Dreamweaver keeps all template files in the Templates directory.

The original essay.html file remains in your scuba folder. Dreamweaver created a copy before converting to template format, keeping the original HTML page intact in case you need it later.

Creating Editable Regions

Start by defining the editable page areas, known in Dreamweaver as editable regions.

1. Select "Insert title here," then click the <h1> tag using the Tag selector in the lower-right corner of the document window (this ensures that you have selected the entire h1 tag). Go to Insert > Template Objects > Editable Region.

In the New Editable Region dialog, name the region "essay title" and click OK.

Give each editable region a clear name, so you know what goes where.

Your new editable region will be highlighted. The name appears in a tab on top. If you don't see the editable region tag, choose View > Visual Aids > Invisible Elements.

By default, the Editable Region tabs are teal. If you want to change the color, choose the Highlighting category in your Preferences panel.

2. Select both paragraphs of greek text and choose Insert > Template Objects > Editable Region. Name this region "essay".

3. The photo is next. Select the image placeholder, choose Insert > Template Objects > Editable Region, and name the region "photo".

4. One more region: the caption under the photo. Select the small line of text that reads "caption", then click the <p> tag in the Tag selector to make sure you've selected the entire paragraph. Choose Insert > Template Objects > Editable Region, naming the region "caption".

That's it! Go to File > Save to save your changes.

If an alert message pops up about block tags, click OK.

The block tag alert is telling you that the editable region is inserted within a <h1> block tag. It looks like this in the code:

<h1><!-- TemplateBeginEditable name="EditRegion3" -->Insert 
title here<!-- TemplateEndEditable --></h1>

If you create an HTML page based on this template, you'll only be able to enter one line of text inside this editable region. It is not valid to insert a block tag (like a header or paragraph) inside another block tag.

To prevent this type of error message, be careful to select the entire <h1> tag before you add the editable region. The code should look like this:

<!-- TemplateBeginEditable name="essay" --><h1>Insert 
title here</h1><!-- TemplateEndEditable -->

Here, the editable region tags are outside the <h1> tags. You will be able to insert additional block tags within this area.

If you select the block element correctly before applying the editable region, you won't get the block tag alert. But if this problem does turn up, just switch to the Code view to manually reverse the tag order, so the block tag is inside the editable region.


Click the Editable Region tab to quickly select all its content.


Creating a Child Page

Now that the template is finished, you are ready to create your first template-based HTML page. Pages based on a template are called child files.

Open the Assets panel (Window > Assets) and click the Templates icon on the left. The essay template should be listed. Click the refresh icon if you don't see it there.

The Templates category of the Assets panel lists all the templates in a given site.

Control-click (right-click in Windows) the "essay" template and choose New from Template from the context menu.

Control-click (or right-click) the template file to open a menu of options. You can also use the little icons at the bottom of the Assets panel.

A new, untitled HTML file will open in the Document window. Go to File > Save As and save the page as galapagos.html inside the scuba local site folder.

Editing a Child Page

Your new galapagos.html page looks exactly like your template. The only difference is the file extension (it is an .html file rather than a .dwt).

If you try to click around the page, you'll get a "don't" symbol, a little circle with a cross. You won't be able to select anything outside the editable regions.

1. Insert your cursor into the "essay title" editable region, and type "Galapagos". If the h1 formatting disappears, select the text and choose "Heading 1" from the Format menu in the Property inspector.

2. Copy/paste Mark's essay into the essay region. Open the galapagos.txt file from the text directory. Select the entire essay and go to Edit > Copy. Then switch back to the galapagos.html file, click the "essay" tab, and Edit > Paste.

3. Replace the image placeholder with a real photo. You'll find galapagos1.jpg in the images directory.

4. Open the captions.txt file and copy the caption for galapagos1.jpg. Then switch back to the galapagos.html file and paste into the "caption" editable region.

If you don't see the small text style, make sure the caption is inserted in a paragraph. Hit your Return key to add the paragraph formatting.

The Galapagos page is finished, so go to File > Save.

5. For extra practice, create another child page based on the template. Open the Assets panel and select the Templates category. Control-click (right-click in Windows) the "essay" template and choose New from Template. Save the new page as belize.html.

Enter the following info into each region:


1. Essay title: Belize

2. Essay: Copy/paste the belize.txt file.

3. Photo: Insert belize1.jpg.

4. Caption: Copy/paste the belize1.jpg caption from the caption.txt file.


When you're finished, save your Belize page and preview in a browser. Looks good, but the home link isn't working. Also, Mark called up asking if you could change his email address, and he wants to add a date above each essay. Back to the template to make these changes!

Editing a Template

Open the essay.dwt file. You'll find it in the Templates directory in the Files panel, or in the Templates category of the Assets panel.

1. Select "HOME" in the yellow nav bar and link to the index.html file in the scuba folder. The home page isn't based on a template because it has a slightly different page layout. That's OK: most Web sites use a mix of template-based and non-template-based pages.

2. Change Mark's email address to markburton@divejournal.com.

3. Add another editable region for the date. Click below the essay title. If the "essay" tab is in the way, select the tab, press your Left arrow key to position your cursor to the left, then hit the Return key to allow yourself some space.

Type "insert date here". Apply the .date style to format the date in bold italics.

With "insert date here" selected (use the Tag selector to get the entire <p.date> paragraph tag), choose Insert > Template Objects > Editable Region. Name the region "date."

4. Go to File > Save to save the template. The Update Template files dialog will pop up, asking if you want to update belize.html and galapagos.html (the two child pages based on the template). Click Update.

When you make a change to a template, Dreamweaver will ask to update all child pages.

5. Open galapagos.html. All the changes made to the template have been updated in this child page.

You'll see a new Editable region called "date" above the essay. Type in "Thursday, 18 August 2011".

Scroll down to the bottom of the page. Mark's email address has been changed. Save and preview in a browser and test the "home" link.

6. Next, open belize.html. Mark's email address and the home link have already been updated by Dreamweaver, you just need to fill in the date: "Tuesday, 01 November 2011". Save your changes and test in a browser.

This covers the basic process of creating and using templates:


  • Design the basic page layout and save as a template.

  • Define the editable regions.

  • Using the Assets panel, create the child pages based on the template.

  • Edit each child page. Insert text and images into the editable regions.

  • If necessary, go back and edit your template. The changes will apply to the child pages automatically.


If you are feeling comfortable up to here, let's move on to explore further methods for working with templates.


You must resolve any inconsistent regions before continuing.


To turn an editable region into an optional region go to Insert > Template Objects > New Optional Region.


Repeating Regions

Mark is happy with the layout of the essay pages, but he would like to have the option of adding more photos down the right column.

1. Open the essay.dwt file. Click the image placeholder, then use the Tag selector to select the nested div that holds the photo and caption.

Select the div that holds the photos and caption.

You will see a border around the div when it is selected.

2. Choose Insert > Template Objects > Repeating Region. In the dialog that pops up, name the region "photodiv" and click OK.

3. The repeating region will be labeled "Repeat: photodiv".

The Repeat: tab indicates that this region will repeat.

Save the template and update all template files.

You might hit a snag here. The Inconsistent Region Names dialog pops up, informing you that there are two "unresolved" regions, caption and photo. When you changed the photo table to a repeating region, Dreamweaver changed the "editable" template tags to "repeating." Our old "editable" caption/photo regions in the child pages don't match the new template.

Don't be frustrated by the Inconsistent Regions dialog! It's there to help you sort out any inconsistencies between the template and child pages.

This dialog can be unsettling at first, but Dreamweaver is only asking what to do with the stranded child page content. You could choose to move the content into another editable region, but nothing matches up. Select Nowhere and Use for all to remove the mismatched data from the child pages. No great loss, you can insert it again later.

4. Open the galapagos.html file. You've lost the photo and caption you entered earlier, but it is quick enough to insert galapagos1.jpg and the caption again.

You'll see the Repeating Region Controls above the photo table region. Click the + button to add another table region. Insert galapagos2.jpg to replace the image placeholder, then copy/paste the galapagos2 caption from the captions.txt file.

Click the + (plus) button to add a region, the - (minus) button to subtract a region, or the arrow buttons to move a region up or down.

This is so easy that you might feel inspired to add another photo table (click the + button again). Insert galapagos3.jpg and its respective caption.

Save your changes when you're done. For extra practice, insert the three Belize photos and captions in the belize.html page.

Optional Regions

Another phone call from Mark. He wants to add a map to the Galapagos page. He doesn't have one for Belize yet. No problem—just make the map an optional region.

1. Open the essay.dwt file. Select the essay tab, press your right arrow key, then hit Return to move your cursor down below. Insert an image placeholder for the map (Insert > Image Objects > Image Placeholder). Set the width to "296" and the height to "240".

You can choose any color for your Image Placeholder to make it stand out against the page background.

2. With the image placeholder selected, go to Insert > Template Objects > Editable Optional Region. Name the optional region "map" and check Show by default.

3. The new optional region will be marked with an If map tab (indicating that the region is optional).

4. Save your template and update all pages.

Open galapagos.html and scroll down to the bottom of the page. You'll see the image placeholder after the essay. Replace the placeholder with galapagos_map.jpg. Save and preview in a browser.

Now open belize.html. There isn't a map for this page, so hide the optional region. Go to Modify > Template Properties.

Map is listed with a value of "true." Uncheck "show map" to get a value of "false." Click OK to make the optional region disappear from view.

The Template Properties dialog lists all optional regions.

Once you get the hang of templates, you will wonder how you ever worked without them. I know I do!


Library items can be used inside or outside templates.


Dreamweaver will create the Library folder automatically when the first Library item is added to the site.


Library items are saved into the Library folder with the .lbi extension.


Library items are highlighted in Design view. The highlighting won't display in the browser.


Use library items or SSI's for site-wide content that will be regularly updated, like copyright notices.


Find out if your server handles SSIs, and upgrade if necessary.


Remember to select a content area before applying a Wrap Selection Snippet, otherwise the Snippet may not work as planned.


If you want to use check-in/check-out, create a testing directory for all collaborative files on the remote server. Maintain the same directory structure in the testing site as you would on the actual Web site.


Dreamweaver templates work quite nicely in Contribute. Editable regions can be modified by the Contribute user, while non-editable regions are safely locked.


Workflow Tools

Using Library Items

Library items have a similar goal to templates, but a different approach. Rather than standardizing page layouts, library items are used for elements that repeat from page to page—for example: a navigation bar, a line of copyright info, or a business address.

Let's say your company headquarters has moved to a new office. You have to change the address on every page of the Web site, a tedious task.

However, if you had the foresight to save the address as a library item, you simply edit the library item and the changes will apply automatically to every occurrence.

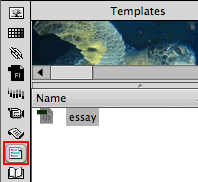
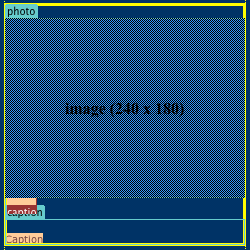
The Library is found in the Assets panel (Window > Assets) and denoted by a book icon in the left column of the panel.

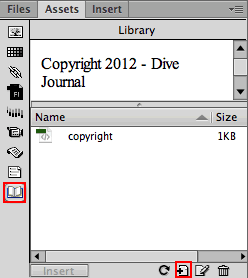
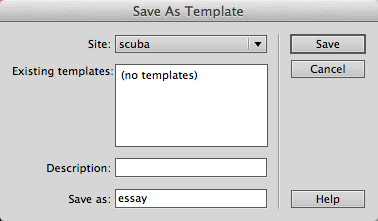
To save an item to the library, select it in your document and click the New Library Item button.

Any element can be saved as a library item: a paragraph of text, a table, a div, a Spry widget, or a list-based navigation menu. Just select the element, then click the New Library Item icon in the Assets panel.

When you create a library item, Dreamweaver creates a Library folder in your defined site. All library items within a site are stored in the Library folder, and all library items have the .lbi extension.

Like templates, library items should be kept in this Library folder, and you shouldn't add non-LBI files to this folder. Dreamweaver creates relative links to each library item. To do so, it needs to know exactly where the original library item is stored.

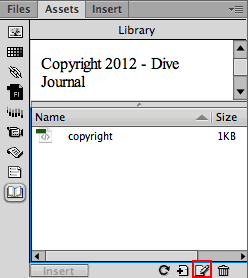
To insert a library item, select the item from the Library and click the Insert button.

After you insert a library item, you won't be able to edit it; the item is locked. Instances of a library item cannot be edited on a page-by-page basis. Instead, click the Edit icon in the Assets panel to open the original library item in the Document window.

Switch to the Library Items category in the Assets panel, select the library item, and click the Edit icon.

The library item might look rather plain—library items don't include CSS formatting. No problem, you can add the CSS formatting later, after you insert it into the HTML file.

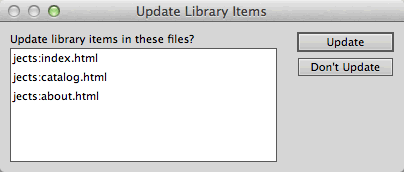
When you save your changes to the library item, Dreamweaver will update every instance throughout the site.

Server-Side Includes

If you have a programming background, you might be thinking that library items are similar to SSIs, or Server-Side Includes. And you're right—exact same idea.

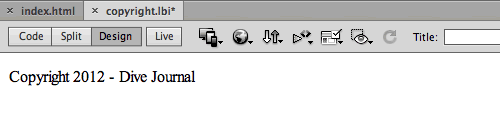
When you insert a library item, it looks like this in Code View:

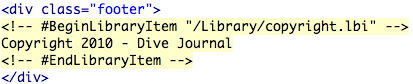
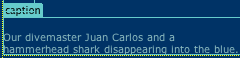
The "Copyright 2010 - Dive Journal" element is hard-coded into the document and surrounded by library tags.

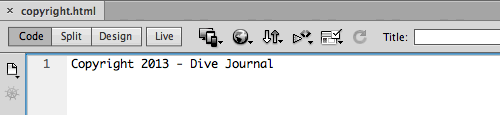
When you insert a Server-Side Include, the code looks like this:

The "Copyright 2010 - Dive Journal" element is no longer present. Instead, it is saved in a separate "copyright.html" file. The server adds the content of the include file when the Web page loads in the browser.

As you can see, the code created by using a Server-Side Include is cleaner than the library item code. Also, using SSI's makes it faster to post changes online. After making a change to the include file, you just upload that one file to the remote server. If you use a library item, then you must upload all the HTML files that contain the library item.

When you create a new include file, remove the <html>, <head>, <title>, and <body> tags. The include element will be inserted into another HTML page that already has an HTML head.

The include file includes only the page element itself. The HTML head and body tags are not necessary.

After you've created your include file, you can insert it into any number of Web pages. Go to Insert > Server-Side Include, and browse to your include file.

If you are working on a small Web site with less than 30 pages, library items will do the trick. If your Web site is much larger, then Server-Side Include is the better option.

Sitewide Link Changes

Bad news, the boss called and the deal with Amazon is off. All those links throughout the site to Amazon.com need to be changed to BN.com. Yeah, I know the links are on every page—but the boss offered to buy you some coffee to help you stay awake for this!

Hardworking designer, you can pass on that cup of coffee—little does your boss know that Dreamweaver's on your side. This type of situation comes up frequently, whether it's off-site URLs that need a switch, or links within your site, and the Change Link Sitewide feature comes to the rescue.

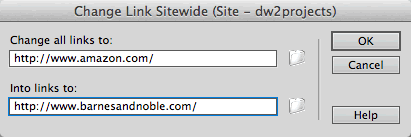
For off-site URLs you must type the full URL including the http:// prefix. For internal links, you may use the folder button to browse to files.

You can access this feature from the Site menu (Site > Change Link Sitewide). Enter the old and new URLs, click OK, and let Dreamweaver do the work for you.

The Snippets Panel

Dreamweaver offers the ability to save chunks of code in a panel with the cute little name Snippets (Window > Snippets).

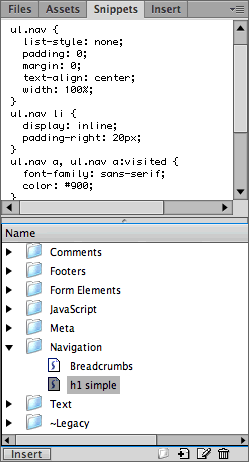
Scroll through the menu of predefined Snippets to see what's offered. You may find some pretty handy ones like the Angle bracket breadcrumb trail for navigation.

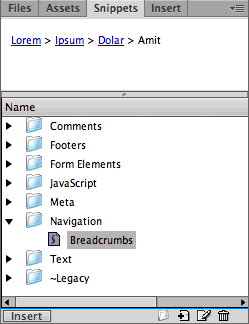
Clicking once on a Snippet will show you a preview at the top of the panel, and double-clicking will insert the Snippet into your document.

Using Snippets can save you an enormous amount of time, whether you're working in Design View or in Code View. Let's create a snippet now:


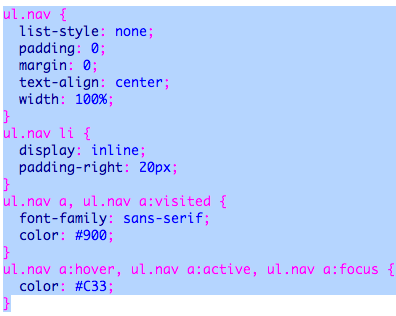
1. Open the h1_simple.css file in the listamatic folder (if you don't already have this folder, go to the course downloads area).

Select the list styles and Edit > Copy.

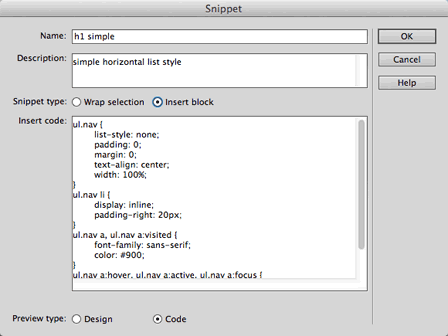
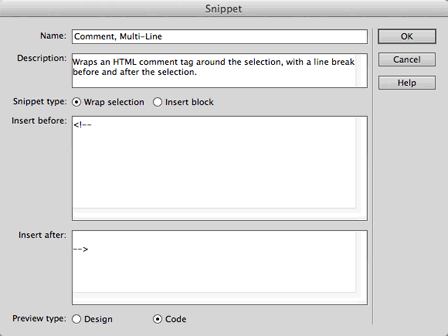
2. Click the menu button in the upper-right corner of the Snippets panel and chose New Snippet. The Snippet dialog automatically includes the list styles that you copied in step 1.

3. Name the snippet "h1 simple" and add a description.

4. Choose the Insert Block Snippet type.

A Wrap Selection Snippet would wrap the code around a selected area, for example:

The code in the Wrap Selection panel is divided into "insert before" and "insert after." Before using this Snippet, select a page element for this code to wrap around (before and after).

5. Click OK when you're finished. The newly created snippet will appear in the Snippets panel.

Anytime you need the h1 simple navigation styles, insert your cursor in your external style sheet and and double-click "h1 simple" in the Snippets panel.

If you have time, go ahead and create new snippets for all the navigation list styles in the listamatic folder. You'll never have to worry about losing that folder again: the code will be ready and waiting in the Snippets panel.


The Snippets panel may quickly become one of your favorites—you can increase your work speed pretty significantly!

Working Collaboratively

Site development is often handled as a team with files that are shared over a network. When dealing with a designer, a developer, and a technology specialist (or maybe even several of each!), the same site files are often used by a number of co-workers. This can be a symbiotic relationship, or one that leads to chaos.

Company employees with no Web experience are often given the task of updating Web page content, sometimes accidentally destroying a design or important programming features in the process.

Now that you know the power of Dreamweaver, I bet you're not surprised that Dreamweaver can handle a collaborative work environment to keep things running smoothly.

Check In/Out

Previously impossible without sophisticated network software, Dreamweaver allows collaborators to lock files that are accessible to multiple users.

Enable the check-in/check-out feature by going to Site > Manage Sites. Choose the Servers category and edit your Remote Server info.

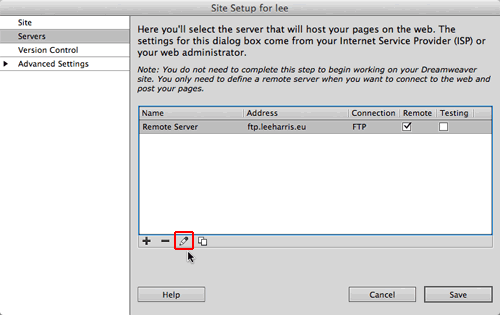
Edit the Remote Server info to enable file check out.

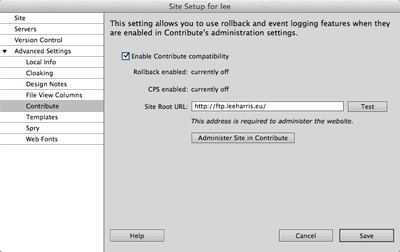
Toggle to the Advanced settings and check Enable file check out.

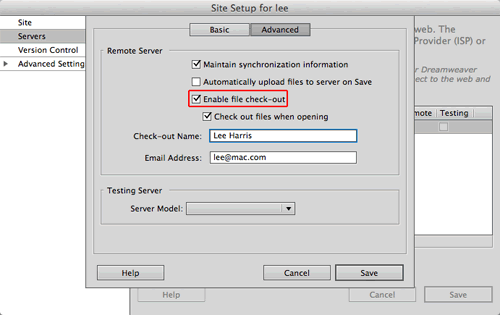
When enabling this feature, enter a check-out name so collaborators will see who has checked out the file. Optionally, you can add an email address so collaborators can email you regarding the file(s).

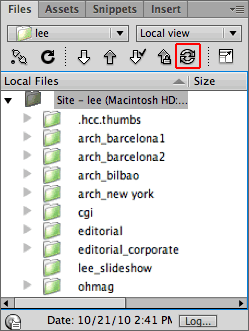
To check out a file, select it in the Files panel (Remote Site) and click the Check Out File(s) button . This downloads the file to your hard drive. The Files panel shows all connected users what files are locked and who checked them out.

When you finish working, check the file back in by selecting it in your Files panel (Local Files) and clicking the Check In button .

For busy projects with lots of team activity, you can run workflow reports that display who has checked out a file and which files have been modified recently.

Select Site > Reports. Select a workflow report and click the Report Settings button at the bottom of the dialog.

Check the Workflow report you wish to run, then click Report Settings.

Run the Checked Out By report to see a list of all documents checked out by a specific team member. Enter the name of a team member, then click OK to return to the Reports dialog.

If you need to see which files where modified during a specific time frame, run the Recently Modified report. Enter date ranges and location for the files you want to view.

Choose Design Notes to run a report listing all Design Notes. What are Design Notes, you might ask? Let's say you finish up a new home page design, and you post the changes for review by your Art Director. You would go to File > Design Notes to add information on the status of the document, what changes were made, how the design decision was reached, and what needs to be done next.

Synchronizing Sites

You're working in New York, and your co-designer is in Barcelona. You both need access to the same HTML files. Not a problem!

Before you make any changes to the files, make sure that your European counterpart hasn't already done the work for you. Click the circular Synchronize icon the Files panel to sync the local files on your computer with the remote files on the server.

Click the Synchronize icon, or choose Site > Synchronize from the flyout menu in the upper-right corner of the Files panel.

The Synchronize Files dialog appears. You can choose to synchronize specific files that you've selected in the Files panel, or the entire site. You can get new files from the remote server that your co-designer has modified, or post the new files from your local site that you have completed, or both.

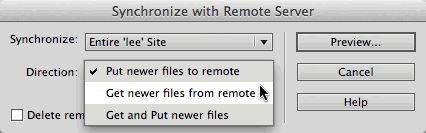
It goes both ways: get newer files from the remote server or post newer files from your local computer. Either way, you'll be working on the latest version.

Click the Preview button. Dreamweaver goes to work, comparing the modification dates for each file, local and remote, and outputting a list of files that need to be synchronized. Overwriting files is a serious action to take, so review carefully before executing the synchronization.

Adobe Contribute

With Contribute, anyone can add simple content updates while you handle the technical stuff.

Finally, I would like to mention a software program that is used for collaborative environments that include non-Web workers. Adobe Contribute allows anyone, no matter how "non-technical" to publish content to a Web site.

Contribute is a stand-alone program, but it integrates with Dreamweaver. You can administer a site and delegate user roles directly from the Dreamweaver Site Definition window.

If you are interested in seeing how this works, download a free trial version of Contribute from the Adobe Web site.


Install Contribute

  • In order to administer a site, Contribute must be installed along with Dreamweaver.

Enable Contribute for your Web site

  • Launch Dreamweaver and choose Site > Manage Sites. Select the site you wish to enable and click Edit.
  • Choose the Contribute category.
  • Select the Enable Contribute Compatibility check box.

The Contribute category is listed under the Advanced Settings.

Launch Contribute

  • To launch the Contribute Site Administrator, click Administer Site in Contribute.

Define User Roles

  • The first task at hand is to define the members of your team. There are three type of roles:
    • Administrator: If you are setting up the site, this is probably you. The Administrator has total power. You can edit, modify, and publish Web pages using Dreamweaver or Contribute. The Administrator is responsible for defining user roles and giving other team members access to the site.
    • Publisher: Publishers can modify and publish content from within Contribute.
    • Writer: Writers can modify content, but they can't publish. All drafts are sent to a Publisher or Administrator for review before going live on the Web site.
  • Click Edit Role Settings to define responsibilities for each member of your team. You can decide which folders the user should access, whether the user can modify page elements or text only, and whether the user can create new pages.

Send Connection Keys

  • Click Send Connection Key to email the user the necessary information to connect to the Web server.
Edit and Publish with Contribute
  • Now that your user is connected, using Contribute to make basic edits is easy.
    • Publishers can click the Edit Page button to open a page in Edit mode, then click the Publish button to upload to the Web server.
    • Writers can edit the page, then click the Send for Review button to send their changes to the Publisher for approval before going live.


Using Dreamweaver, you can collaborate with other team members in harmony.


Learn about front-end and back-end form design.
Learn how to create various form elements such as text fields, radio buttons, checkboxes, menus, and submit buttons.
Learn how to implement Spry form validation.
Learn about the GET and POST methods used for submitting form data and the Enctype attribute.
Explore ways of implementing different types of form handlers.
Learn to troubleshoot common form problems.
 

Discussion
Share your thoughts and opinions with your fellow students in the Discussion area.

Exercise
Use templates to build an 11-page Web site for a Napa Valley winery.