CSS Selectors
When you create a new style, you will be asked to choose a "selector
type." Confused already? Don't worry, this is more simple than it sounds.
A CSS rule consists of two parts: the
selector and the declaration. The selector tells the browser what to format and the declaration tells the browser how to format it.
For example, the CSS rule above is an instruction to "select all the paragraphs and set the font size to 12px."
Tag Selectors
Tag selectors are used to redefine HTML tags. Browsers come with built-in formatting for HTML elements like <h1> text, <p> paragraphs, and <strong> bold text. An un-stylized text block might look like this:
 |
The default setting for headers is big and bold. |
Using CSS, you can redefine the appearance of each element, changing
the font size, style, color, and margins as needed.
 |
A h1 tag selector was used to redefine the appearance of the header. A p tag selector was used to format the paragraph text. |
If you redefine an HTML element like the <p> tag, the new formatting
will apply automatically to all paragraphs throughout the site. This
is where you really see the power of CSS.
Tag selectors do require some knowledge of HTML tags and how they
are used. Even though you can be a master of Dreamweaver
without being much of a code head, you should still be familiar with
basic tags. A few handy ones are listed below.
 |
|
 |
| |
body: Text formatting on the <body> tag will apply to the entire page. This is useful for adding background colors or patterns.
h1: H1 tags are used to format page headers. H1 text should indicate the central topic of your entire page.
h2 - h6: H2 tags are used to format sub-headers. There are six levels of headings, with h1 as the most important and h6 as the least.
 |
To format your text with heading tags, select the text, then use the Format menu in the Property inspector. |
p: The <p> tag is applied every time you hit the return key to create a full paragraph break.
em: Text enclosed in <em> tags is italicized. Using CSS, you might decide to format the italic text in a different font or color to make it stand out even more.
To format text with the em tags, select the text, then click the italic I icon in the Property inspector.
Dreamweaver CS4 users: Toggle to the HTML view of the Property inspector if you want to insert an <em> tag. The CSS view has a twin I icon that creates a CSS class style rather than a html <em> tag.
strong: Text enclosed in <strong> tags is bold. Using CSS, you can control the exact appearance of bold text.
Dreamweaver CS4 users: Clicking the B icon in the HTML view of the Property inspector will wrap the text in <strong> tags. Clicking the B icon in the CSS view of the Property inspector will create a class style.
|
|
 |
|
 |
Creating a tag selector begins in our handy New CSS Rule dialog, and
you know how to get there.
 |
I've selected the p tag for my new style—one of the most common and most useful tag selectors. |
Select Tag from the Selector Type menu. Choose a tag from the menu to the right of the Selector Name field. Click OK and
you'll enter the CSS Rule definition window, which we'll explore shortly.
Dreamweaver CS3 users, your New CSS Rule dialog looks quite different, but you have the same three steps to carry out: choose the tag selector type, choose the tag you want to format, and save to your external style sheet.
 |
The Dreamweaver CS3 New CSS Rule dialog. |
Class Selectors
Class selectors (named for the "class" attribute) do not rely on HTML tags. You can apply classes anywhere, anytime, to any element you like.
You'll find that class selectors come in handy for text that introduces a paragraph, specific "callout" words or phrases, dates, captions, or any other areas that differ from the standard formatting you created with your tag selectors.
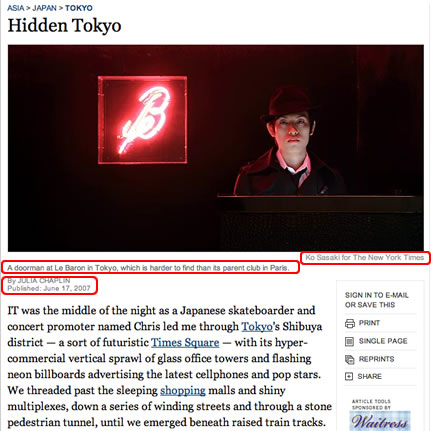 |
This New York Times travel article page uses tag selectors to format the "Hidden Tokyo" <h1> header and <p> paragraph text. For the photo credit, caption, byline, and date, class styles were applied. |
CSS novices tend to use mostly classes and avoid tag selectors altogether. However, this has some drawbacks. First, class selectors add extra markup to the HTML file. A new class attribute is added to the HTML code each time a class is applied. Second, you have to apply classes one-by-one, rather than harnessing the automatic application of tag selectors.
Before you create a class selector, consider whether a tag selector would do the job instead.
As you'd probably expect, since you're now pretty familiar with the
New CSS Rule dialog, creating a class selector begins right there. Select
the Class selector type, type in a name, and you're on your way.
Note that all class selector names begin with a dot (Dreamweaver will
put it in for you if you forget).
After you create a class selector, you will need to apply it. Select the type you want to format, then choose the class from the Class menu in the Property inspector. (Dreamweaver CS3 users, you'll find the class selectors in the "Style" menu).
 |
 |
Here, a class style was created to set the first few words of the paragraph in bold italics. |
If you switch to Code view, you'll notice that your newly stylized element is enclosed by a class attribute. This is the extra markup that drives the CSS purists crazy. However, in moderation, a few class attributes is nothing to worry about.
 |
A class attribute is added to the code each time you apply a class style. |
If you accidentally apply a class selector and decide to remove it, select "None" from the Class menu in the Property inspector.
You can also apply a class selector using the CSS Styles panel. Select the text you want to format, then Control-click (right-click on a PC) the class selector. Choose "Apply" from the context menu.
 |
Using the CSS Styles Panel is an
alternate method of applying class styles. |
ID Selectors
ID selectors are used to format specific
content areas—for example, a left nav, sidebar, header, or footer.
You could use a class selector for this same purpose, but giving each
content
area a unique ID will better define the structure of the document.
To create an ID Selector, use the New CSS Rule dialog. Choose the ID selector type. Then type the name of your selector, beginning
with a # hash or pound sign.
Dreamweaver CS3 users, select the Advanced (IDs, pseudo-class selectors) radio
button to create an ID selector.
To apply an ID selector to a table or div, select the ID from the left menu in the Property inspector.
To apply an ID to an image, a paragraph, or table cell, first select
the element, then Control-click (right-click on a PC) the ID in the CSS Styles panel.
Choose Apply from the pop-up menu.
ID selectors give you the same kind of control as class selectors—an ID selector can be applied to any element. However, IDs can only be applied once per page.
|
|
|
| |
When should you use an ID selector and when should you use a class selector?
Scenario A: You are designing a medical portal with articles on the latest research in the field of neurology. Each article is dated.
- There is only one date per page. This means that you could
give the date an ID. The date is an important element you really
want to emphasize—maybe you'll give the date a unique background
color and border to make it stand out.
- Applying a class selector to the date is also an option. However, you will be creating a lot of class styles for different elements all over the site, so it doesn't give the date quite as much importance in the structure of your code—it is just another class.
Scenario B: The medical portal contains 5-10 short news flashes per page. Each news flash is dated.
-
In this case, an ID selector is not a possibility. IDs cannot be applied more than once in a single page.
-
Using a class selector is the solution here—classes
can be applied as many times as needed within a document.
|
|
|
|
|
Descendant Selectors
The three main selectors (tag, class, and ID) can be combined to suit your needs.
Here's a scenario: You are designing a movie review site with a two column layout. The sidebar will contain short highlights on the the latest releases. You want to set these paragraphs in a bold sans serif font to make them stand out.
The main content area will contain longer movie reviews. The paragraphs in the content area will be set in a normal font weight with extra line spacing to improve readability.
The solution is to give each column a different ID: #sidebar and #content. Then use descendant selectors to target the paragraphs within each area.
| #sidebar p |
This descendant selector applies only to the paragraph text inside the sidebar. |
| #content p |
This descendant selector applies only to the paragraph text in the main content area. |
Descendant selectors can be also be created by combining several tag selectors or tag and class selectors. For example:
| ul li |
This descendant selector applies to the list items (li) inside an unordered list (ul). |
| ul li .first |
Here, the first list item is given a class of ".first" to differentiate it from the other list items. |
If you select a page element before you create a new CSS rule, Dreamweaver will take a stab at writing a descendant selector for you. In Dreamweaver CS4, choose Compound (based on your selection). In CS3, choose the Advanced radio button.
You can make the selector more or less specific. For example,
| #container #mainContent img |
| This descendant selector would only format images inside the #mainContent div (which is nested inside the #container div). |
| #container img |
| This descendant selector is less specific. It will format any image inside the container div, where or not it is inside the #maincontent div. |
| #container #mainContent img.new |
| This descendant selector is more specific. It will only format images inside the #mainContent div with a class selector type of ".new". |
Pseudo-Class Selectors
Now on to the fun topic of link states. You may be familiar with these already, but let's review:
|
|
|
| |
link: This is the typical state of a link when nothing is happening to it and it has never been visited—it's just sitting quietly on your page waiting for some action.
visited: This state appears when the viewer has visited the link previously, but is not currently doing anything with the link like clicking on it or mousing over it.
active: This is a brief state, only appearing for the duration of time that the user's mouse is actively clicking on the link.
hover: A designer favorite! This state appears when the user's mouse is hovering over the link—looking much like a JavaScript image rollover and giving the link a very interactive effect. |
|
|
|
|
It is a good practice to define all four link states for a consistent look. If you don't want certain states to have an effect (for example, no change when hovering), just apply the same style definition to the hover as you would to the regular link.
To ensure that the link states work properly, you must define your link selectors in the following order:
|
|
|
| |
- a:link
- a:visited
- a:hover
- a:active
|
|
|
|
|
A good mnemonic for remembering this order is LoVe HAte: L-link V-visited H-hover A-active.
Using this order will ensure that your visited link styles override your link styles, and that your hover styles will override both the visited and link styles.
When two rules target the same element (in this case, both a:link and a:visited format links) the last rule to be defined overrides the other.
Create your pseudo class selectors using the New CSS Rule dialog. Select the Compound selector type. "a:link" is a compound selector—a combination of the <a> link tag and the ":link" pseudo selector.
 |
In Dreamweaver CS4, use the Compound selector to create link states. If you select the body tag before creating a new style, the link styles will display in the menu on right. |
Dreamweaver CS3 users, select the Advanced radio
button in the New CSS Rule dialog to create a pseudo class selector.
If you click the menu to the right of the Selector field, you'll see options for four link states: link, visited, active, and hover.
 |
In Dreamweaver CS3, select the Advanced radio button and choose the pseudo-class selector from the menu on the right. |
Hierarchy of Styles
All this talk of styles brings us to the important topic of hierarchy—CSS hierarchy, that is. What happens if you create an internal style that acts on the same HTML tag as your attached external sheet? What if you apply two class styles to the same text? That's where the intriguing term "cascading" comes into play (I know you were wondering).
The best way to remember the hierarchy of CSS is that the closest style wins. External styles are the "farthest" from the item you're modifying—all the way over in some other document. Internal styles are much closer—just at the top of your HTML code. Therefore, an internal style will
override an external style.
In addition, a class selector that you apply
manually will override a tag selector, because the code used
to apply a class style is wrapped around the item you're styling.
ID selectors carry more authority than classes. If a class selector and an ID selector are in conflict, the ID selector will win out.
CSS will try to accommodate styles that don't conflict with one another, combining them when possible rather than knocking out the less dominant.
Such issues are paramount when troubleshooting. If you apply a style and don't see a change in your document, a hierarchy conflict is usually the reason. Check that other styles, particularly internal, aren't conflicting with the problematic style.
Dreamweaver CS4 users can use the Code Navigator to identify style conflicts. When you hover over an element, the Code Navigator icon  will pop up. Click the icon to view a list of all the CSS styles that affect the current selected element. You can view the properties for each style and jump directly to the CSS code to make any modifications.
 |
The selected text is affected by several CSS styles. Using the Code Navigator, it is easy to identify conflicting properties. |
The Code Navigator is a terrific troubleshooting tool, but the hovering icon can become annoying. Check "Disable" to get rid of it. There are several alternative methods of accessing the Code Navigator when you need it:
|
|
|
| |
- Select the page element you need to troubleshoot, then go to View > Code Navigator in the top menu.
- Command-option-click (Mac) or Alt-click (PC) any page element.
- Control-click (right-click on a PC) a tag in the Tag selector in the lower-left corner of the Document window. Choose Code Navigator from the context menu.
- In Code view, click the Code Navigator icon in the left panel.
|
|
|
|
|
Style Settings: Overview
Now that you know how to create internal and external styles using each of the major selectors, we can focus on style settings—the attributes that make your styles so stylish!
Defining Style Attributes
When we click OK in our trusty New CSS Rule dialog, Dreamweaver supplies us with the following settings:
 |
The CSS Rule Definition dialog is used to create and edit style attributes. |
The various attributes are organized into categories on the left. Your
style may contain attributes from all of the categories, just
a couple, or in many cases, just the Type category.
Clicking Apply will register your style so you can see it on your page (if applicable) while leaving the Rule Definition dialog open for further adjustments. Click OK to save the settings and return to the Document window.
If you've created a tag selector, you may see your style in action immediately, providing that the proper tag has been used somewhere on your page.
If you've created a class selector, it will be ready and waiting in the CSS Styles panel. You will need to apply it before it will take effect.
Style Settings: Type Attributes
Type Styles
Let's take a closer look at the Type category of the CSS Rule Definition dialog. This is where we'll handle the most common formatting tasks such as defining font color and size.
 |
The Type category allows you to change the size, weight, color, and many other attributes of your text. |
Most of the options here are self-explanatory, while others (sigh!) are a little more complicated. Let's look at each one.
|
|
|
| |
Font-family offers the standard font group choices. It is important to stick to the standard Web fonts to ensure that all of your users will see your text properly. Unusual fonts may default to Times New Roman or another standard font that you did not intend.
Font-size can be set in a number of different units (points, pixels, ems, and so on) which we will talk about in the next section.
Font-weight refers to the boldness of a font. Did you know that you have more options than just plain normal and bold? Click the menu next to the Weight field to see all the variations, or enter a numerical weight (ranging from 100 to 900—normal is somewhere in the middle while the standard bold weight is around 700).
Font-style includes Normal and Italic and a surprise newcomer: Oblique. Italic will slant or italicize any font (whether or not there is an Italic version in the font family) while Oblique is handled differently from browser to browser. In some browsers, it will act as Italic, slanting the text if an official Oblique version is not found, while in other browsers it will revert to Normal. So, Italic is your best bet for slanted text.
Font-variant includes an option for Small Caps (where lowercase letters are small capitals). Some browsers support this variant, but older browser will ignore it and display the text normally.
Line-height specifies the height of each line of text, also known as line spacing. If you'd like to add more breathing room to your text area, you can specify a line height slightly larger than the text size.
Text-transform switches the letters you've typed to all uppercase, all lowercase, or capitalized (the first letter of each word capitalized, also known as "Headline Case"). This can be useful when creating a style for headers or navigation links.
Text-decoration allows you to add underlining, overlining, line-through (also known as strikethrough), or a blinking effect. You may choose more than one of these options. For the sake of all that is right and good, please avoid blinking. Also note that blinking and overlining (where a line is placed over the text rather than under) are not supported by all browsers.
Color sets the text color. Click the color chip, or enter a specific hexadecimal code code. |
|
|
|
|
You do not need to apply all of these type settings—the fields you leave blank will simply default to normal (such as no decoration, normal case, standard line height, and so on).
 |
In the above CSS example, the header style includes font, size, weight, and color. The main paragraph style includes font, color, and line spacing. A strikethrough was added to the original price, and red, italicized text denoted the sale price. |