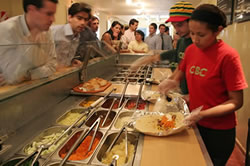
In the land of the empanada, most Argentines have never even heard of a burrito. At least, that was the case until three young Californians opened a burrito joint in downtown Buenos Aires. The lunch crowds are lining up, but they need a website to further promote their business.
Files and Guidelines
The text and images for this project are found in
the cbc folder in the course downloads
area. Save the cbc folder to your
hard drive and move it into your dw1exercises local site folder.
Launch Adobe Color CC, selecting Create and Monochromatic. Choose one of the CBC colors to serve as your main base color.
 |
#f1c461 |
 |
#bdc866 |
 |
#c8ac6d |
 |
#f88d3d |
|
| Choose one of these colors to build your Adobe Color CC color theme. |
Enter the hexadecimal color code into the HEX field and press return. Adobe Color CC will generate five variations of the hue. Drag the slider under the color wheel to adjust the brightness.
 |
Enter the hexadecimal color code into the HEX field under the Base Color. |
Add a second "punch" color to the design. You may use another CBC color, or an entirely different color of your choice.
First, select Custom. This will enable you to add colors outside the Monochromatic color scheme. Next, click one of the supporting color swatches. You'll notice that the corresponding color marker will light up on the wheel. Click and drag to choose a hue.
In the example below, I replaced the dull-gray color swatch with a deep-red, and I made the brown color swatch even darker.
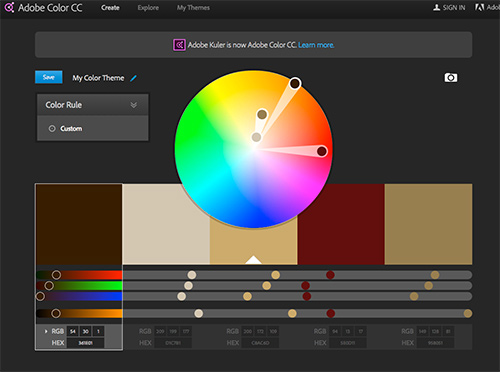 |
Adjust the brightness of each color swatch until you have a range of light, dark, dull, and bright variations to choose from. |
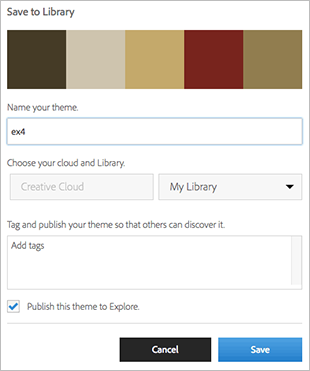
Click the blue Save button to save your theme. Name your theme "ex4".
The cbc folder contains a text folder with content for the various pages. The images folder contains a variety of photos and illustrations. You are not expected to use them all—you can pick and choose the images you'd like to build into your design. The images-logo folder contains a large logo that you may insert in a header, and a mini-logo to insert in the navbar.
You will create a total of five pages:
| Home (index.html) |
Use content from home.txt. |
Choose from photos 01-06. Feel free to resize or modify the photos using Photoshop. |
| Who We Are (whoweare.html) |
Use content from whoweare.txt. |
Choose from icons 01-03. |
| Burritos (burritos.html) |
No text content for this page—just a graphic. |
Choose enjoyburrito 01-02. |
| Menu (menu.html) |
Use content from menu.txt. |
Use the menu data in the menu.txt file. |
| Our Location (ourlocation.html) |
Use content from location.text. |
Choose location 01-02. |
Several background images are provided in the images-bg folder.
|
| Choose from the provided background images, or create your own. |
In the images-miscellaneous folder, you'll find a few additional images that you may incorporate into your design. The logo.eps file is editable in Photoshop or Illustrator in case you need to modify the logo.
Project Requirements
 |
|
 |
| |
- Each of the five pages must include
the CBC logo and address (include the address
in the header or
footer, or both).
- Text must be formatted using CSS
and proper markup (h1 tags for page
headers, p tags for paragraphs, and
so on).
- The CBC menu must be formatted with a responsive table using the Bootstrap table classes.
|
|
 |
|
 |
Planning the Site Layout
1. You'll be using a Bootstrap layout for this project, so head to http://expo.getbootstrap.com/ for inspiration. Study how each Bootstrap website handles the navigation element, logo placement, background images, font-styles and grid layout elements.
2. Review the content in the cbc folder. Sketch out your ideas on paper.
3. Study the menu data in the menu.txt file. Plan how many rows and columns will be needed to display the menu data and whether the table header cells will be positioned along the top row or the left column. You may decide to use multiple tables if necessary.
Creating a Bootstrap Layout
1. Go to File > New and create a new Bootstrap layout. You already have a Bootstrap CSS file in your dw1exercises folder, so you can select the "Use existing Bootstrap CSS" option. Uncheck "Include a pre-built layout". Click Create.
 |
Create a new Bootstrap layout via the New Document window. |
When the Save Style Sheet File As dialog pops up, name the style sheet custom.css and
save in your cbc folder. Go to File > Save, saving the HTML file as index.html in your cbc folder.
2. Switch to Code View and enter "California Burrito Company" as the document title.
 |
| Descriptive, accurate page titles are important for search engine ranking. |
3. Toggle to bootstrap.css to make sure it is linked correctly.
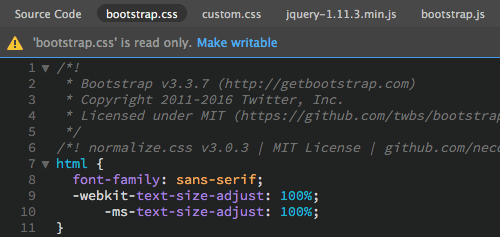
4. Toggle to custom.css to make sure it is also linked correctly. If you see an error warning you that the custom.css file is not on the local disk, open your CSS Designer panel and create a new CSS file.
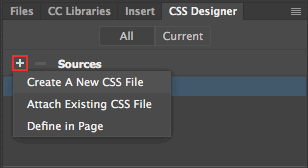
Save the file as "custom.css".

Building the Home Page Layout
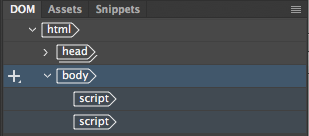
1. Toggle to Live View. Before you insert your first page element, expand the body using the DOM panel. Keep an eye on the DOM panel as you insert elements. The two script tags should stay at the bottom.
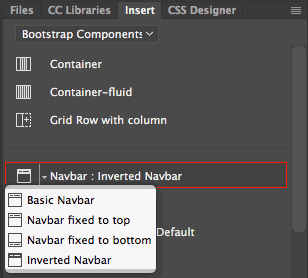
Choose the Bootstrap Components category in the Insert panel and click to insert a "Navbar". You can choose a "Basic Navbar" (with a white background) or an "Inverted Navbar" (with a black background). The "Navbar fixed to top" will stay in place, overlapping the content as the page scrolls.
Use the DOM panel to expand the nav element. The nav element contains two unordered lists. The first list is aligned to the left. The second list is aligned to the right. Decide which list you want to use, then delete the other one. Also, delete the form element between the lists.
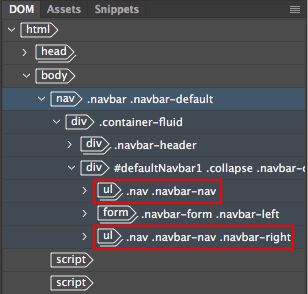
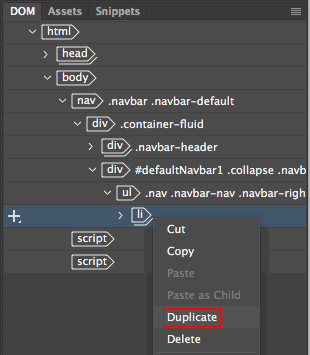
Expand the remaining list and delete the "dropdown" list item.
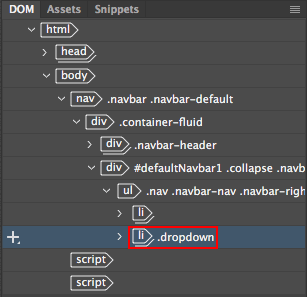
Duplicate the remaining list items (you'll need a total of 4 list items for the CBC navbar).
Toggle to Code View to type in the links, referencing the table below:
| # |
Link |
whoweare.html |
who we are |
burritos.html |
burritos |
menu.html |
menu |
ourlocation.html |
our location |
Select the "Brand" filler text (above the navbar list) and hit your delete key.

Type "img" and hit your tab key.

Dreamweaver will write an image tag for you.

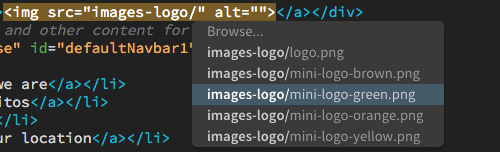
Type the letter "i". Key down to select "images-logo/" and hit your return key.
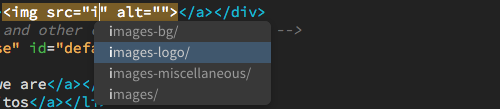
Now you need to select an image inside the folder. Key down to one of the mini-logos (you've got a selection of four colors) and hit return.
Use your right arrow key to move your cursor into the alt property.

Type "CBC" as the alt text.

To finish up, set the logo image to link to the home page. Select the "#" inside the link tag.

Type "index.html" as the link.

2. Toggle back to Live View and use the DOM panel to select the nav element. Use the Insert panel to insert a container (Bootstrap Components category) after the nav element.
Insert logo.png from the images-logo into your new container.
Use the DOM panel to select the container, then insert a header (HTML category). Choose "Wrap" from the insert options to wrap the header around the container.
3. Below the header, insert a container (Bootstrap Components category) for the page content.
Copy and paste the text from the home.txt file into the container div. Select the "Welcome to CBC" page title, then press Ctrl+T on Windows or Cmd+T on Mac to bring up the Quick Tag Editor. Change the <p> tag to an <h1> tag.
Insert a responsive image (Bootstrap Components category) into the container div. Browse to the images folder and choose from photos 01-06.
If you need to float an image to the left or right of the content, click the + sign on the blue tab and apply a class selector: .pull-left or .pull-right
If you need to center an image, apply the .center-block selector.
If you need to center text, apply the .text-center selector.
4. Insert another container (Bootstrap Components category) at the bottom of the layout. Copy and paste the following footer text into the new container:
California Burrito Co. | Lavalle 441 | Delivery: 4328-3057
Use the DOM panel to select the container, then insert a footer (HTML category). Choose "Wrap" from the insert options to wrap the footer around the container.
Styling the Home Page
1. Create a body style to define the basic font styles. Choose a background color and/or background image for the page body.
2. Create an h1 style, choosing a font-family and color.
3. Create a footer style, choosing a background-color or top-border. Add margin and padding to the footer.
4. Customize the default Bootstrap styles to suit your design. This may include changing the background color of the navbar, adjusting the padding around the logo, changing the link colors, changing the rollover colors, changing the active link style, changing the table styles, or any other modifications you wish to make.
The process for modifying Bootstrap styles is two-fold. First, identify the style that is currently formatting the element using the Code Navigator. Then, copy and paste the style into your custom.css file and modify the property you'd like to change.
5. Add any additional style formatting. Go to File > Real-time preview to see your design in a browser.
Building Subpages
Use the home page as a springboard to create the other pages. Go to File > Save As. Name the new page whoweare.html. Replace the page content and save. Repeat for the other pages: burritos.html, menu.html, ourlocation.html.
Post to Your Web Server
Open your index.html file and add a link to Exercise Four.
Publish your project using Dreamweaver's FTP feature. Click the Connect icon at the top of the Files panel to connect to your web host. Select the cbc folder and click the Put Files icon.
When Dreamweaver asks if you want to include dependent files, click Yes.
Summary
When your site is finished, briefly answer the following questions:
1. Did using tables improve the legibility of the menu data?
2. Did you come across any problems as you worked with CSS layouts? If so, how did you solve or work around them?