You've just signed up your kids for a fun summer arts and crafts camp. You went to their website to scope out the details and were horrified to discover a totally basic and unprofessional design. It didn't make the camp look like much fun.
A quick call to the Camp Director changed all that—you've just volunteered to give the site a reworking using CSS!
Files and Guidelines
Go to the course download area to download
the camp file
for Exercise Two. Move it into your dw1exercises folder. You don't need to define a new site for this project—you'll be using the same dw1exercises local site folder for the rest of the class.
Expand the camp folder inside the Files panel. Open all three html files: index.html, moreinfo.html and projects.html.
 |
Keep all your project folders inside your dw1exercises local site folder. |
The Camp Director is happy with the general layout of the website, but hopes you can add some color.
 |
Surely you can add flair, readability, and professionalism to these pages with CSS! |
Part 1: Background Colors and Patterns
What colors make you think of summer camp? Head to Adobe Color CC. Click Explore and enter "camp" in the search field. You'll find hundreds of options.
 |
Select a theme, then click the slider icon to modify the color swatches. |
Choose any color theme that suits your fancy. Then, hover over the theme and click Edit Copy.
Each of the color swatches is represented by a marker on the color wheel. Drag the markers to modify the color scheme as you like.
 |
Drag the color marker towards the center of the wheel to reduce the saturation, or towards the outside of the wheel to increase the saturation. |
Click the blue Save button. Name your theme "ex2" and save to "My Library". Click Save.
After saving your color theme, it will appear in your CC Libraries panel. If your panel is blank, quit Dreamweaver and restart.
Open index.html from the camp folder. Open the CSS Designer panel. A few basic styles have already been prepared for you in the custom.css external style sheet.
1. Choose custom.css under Sources, GLOBAL under @Media, and body under Selectors. Jump to the Background properties.
Choose a color from your CC Libraries panel for the overal body background color. Paste the hexadecimal color code into the background-color field.

Click the folder icon next to the background-image url field and browse to the bgs folder (inside your camp folder). Choose one of the patterned background images.
The patterns in the bgs folder were developed by Hal Gatewood. Textures and background patterns give web pages a softer, more tactile feel, softening the bright glare of the screen.
2. Next, choose a background color for the container div. Copy the hexadecimal color code from your CC Libraries panel.
Choose custom.css under Sources, GLOBAL under @Media, and .container under Selectors. Enter the hexadecimal color code into the background-color field. If you want a white background, enter #FFF.
Jump to the Border category to add a border around the container div. Choose a border-width, border-style, and border-color.
Part 2: Text Styles
1. Let's start with the most general typography settings. The body tag formats all text elements in the entire site—paragraphs, headings, lists, and so on. You can override the general body settings with more specific styles as you fine tune your design.
Choose custom.css - GLOBAL - body and take a look at the Type category:
Choose a font-color from your CC Libraries panel, or stick with basic black.
Click the menu next to "font-family" to choose a font stack. Choose a legible font for the body text.
By default, the bootstrap.css file sets the font-size to 14px. If this seems too small to you, change the font-size to 16px or 18px.
Does your text have enough value contrast? Try several options, for example:
 |
Black type has good contrast against the green background, but it isn't related to the brown/green nature tones in the rest of my color theme. |
 |
Gray softens the type. Not bad. |
 |
White type has a brighter feel. Another option. |
 |
I chose this color from my Adobe Color CC theme, but the brown doesn't have enough value contrast against the green background. |
 |
I went back to Adobe Color CC and selected the brown color swatch, then dragged the value slider under the color wheel to make it darker. After copying the new hexadecimal color code, I'm happy with the hue and contrast level. |
2. The page titles should stand out more. Click "Welcome!" to make a selection. Switch to Split View so you can keep an eye on the code while we make the next change.
Right now, the "Welcome!" title is inserted in a normal paragraph tag.
 |
 |
In Code View, the "Welcome!" title is wrapped in a p tag. |
With the paragraph selected in Live View, press Ctrl+T on Windows or Cmd+T on Mac to bring up the Quick Tag Editor. Change the <p> tag to an <h1> tag.
 |
 |
The Quick Tag Editor makes it easy to make structural changes to the code. |
You'll see the changes in Code View.
 |
In Code View, the "Welcome!" title is wrapped in a h1 tag. |
Now that you have your h1 tag, style it. Choose custom.css under Sources, GLOBAL under @Media. Click the + sign to create a new selector, then type h1 as the name. Press your return key (twice).
Jump to the Type category. Have some fun formatting the page title.
 |
|
 |
| |
- Choose Manage Fonts from the font-family menu. Select an Adobe Edge Web Font.
- Set the font-size to 40px or 50px (big!).
- Choose a color from your CC Libraries panel.
|
|
 |
|
 |
After adding an Adobe Edge Web Font, it is a good idea to save your changes. Go to File > Save All. If Dreamweaver asks you to update the Web Fonts script tag, click Update.
3. Notice the quote under the origami photo? Let's give it some special formatting. The quote is formatted in the HTML blockquote tag.

Create a new style to format the blockquote. Choose custom.css, GLOBAL, and click the + sign. Type blockquote as the selector name.

Jump to the Type category and style the quote so it stands out from the rest of the text. Here are a few ideas:
|
|
|
| |
- Change the font-style to italic.
- Change the font-weight to bold.
- Choose a contrasting color from your CC Libraries panel.
|
|
|
|
|
Notice the pale-gray line to the left of the blockquote? This is a standard blockquote style, but we don't need it here. Jump to the Border category and set the border style to "none".
Part 3: Top Nav Links
We need two different navigation styles for the top nav. On large screens, the top-nav will be formatted as a horizontal list:

On small screens, the top-nav will be formatted as a vertical list:
Using a vertical list on small screens will ensure that the links fit comfortably. A horizontal list might not fit in one row:

1. Open the v2-rollover.css file from the listamatic folder. Rather than recreating the styles from scratch, save time with some copy and paste work.
Select all the styles (except the @charset "UTF-8"; tag at the top). Go to Edit > Copy to copy the selection.
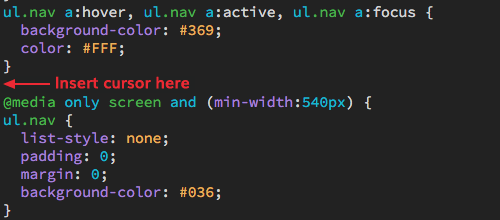
Open the custom.css file in the camp folder. Insert your cursor directly above the @media only screen and (min-width:540px) media query.

Go to Edit > Paste.
If you'd like the change the color scheme, you can do so directly in the external style sheet. Copy/paste the hexadecimal color values from your CC Libraries panel.
Preview in Live View to test the rollover effect.
Ready for the horizontal styles?
2. Open the h2-rollover.css file from the listamatic folder. Select all the styles (except the @charset "UTF-8"; tag at the top). Go to Edit > Copy to copy the selection.
Open the custom.css file in the camp folder. Insert your cursor directly below the @media only screen and (min-width:540px) media query.
Go to Edit > Paste.
Make the same color changes that you made to the vertical version of the list.
Go to File > Real-time Preview and make your window very small, then very large. You'll see a vertical nav-bar at small sizes, a horizontal nav-bar at large sizes.
Part 4: Content Area Links
That takes care of the top nav links, but you'll need a separate set of styles to format the "click here" links in the main content area.
1. The link styles are global, so they shouldn't go inside a media query. Insert your cursor at the bottom of the global styles.
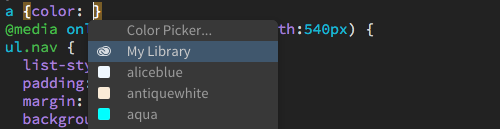
Type a {co
Choose "color" from the code hint.

Choose My Library to access your Adobe Color swatches.
Dreamweaver will enter the hexadecimal color code for you.

Type a semicolon to close the declaration.

Insert your cursor after the closing } and hit your return key to create a new line.

2. The hover and focus link states can be grouped together in a single style: a:hover, a:focus. When you type in the group selector, you have to be very careful to use a comma and a space mark between each pseudo selector:
a:hover comma space a:focus
Ready?
Type a:hover, a:focus {co
Choose "color" from the code hint.

Browse to select a color swatch from your library. Choose a contrasting font-color so the links will light up on rollover.

Type the semicolon to finish up.

Go to File > Real-time Preview and mouseover the "click here" links to test your rollovers.
Part 5: Spread the Word
Now the fun part! Apply your styles to the
other pages in the site.
1. Open moreinfo.html using
the Files panel. Toggle to Live View. The link styles and background images will kick in automatically. However, the page title isn't styled. Select the "More information" paragraph and press Ctrl+T on Windows or Cmd+T on Mac to bring up the Quick Tag Editor. Change the <p> tag to an <h1> tag.
2. Open projects.html. Select the "Projects" page title and change the <p> tag to a <h1> tag.
3. Select the "Green
Group (ages 7 to 9):" subheading and change the <p> tag to a <h2> tag. Do the same with the "Orange
Group (ages 10 to 12):" subheading.
Create a new style to format the subheadings. Expand your CSS Designer panel. Choose custom.css, GLOBAL, and expand the list of selectors. It would be nice to list the h2 style after the h1 style, right? So first, select the h1 style in the list of selectors.
Then, click the + sign to create a new style. Enter h2 as the selector name.
Jump to the Type category. Here are a few ideas:
|
|
|
| |
- Choose the same font that you used for the h1 headings.
- Make the font-size larger if necessary.
- Apply a different font-color.
|
|
|
|
|
4. Let's add borders around the project images. Each image is inserted inside an HTML figure tag.
Choose custom.css, GLOBAL, and edit the figure img selector.
figure img is a descendant selector that will format any image inside a figure.
In the Border category, choose a border-width, border-style, and border-color.
5. Now for finishing touches. Are you happy with your color scheme and type styles? Make any adjustments you like, and watch as your changes magically apply across all three pages.
Troubleshooting
Go to File > Save All to save your HTML and CSS files. Preview your final design in a web browser, and troubleshoot if your styles don't seem to be appearing on your page. Use the following troubleshooting tips for guidance:
|
|
|
| |
- If a particular color displays in Dreamweaver but not in the web browser, you probably forgot to enter the # before the hexadecimal color code.
- Preview in more than one browser—you
may be using a style that does not
appear in all browsers.
- If the problem is a tag selector, make sure that the proper tag
is being invoked. For example, a <p> tag selector
will not appear unless the content
is inserted in a paragraph.
- If the problem is a class selector, remember that you have to apply it.
- Check if your style is being overridden by another style. (Refer back to CSS hierarchy in the lecture if needed.)
|
|
|
|
|
Post to Your Web Server
When your pages are finished, open your dw1exercises index.html file and add a link to Exercise Two.
Publish your project using Dreamweaver's FTP feature. Click the Connect icon at the top of the Files panel to connect to your web host. Select the camp folder and click the Put Files icon.
When Dreamweaver asks if you want to include dependent files, click Yes.
Summary
Briefly answer the following questions:
1. What do you like about working with CSS?
2. Which of your styles do you feel makes your site pages most unique? Explain how you achieved this style.