Digital Video Editing I | Shooting and Editing Video
Film
an Interview
Choose a nice background for your shoot!
To get some working
knowledge of filming, editing, and digitizing video, we'd like you to
shoot yourself. In this project, we'd like you to shoot an
interview with yourself as the
interviewer and as the interviewee.
This project will be very challenging
and may take more time than others in the course, but it will teach you an incredible amount about
how to direct and edit video. You'll create a flow of conversation,
choose camera angles, manipulate framing, pacing, and continuity,
and more.
Beyond these important aesthetic and technical aspects, we will investigate the influence of subjectivity and objectivity in the editing process of one's own video project.
Shoot interview footage, acting as both the subject and the interviewer. Experiment with different camera framing and angles in your video, making sure you observe the 180 degree rule. Set up your hardware and properly manage your video files. Capture your source material and organize your subclips. Edit your project into a finished sequence with relatively smooth editing and pacing.
Exercises
will be evaluated for creativity and understanding of course
concepts.
The Self Interview
The production process for your interview is very simple, and in fact, it promises to be really fun. You won't need a studio, a crew, or any extra equipment such as external microphones, professional lighting, and so on. Just a video camera with a tripod, an extra lamp, some imagination, and the ability to talk about a subject that fascinates you!
Note: A tripod is highly recommended for this assignment, but if you don't have one, you can improvise a camera stand on a stable surface.
Your final interview should be no more than two minutes in length.
Preparing the Q & A
Most interviews that you see on TV or film are carefully prepared—scripted or rehearsed in some way.
So prepare for your interview by taking some notes before you start. You can conduct the interview on any subject you like. If you are stumped, ask yourself four questions about your life and career. Phrase the questions as you like. The following is just a guide:
1. Tell
us about yourself: What is your name and where did you grow
up?
2. What
are your main objectives in life right now, and how did you
decide on those?
3. What
was the inspiration for choosing digital media as your creative
path or occupation? Did you have a key experience that inspired
you?
4. What
are your goals? What is your desired job in the future? (This question should have a longer answer than the others, 10 seconds minimum.)
Setting
Up the Interview
The goal of this self interview is to create two different lighting situations for yourself in the double roles of interviewer and interviewee. To make your video intelligible to the viewer, you will have to choose a different background for each persona. Remember that in film you can "construct" space, so those two backgrounds can be in the same room or in totally different rooms. We, as the audience, will never know because, through editing, you can produce the illusion that those walls are part of the same room, even though in reality they are not. Experiment with the different framings that were discussed in this lecture. Change the framings of your subjects from shot to shot. Try an occasional change from medium close-up to close-up!
Since you are creating the illusion of a video depicting two subjects talking to each other, you will have to be careful with the angles where you set up your camera. The diagram below shows the 180 degree rule traditionally used in film:
According to the 180 degree rule, if you establish two characters in conversation, your camera should always stay on the same side of an imaginary 180 degree line.
To understand why, think of a TV interview. Imagine the interviewer is sitting on the left side of the screen, and the interview subject is on the right. Now, when the interviewer is talking, he or she should always be looking to the right of the screen toward the interview subject. When the interview subject is talking, he or she should always be looking to the left, where the interviewer is sitting. This keeps everything in proper relation to each other.
If the camera were to "cross the line" and shoot from the other side, the viewer would get confused. Suddenly, the interviewer is looking toward the right of the screen. Is he or she talking to a different person?
With that in mind, let's get ready to film you as the interviewer first.
Shooting the Interviewer
1. If you have already chosen a background, place the camera in front of you or to your right. Adjust its height so the camera is at the same height of your face (avoid any camera angles that point up or down—instead, adjust the height of your tripod).
2. Sit facing the camera. Look towards the left side of the camera. (Don't look into the lens.)
3. It
is
very important to make a test first to see if the sound is
recording properly. Some cameras have a switch for internal/external
sound input.
4. Flip
the LCD viewfinder in your direction to see yourself and to frame
yourself properly. Try to avoid looking towards this viewfinder during
the interview. Remember that you are supposed to be looking to the
left!
5. Since
there is no one facing you, you now must choose a spot on the wall
at the eye level of your imagined interview subject. This is where you will look when you are speaking to the camera.
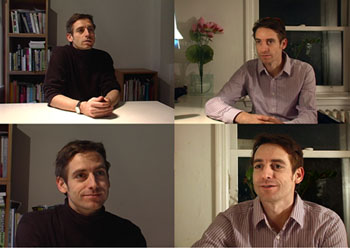
Changing the framing helps to alternate the sequence.
6. To make sure you understand the 180 degree rule, we also want you to break this rule. So please go ahead, cross the 180 degree line, and place the camera on the other side and look to the right of the camera. Now repeat the first question. (We'll use this footage later to demonstrate the problems that crop up when you break the 180 degree rule.)
Shooting the Interviewer's Reactions
You also will need to shoot reaction shots. They are the cutaways that you can use to break the length of a shot, mark a reaction, or cover some unwanted action or change.
In this case, it is important to remind the viewer that there is a listener. Once you finish talking, keep looking in the same direction you've been looking the whole time and anticipate your possible answers. Nod from time to time and change the framing once or twice (see example below).
Sample interview.
Shooting the Interviewee
When
you have finished filming the interviewer and the interviewer's reaction
shots, it is time to change sides (and change clothes if you want)
to play the interviewee. Place the camera at the opposite side, so
that it matches the viewpoint of the interviewer. This time, look
towards the right side of the camera.
1. If
possible, turn off the ceiling light in your room and aim a reading
lamp in your direction. (If you want to be more creative, light yourself
from two sides. The idea is to create a different ambient situation.)
2. Once
again, make sure the camera height is at eye level.
3. Now use your interview notes to answer each question.
4. Again, make sure you record some reaction shots of you listening to the interview questions.
You're done shooting. It's a wrap!
Post-Production Your Drive and Camera Setup
Let
the post-production begin! You will need a computer
with a FireWire port, your DV Camera, a FireWire cable
to connect your camera to your computer, and optionally an external
hard drive since these files get pretty big.
More
details for Premiere Pro users on how to hook up a camera are found here and how to hook up your television or
NTSC monitor here. Final Cut Express users, check your manual or Apple videos for details.
Capturing your Source Material
Capturing is the crucial first step. The setup is relatively easy. If you have done capturing before, you can skim or skip this short section. What follows here is a quick rundown:
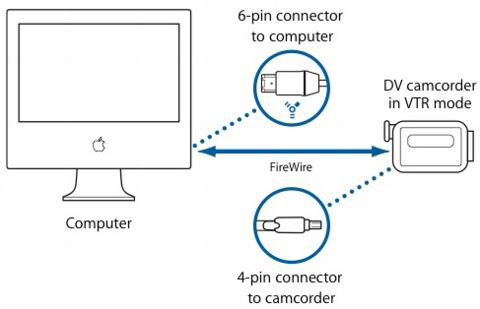
1. Hook up your video camera to your computer with the FireWire 6-pin to 4-pin cable. Load the tape with the footage you want to capture and turn your camera on in VTR Mode.
This diagram from Apple helps explain the required system connections.
2. Now launch Premiere Pro or your NLE software of choice, start a new project, and name it "E2-Interview."
3. Before
you begin capturing your footage, check where you want to save the material and how much space you have on your computer (or external hard drive).
You
can easily estimate the amount you will need: Calculate that each
minute of MiniDV = 216 Megabytes. If you have 14 minutes of video
you count: 14 x 216 = 3024 MB = 3.024 Gigabytes. This is what you'll
need, in addition to the usual 2 GB of free disk space, to make your
system run properly.
4. Follow
the instructions below to start capturing in Premiere Pro:
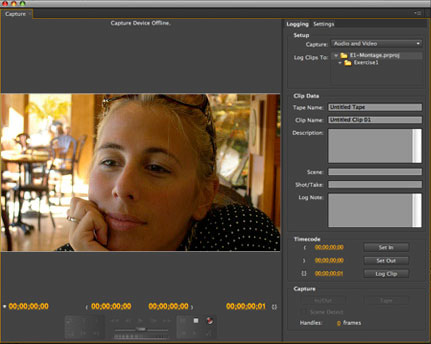
Go to File > Capture. The
Capture window will open, and you can start capturing your tape, but you should label it first! Give your reel a name.
The Capture window
Now you are ready to capture. There are several ways to do so. The easiest is to just "roll the tape" (using the control buttons and the slider) and click Record in the lower-left. After you have finished capturing all the interview material, press the Esc key to stop capturing.
The clip should now automatically appear in your Project Panel. After you have finished capturing, save your project.
Note:For those of you shooting with still cameras or video cameras with memory cards, you would simply import your movies into your project like any normal picture file off your camera.
Organizing your Clips
Now you should have a master clip with all recorded questions and
answers on it. For this section we will work entirely in the Source Monitor.
1. Load
the clip in the Source Monitor.
2. Check the settings of your footage. If you were using a DV camera, you will likely see dimensions of 720 x 480 or 1280 x 720, and a perhaps a 0.9 pixel aspect ratio rather than 1.0. This is perfectly fine as long as you work within these settings.
3. Create a new Sequence that matches the settings of your footage as closely as possible.
4. Mark
the in and out points of the first section you want to use.
5. Drag your clip from the Source Monitor to the Program Monitor and a new clip will appear with the in and out points you just selected.
6. Continue
creating the rest of the subclips and log/name them one by one. This may sound tedious but it will save you a lot of time in the long run; organization is a video editor's best friend!
7. Remember when we asked you to shoot a version of your first question against the 180 degree rule? Make a separate subclip of this take and name it "ALT" behind
your title.
8. You (hopefully) also filmed yourself listening/reacting
as both interviewer and interviewee. When you create subclips of
those shots, make them short: three seconds is more than enough.
Maybe just a nod or two. Label these with specific terms too.
When finished, you should have a bin full of your selected questions and answers with appropriate labels.
Editing
a Conversation (Shot/Reverse Shot)
We are ready to edit! The final interview length should be around two minutes or less, so keep this in mind while editing.
1. Double-click
the first subclip to load it in the Source Monitor. We will now
assemble the sequence. Drag Question
1 and then Answer 1 into the Timeline. Play your edit to make sure that
the eyelines work. Is the interviewer really looking at the interviewee?
2. Just
for comparison, insert the shot you named ALT (the one that broke
the 180 degree rule). Place it behind the second shot and repeat
once
again
Answer 1. Now you should have four clips in your timeline. To compare
the two versions you can conveniently jump back and forth.
Tip
for navigation: When
moving the playhead over the clips, press the page up and page down arrow keys to automatically jump to the very first frame of the next clip
or the next closest edit point. This is one of the most important shortcuts
for editing. In this case it helps to quickly compare the first
version and the ALT version. Try to find out for yourself why this
alternate shot doesn't work.
3. Now erase the ALT version by selecting it and pressing Delete.
4. Finish assembling the remaining questions and answers. When you have them all in the sequence, play the whole sequence and see how the timing between the questions and answers work and if the whole conversation flows "naturally."
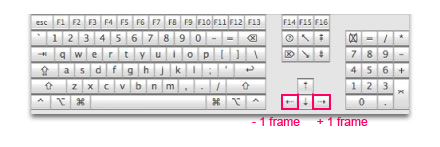
5. Now it's time to do the
fine tuning. You can even compare the images that define the
cut by going one frame forward and one frame backwards when you
are right over the cut, using the left/right arrows on your keyboard.
Placing the Reaction Shots
Let's
place reaction shots over the first answer. For that task we will revisit the overlay (overwrite) edit type from Exercise One. What we need to do now is place the reaction
shot without altering the length of the whole sequence.
1. Choose
an easy reaction shot. Maybe just a nod to start with. On the Source Monitor, mark your desired in and out points for how long the reaction
shot should last.
2. Move
the playhead on the Timeline to wherever you want your reaction shot
to begin (during the answer of the interviewee).
3. Disable/detach
the audio tracks, because for this reaction shot we don't want to
interrupt the interviewee's answer.
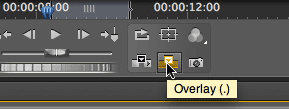
4. Now use the Overlay button to
pull your clip from the Source Monitor on to the Timeline. For the marked length, the
reaction subclip will overwrite part of the answer subclip.
An Overlay edit
Do you like how your first reaction shot works with the rest? Did you start trimming the clip to fix the beginning and the end? Well this is quite normal. It is often hard to predict how two facial expressions will work together. How and when the other reacts seems to be equally important. So finding the exact place and length for it may take some time.
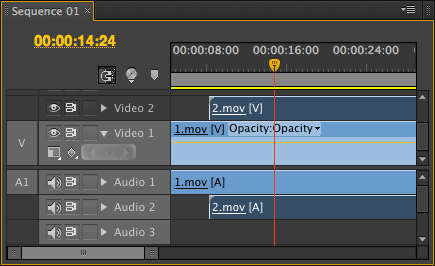
The second, more ideal way to place a reaction shot however, is to simply drag the reaction clip onto the timeline onto a new video track. Notice when you drag down from the Source Monitor, Premiere makes video track 2 available for you to place it on.
Inserting video onto a new video track
The advantage of this, as you can see, is you don't actually overwrite the interviewee's answer clip. This allows you to fine tune your placement with greater ease and peace of mind.
Pacing
Why are we putting all these reaction shots into the interview? Their function is to bridge long answers, to introduce a change of image, and to make the audience aware that there are two people in conversation, not one person in monologue. So it often works best to put them in more or less equal intervals.
The great advantage of now working with two video tracks is that you can move
the reaction clips without touching the edit on the track below. Try this in
different locations and see what an impact it has on the conversation. Common
sense will tell you not to cut a shot while a subject is in mid-sentence. In
fact, these changes work well when placed after sentences.
Make
sure there is some space between the answer and next question. Don't
cut it shorter unless the interviewee's intention is to interrupt
(which is actually the case in our example). Also, the reaction shots
should not be too tight. Make the absolute minimum one second of
length. Everything below a second may appear more distracting than
supportive to the flow.
Aim for your video to be no longer than 2 minutes in length. Don't be afraid to cut out substantial portions of your original footage in order to achieve this!
The Output
Remember
that for the course you will encode your short videos in
a smaller compressed format so that the result can be uploaded
and
downloaded in a reasonable time. Let's recap the output settings
we covered in the last exercise...
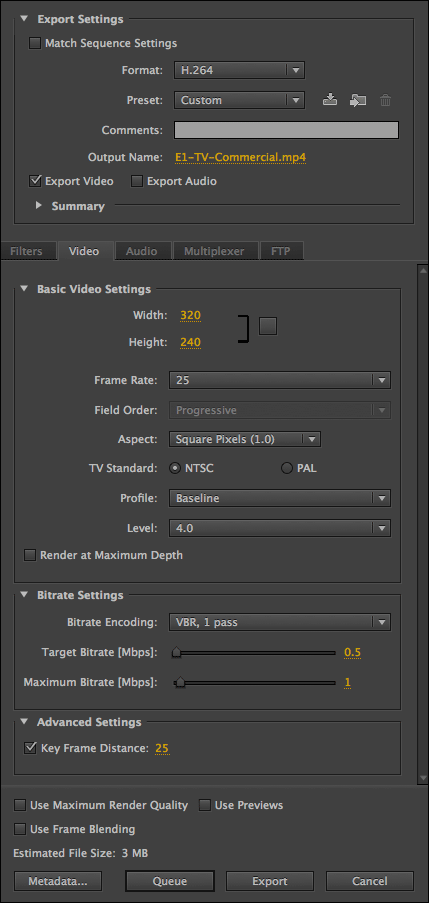
MPEG-4 Export settings
Here's a reminder checklist for exporting your video:
1. Make
the Format type H.264.
2. Final dimensions should be around 400 px wide and relative to your original footage. You'll likely need to unlink the constrain proportions link in order to enter these, but then relink them in order to reduce the dimensions proportionally. Here's an example:
Original source footage properties
Setting the correct dimensions, then scaling down proportionally.
3. Change the Frame Rate to 25.
4. Make sure Field Order is set to None (Progressive).
5. Set the Pixel Aspect Ratio to "Square Pixels."
6. Bitrate Encoding should be
set to "VBR, 1 Pass" with a Target Bitrate of 0.5 and a Max Bitrate of 1. If the file is still too large, reduce
you may try reducing the Target Bitrate to 0.3 or 0.4.
Alternatively, if you are well under the 10 MB limit, you may try increasing the export dimensions and/or Target Bitrate settings to achieve a nicer presentation!
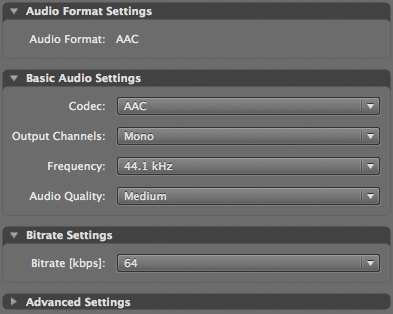
For your Audio Settings, first make sure to check the Export Audio box. Then under the Audio tab, follow these specs: AAC Codec, 44.1 kHz Frequency, Mono output, Medium quality, and 64 Kbps Bitrate.
Audio Export settings
Remember, you may have to toy with these settings in order to compress your movie to the appropriate size. If you are finding your movie is still too large even after compressing it with these specs, try lowering the audio frequency and bitrate. You'd be surprised how much data is typically in the audio as opposed to the video. Just be aware that you typically should not go below a 22 kHz frequency and a 40 Kbps bitrate to keep the audio from degrading unacceptably.
It is of great help to carefully learn all the steps of this output process since you will repeat this process several times in the course.
Congratulations! You have now completed the most difficult and lengthy exercise. You've shot, edited, and exported an entire interview!
As a reward, and for some inspiration, check out this Quick Crit of a great self-interview project by student Joe Savella.
Grading
Criteria:
What
your instructor expects you to do:
Demonstrate the ability to set up and shoot a short video with yourself as subject and interviewer in two minutes or less.
In shooting your video, demonstrate a basic ability to choose appropriate camera angles, different framing choices, and to utilize the 180 degree rule.
In editing your video, demonstrate a basic ability to organize your material and edit together your clips into a coherent sequence using the shot/reverse shot framework and reaction shots and displaying smooth editing and pacing.
In digitizing your project, show that you can output and upload your project file as an MPEG-4 movie.
How
to Post:
Upload your MP4 file to the Dropbox with a file size under 10 MB. Include comments with your post noting your experiences thus far.
If you have a question before sending your completed exercise for grading, use the Send Mail area to contact your instructor.


 Shoot interview footage, acting as both the subject and the interviewer.




 Demonstrate the ability to set up and shoot a short video with yourself as subject and interviewer in two minutes or less.
