The
word "seamless" is a word that we commonly use
to represent perfection. A seamless dress, for example, has no obvious
stitches. It appears perfect because we can't tell how it's made.
This
principle applies in filmmaking too. Seamless
editing is a process that gives the
viewer of the film no indication that there was ever a break in it
at all. This type of editing creates the invisible style that
early Hollywood studios commanded to be the only tolerated way of
editing.
How
is it achieved? Let's find out...
Editing
Techniques
A whole range of techniques can be applied to linking one
moving image to the next. So let's start with
the most common technique: using an object or gesture to create
a link.
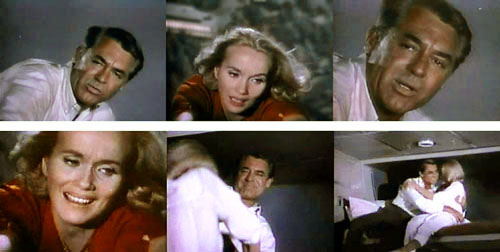
In
the following example, the edits were carefully planned
in pre-production. The edit bridges time in an unusual
way and is a world famous cut. The
sequence is another Hitchcock classic, the final sequence of North by Northwest (1959). In this scene, Cary Grant is holding Eva
Maria Saint
who is hanging
from
the Mt. Rushmore monument.
| |
Click
the image to view the clip (scroll to North by Northwest -
Mt. Rushmore on the page). |
This
sequence dramatically cuts back and forth between Grant and Saint,
each time with a slightly
closer
framing. Grant literally pulls Saint into the next scene:
the gesture of reaching with the arm—the "connecting element"—transforms
this near-death experience into a (slightly banal) romantic scene
in a sleeping car on a train, where Grant continues pulling
up Saint onto the top bed. Hitchcock cleverly segues into the typical ending of a thriller after the suspense is over and the good
guys win. He even tops it with an associative
cut for the very
last scene. Check it out for yourself by clicking the image above and
watching carefully
how the sequence is shot and edited.
How did Hitchcock weave this magic? In video editing, it's important to remember that the tail of one
shot enters into a dialog with the head of the following shot.

The
switch from one frame to the next takes exactly 1/30 of a second
in video, and this is enough time for a viewer to spot a bumpy
edit. For
instance, if you accidentally splice a single frame of a different
clip in between two scenes, most likely an editor (and
maybe a viewer) would
notice "something flickering" or something that does not belong there. Compared to a
TV monitor, the big screen makes these seemingly small
accidents much bigger.
Predicting
how one image affects the next is a very mysterious but fascinating
science on its own. This is where
editing theory becomes
the psychology of perception. Fundamentally, it's about analyzing which elements and shapes can relate to each
other from shot to shot.
Breaking
the Rules
The
common term for the seamless traditional style is continuity
editing, which means achieving a fluid progression
using an editing technique that avoids drawing attention to itself. While
continuity is still widely used and expected by the general public, there are times when it's OK
to break from it.
Nowadays
you have a lot of hybrid styles. The opposite of continuity editing
is everything
that highlights an edit: edgy cuts, flashing,
shaking, flickering,
or simple "jump cuts."
Danish
filmmaker Lars von Trier, among other directors, contributed to a document called the Dogma
Manifest (1995) that pushed hybrid styles pretty far. The document works against the over-saturated production values of contemporary
Hollywood filmmaking. Dogma's intention (like many other forerunners) is to
break with the cinematic illusion of reality and present film as film. With this approach, virtually all the parameters of film or video production change.
To develop your craft as an editor, you will likely want to master continuity editing before reaching too far into experimental genres. But ultimately, your editing style is up to you. The important thing is to decide which
editing
style carries the intention of your video the best.
Connection
and continuity can be created using four main types of elements:
graphic matches, rhythmic elements, movement, and spatial relations.
Let's take a close look at how each of these works and how best to
use them.
Graphic
Match
Theoretically,
every shot provides the possibility of working with its pure pictorial
qualities. Shots that are linked through
the interaction of their graphic similarities or differences are called graphic matches. Shapes,
shadows, and outlines, especially in black and white, carry the strongest
visual elements—they are even stronger than color.
The easiest kind of graphic match can be achieved with simple graphic
objects. And the impact can be surprisingly strong. Scenes and locations can
blend together, suggesting a major change in time and/or space through a very
smooth
transition. A cross fade is often added to improve the connection.
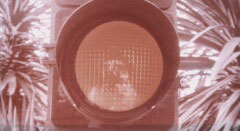
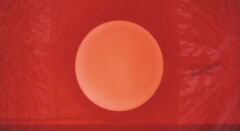
Pedro Almòdovar's Woman at the Verge of a Nervous
Breakdown (1988)
has several of those matching cuts using very simple shapes, the following
cutting from a traffic light to a sunset:
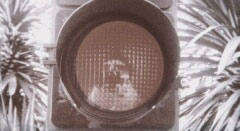 |
|
|
Pedro
Almodovar's Women at the Verge of a Nervous Breakdown (1988).
Click any one of the images to play the clip. |
The film Citizen
Kane, which
we visited earlier, features many experimental production
techniques. It is full of sophisticated
graphic matches. This masterpiece is certainly worth watching for many,
many reasons and will be quoted in different contexts in this lesson.
Even if you have seen it, we highly recommend that you watch it again
during this course.
Now
let's have a look at another classic. Below is an image showing
the legendary cut where Stanley Kubrick skips
3000 years in 2001: A Space Odyssey when the giant rotating bone that the
ape throws into the sky becomes a space ship.
This
cut is not matching the positions of the bone/space ship,
yet the shape is similar
and certainly it is the cut's highly metaphorical value
makes it so spectacular as a graphic match.
 |
2001: A Space Odyssey
(1969) |
Rhythm
Rhythm in video editing is by definition intrinsically related to sound and percussive
music. The most popular example is
the cutting of scenes to a beat that occurs in music video.
But rhythm
is also perceptible even when there is no music track. When the intervals between shots
repeat, for example, they produce a rhythmic visual pattern. With a sophisticated director or editor, editing rhythm acts
like a counterpoint to musical rhythm.
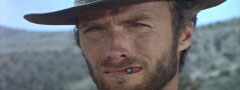
It is quite common to build up to the climax of a scene by gradually
shortening the
duration of shots on screen (similar to the climactic crescendo in a piece of classical music). One of the most striking examples of this technique is Sergio Leon's film The Good, the Bad, and the Ugly (Il Buono, il Brutto, il Cattivo, Italy,
1966). The filmmaker uses both rhythm and acceleration extensively
in the movie.
In a final shootout scene that runs for
several minutes, three men face each other in a triangle, waiting to see who will
act first. One of the film's main theme songs is played in its entirety,
from a
slow, elegiac beginning to a frenzied crescendo that is abruptly cut off by
Clint Eastwood's gunshot. The slow mounting crescendo is paralleled
by an increase in the pace of editing
and the intensity of framing (the sequence actually begins on a long
shot similar to the previous one).
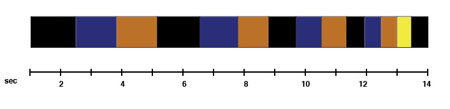 |
This
image represents the intercutting of portraits during the final shootout
sequence. Each color is a different portrait. Notice the insertion
of a different image right at the end. |
|
Click
the image to play the clip from The Good, the Bad, and the
Ugly. |
There
are infinite number of movies in which editing is subordinated to a set of rhythms.
For example, in music videos
where
music dominates in a clear, determined way, the risk can be that editing
becomes a mere alignment of shots, where a stomping downbeat grinds
everything together into abstract mélange. Real
skill comes in when music video editors cut around the downbeat, creating counterpoints to the musical rhythm using editing rhythm.
A
sophisticated exception is Michael Gondry's Chemical Brothers
video Star Guitar. The shots are not edited to the beat; instead, individual components of each image are aligned to the beat. Take
a look...
Michael
Gondry's video is not an editing technique in the traditional sense.
However, it is a perfect example
of what compositors call vertical editing as
opposed to horizontal editing. It's called vertical editing because the image
is treated in many layers (like
in Photoshop) that contain 2D or 3D animations. The traditional edit
on the other hand happens horizontally, with one shot after the other, following
the old concept of film (or a magnetic tape traveling horizontally in
a cassette).
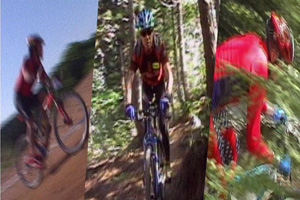
Movement
Movement editing
is another interesting way of relating one shot to the next. Using
the movement editing approach, the camera follows a movement (a pirouette, a speeding
car, a gunshot) to its logical conclusion. Here
are three images from the trailer of the film GOSPEL (2005):
 |
GOSPEL
(2005). Click the image to play the trailer from the Apple Web site. |
This movie trailer is edited to a downbeat
and interrelates some of its images with movement edits. You'll notice that the editor softens the transitions by quickly fading to black between
the images.
Also notice that about three quarters of the trailer is done with
a rhythm edit (which is relevant to
the subject). The trailer starts with some typical snippets
of engaging dialogue between the protagonists and then segues into the rhythm
sequence. Shortly after, certain movement dynamics are
introduced. Look again at the images above. From what you see in the still
frames (not knowing anything about the direction of
movements) one could hardly guess how they would work in a sequence.
In fact, in the first two images you see Boris Kodjoe portrayed from different angles in the same shot in what might
look like an inelegant jump cut.
Below
is the motion
path that is formed out of these three short clips, and this is why
they seem
to melt together so easily. Notice how Boris Kodjoe's head swings down
in the second shot and therefore enables the reverse direction of the
spiraling movement in the third shot.
 |
GOSPEL
motion path |
Movement edits make the editor
become a true choreographer. They're not only applied to dance sequences (although dancers and sports stars are often shown with prominent
movement edits, simply because their motions are so interesting). Movement edits can be applied to any mundane series of movements.
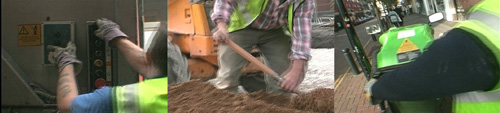
One example is a motion study of everyday jobs of British workers that
one of us made in 1997 entitled Locked Groove. Try to follow the motion path of this sequence and
take a close look to identify which clips cause the motion to reverse direction.
|
Caspar
Stracke: Locked Groove (1997/99). Click the image to play the
clip. |
Spatial
Relations
Editing usually serves not only to control graphics
and rhythm, but also to construct space. The cinematic space must overcome its two-dimensionality by means of movement and editing.
The coherent presentation of spatial relationships between protagonists
and objects is very important for the perception of the overall space.
For
that very reason, a conventional film narrative always starts with an establishing
shot, usually an extreme wide shot that gives an overview of the scene and provides
the viewer with a spatial orientation. This is typically followed by a closer
framing of
the actors. In some cases a re-establishing shot may be used later (or at
end the sequence).
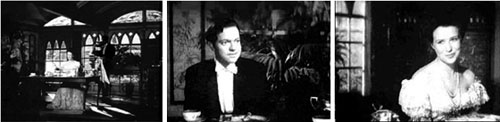
The
following example starts with an establishing shot in which the camera
slowly approaches the subjects, and is followed
by a classical shot/counter-shot dialogue scene. As in our interview exercise, it is shot according
to the 180 degree rule. In this case we can also see the editor's expertise in achieving another important
aspect of continuity: the eyeline match.
| |
Click
the image to play the clip. Choose the Citizen Kane - Breakfast
Scene from the list. |
One way or another, video editing is purely about time
manipulation. We can, for
instance, brilliantly hide the fact that a large amount of
time has passed between two cuts. Most of the following techniques
have the function of compressing time while still giving the viewer the illusion
of real time.
Here is a short glossary of the most common time compression techniques:
 |
|
 |
| |
Elliptical
editing presents
an action in such a way that it consumes less time on the screen
than it does in the story. In most cases it involves a series of
fades. The fact that we fade within the same scene indicates
that we have skipped bit of time in that particular scene.
Jump
cuts are abrupt, raw cuts, sometimes introduced within the same scene to deliberately to make a dramatic point. These often
appear in dramatic moments.
Motivated
edits are
edits made just at the point where the action makes
the viewer immediately want to see something that is not currently
visible. For example, you might see a close-up of a man firing a gun,
aiming it almost directly into the camera. Typically this would be followed by a 180
degree reverse
shot
that shows us where the man was firing.
Cross-cutting edits together two separate events that occur at the same time. If two parallel
actions are occurring, the editor may cut from one line of action
to another. For example, the editor might cut from a scene at the office to a scene that is occurring simultaneously at home.
A cutaway involves bridging or inter-cutting between two shots of the same subject. It
often shows
a secondary activity occurring at the same time as the main action.
It may be preceded by a definite look or glance out of frame by a participant,
or it may show something of which those in the preceding shot are unaware.
It may be used to avoid the technical ugliness of a jump cut, where
there would be uncomfortable jumps in time, place, or viewpoint. It
is often used to bridge time as well.
An insert is a bridging close-up
shot inserted into the larger context (a picture within a picture) offering an essential detail
of the scene or a re-shooting of the action with a different shot size
or angle (such as the listening interviewer in Exercise Two).
A buffer shot is a bridging shot (normally
taken with a second camera) to separate two shots which would have
reversed the continuity of direction.
The fade/dissolve technique is in a category by itself. Fading
is not an editing style or technique. It rather is an alternative.
Both fades and dissolves are gradual transitions between shots.
In
a fade, the picture gradually appears from (fades in) or disappears
(fades out) to a black screen. A slow fade-in is a quiet introduction
to a scene; a slow fade-out is a peaceful ending. Quick fades
are used to smoothen up the transition between images that do
not match together, as
in the GOSPEL trailer.
A dissolve involves fading out one picture while fading in another on top of
it. The impression is of an image merging into and then becoming another. A slow
mix usually suggests differences in time and place. |
|
 |
|
 |
|
For speedy access to various editing functions, get to know the FCE tool palette.
|

Let's
have a quick look how dissolves work
in Final Cut Express. Start by opening up your E1-Flying-Sequence from Exercise
One.
Select
a cut that you want to dissolve, and place the playhead over this
cut.
Go to Window > Effects to open the effects browser.
You see you have a lot of transition effects to work with! Under Video Transitions > Dissolve, find Cross Dissolve. Drag the icon and place it on the timeline over the clips you're transitioning between. The transition will automatically take up the same length as the overlap of your two clips.
|
Adding a transition to the timeline |
Right click on the transition clip and select "Center on Edit" from the Transition Alignment menu. The "Center on Edit" option
will automatically make the cut of your transition halfway between the first frame and last frame of the overlap. Using "Center on Edit" makes it easy to make a common, half-second dissolve over 15 frames with 7 frames of the first shot and 8 frames of the second shot.
If
you don't have enough frames on at least one side, dissolve to the
other (try the options "End on Edit" or "Start on Edit" from the Transition Alignment menu).
Play
it a couple of times and change the dissolve length by dragging either the beginning or end of the transition symbol.
 |
Change the length of a transition on the timeline |
If you want to erase
a dissolve, select the transition and hit Delete. It's important to note again the difference in delete keys. The backward delete key will remove the transition but leave your clip otherwise intact. The forward delete key will clear the part of the clip you have selected as well.
Now
we will check out three more editing techniques that are
not really part of the standard glossary, but rather
promote the opposite of balanced, seamless editing. These techniques belong to the oldest form of experimental
editing and emerged not too long after the birth of cinema.
 |
Now
for a flashback to the olden days of editing... |
Kuleshov
Effect
Lev
Kuleshov was an early Russian theorist and filmmaker who believed
that juxtaposing two unrelated images could
convey a new meaning. In the
Kuleshov experiment he filmed Ivan Mozhukhin, a famous Russian actor, and
shots of a bowl of soup, a girl, a teddy bear, and a child's coffin. He then
inserted the shot of the actor between the other shots. The result was that
the audience immediately assumed not only that the actor's expression changed,
but also that the actor was reacting to things present in the same space
as himself.
Kuleshov
used the experiment to indicate the usefulness and effectiveness
of film editing.
See
a re-enactment from film instructor Jeff Butler here.
He replaced Ivan Mozhukhin with a famous Swiss actor.
Intellectual
Montage
Let's
stay for a moment with the early film pioneers. Intellectual montage
was developed in the 1920s by the great Russian
pioneers Pudovkin, Vertov, and Eisenstein. It's almost unbelievable,
but most of their theories still apply to digital video today.
In
his 1931 essay "A
Dialectic Approach to Film Form," Sergei Eisenstein declared
editing an art form and a political statement. The Russians did
not want to be seamless. The film cut was politicized. A famous
shot from Strike! of the workers' rebellion is juxtaposed with a shot
of cattle being slaughtered. This yields the symbolic meaning
that the workers are cattle.
Eisenstein
dubbed this
technical innovation intellectual
montage, and it resulted
from his studies of Kuleshov. In that same essay, Eisenstein
distinguished between ten different
types of dialectical conflict at the level of shot composition
alone, many of which are utilized in the Odessa Steps sequence
in Battleship
Potemkin (1925).
Here
is an intellectual montage from October (Oktyabr,
USSR, 1927):
 |
Click
the image to play the clip. |
In
this clip, the increasingly primitive icons from various world religions
are linked by patterns of duration, screen direction,
and
shot scale to "produce
the concept of religion as a degenerate practice used to legitimate corrupt
states."
What
nowadays is called montage has
shifted meaning over the years. Unlike its political implications and
metaphors, montage merely stands for an assemblage of images, a freestyle
edit that is only used to show the most possible action in the
shortest amount of film time. In Hollywood, the notion of montage
replaced what American editors called "The Vorkapich," named
after Victor Vorkapich, the editor credited with inventing
the specific
style of dissolves.