Learning Objectives
In this lecture, you can expect to:
- Learn the purpose of the elements in a soundtrack: natural sound, dialogue, voiceover, sound effects, ambient sound, and music.
- Learn the basics of recording sound using commonly available mics.
- Learn tips for working with common recording issues like room tone, background noise, and wind noise.
Anatomy of a Soundtrack
Dialogue and Narration
The most important element in many soundtracks is dialogue, the sound of two or more people speaking to each other. It is particularly important that the audio levels for dialogue are good and the sound quality is high. Nothing frustrates an audience more than watching people speak to each other without being able to make out what they are saying.
The other kind of speaking voice you will often employ is narration, also referred to as a voiceover. The voiceover track is added in over other sounds. With a voiceover, we never see the speaker, but merely hear the voice tell a story or describe events on the screen. This technique is commonly used in instructional and scientific videos, historical programs, and news shows and documentaries.
This clip from a 1950s movie trailer shows how dialogue and narration can be intercut in the same scene:
Note
Dialogue and narration are terms that describe the sound of spoken words in films.
Natural Sounds
Next in your soundtrack are natural sounds. These are unadorned sounds emanating from the actual source. For example, when your character crosses the room, his footsteps are audible. The natural sound is the sound of his feet hitting the ground.
Some natural sounds are recorded while the movie is being shot. Others are recorded as sound effects, which are sounds typically recorded after the synchronized sound and added in the editing room after the shooting is finished. Common sound effects include things like a door slamming, a phone ringing, the pop of a gun, the crack of thunder, the sound of glass breaking, and so on.
Sound Effects
Sound effects for almost anything can be bought online at effects libraries sites like prosoundeffects.com or sonniss.com. The advantage of using pre-made sound effects is that they are clean recordings, usually created in a sound booth. But they can be expensive and you can also make your own.
Sound effects you make yourself will likely be more specific to what you need and less generic-sounding. Since the early days of cinema, such unique sound effects have been created by Foley artists whose sole job is to create sound effects. While watching a film, Foley artists use various props to literally enact the sounds in the appropriate places.

Dialogue and narration are often intercut in the editing process.
Creating Foley effects.
Ambient Sound
Ambient sound is sound that is associated with a particular space. It is comprised of sounds present in the environment. Ambient sound, also called ambiance, is essentially background noise. One example would be the sound of rain falling on a rainy day.
Ambient sound may contain elements that were present in an original recording, as well as deliberately added sound effects that enhance the acoustic space. For example, if you are shooting near the ocean and your original recording fails to pick up the sound of the waves, you may choose to edit them in later to create a seaside ambiance.
Note
Ambient sound is the background sound at your shooting location.

These ambient seaside sounds would need to be low in the mix.
Music
Usually added in the final edit, music can add another layer of meaning to a scene, as well as effectively disguise any audio mistakes. But, like everything else, music works best when used intentionally. It can be employed to create a specific mood, such as hilarity or dread.
If you don't believe me, try watching a horror film that used to give you nightmares with the sound off. You'll likely find it a lot less frightening, and maybe even ridiculous. Horror films often speed up the music or make it more dramatic right before something very bad is going to happen to a character.
Important
Music can enhance the mood of a scene but should not be overused.
Below is a link to a scary scene edited out of The Exorcist. Try watching it first with the sound off, then with the sound/music on.
In other genres, music can also be symbolic of a less deadly shift or a turning point for a character. When music is accompanied by lyrics, they can be employed as a means of describing the inner feelings of a character, or can act as a narrator of sorts, by relaying thematic information. Music is a very powerful tool. When married well with images, it can work wonders.
However, it's also important not to overuse music. When music is used sparingly, it is likely to make a bigger impact.
Also remember that it doesn't matter what kind of video you're making if sounds break up the narration. The goal of any sound is to let a person feel like they're in a certain place and time. It can transform your story into something interesting to watch.
Putting It All Together
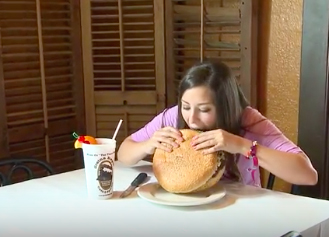
Let's look at a finished project to see how the different parts of a soundtrack come together. Here's a story I shot in New Orleans on a big burger challenge staged by a local restaurant:
Leave a sound break between each piece of dialogue or narration.
Hungry yet? Here are some sound editing concepts to get the creative juices flowing.
- Use natural sound for sound breaks. In journalism, natural sound is often referred to as NAT Breaks or Pops. Why and when do we use it? If you watch the burger video, you'll notice that between every interview segment is a natural sound break. There is a pause after each piece of dialogue so you can digest what was said (I'll stop soon), but instead of leaving dead air, natural sound is used to fill the void. The sound of the grill broke up the interview sound bites, as did natural sound of the chef talking while making the burger. (Okay, I'm done.)
- Use overlapping sounds. You'll notice that in the track, different sounds overlapped: audio, natural sound, even music. That's natural—in real life, we are accustomed to hearing different sounds overlapping all the time.
- Music adds flavor, energy, and a sense of place. Not much to add there! But notice how understated the music is. It gets out of the way when other things need to be heard.
- Make sure the narrative is audible. Smooth editing ensures that there are not too many sounds at any one time. The sounds are not competing with each other, and the narrative and voiceover are always distinctly audible. The voice carries the story, and so it is the main priority
Now in order to assemble each part of the soundtrack, we had to make sure we had clear interview sequences with good audio. On top of that, we had to make sure some important sounds were captured such as the sizzle of the burgers, and the reactions when the intern sits down to eat her burger!
We had to select the appropriate music track for a down south burger joint.
All of this requires careful attention to available sounds while you are on location. If you hear a great sound while out shooting a documentary or corporate video, remember to put the mic close to it!
You can get creative with your sound breaks. Watch the following piece from KARE where they put a mic on the town dog, Bruno:
It's marvelous how artfully the dog's panting (and eating, drinking) are intercut with various interviews and scenes of him loping about his town Longville.
Sound Tech Fundamentals
Having just discussed the various kinds of sound we could record for a soundtrack, let's turn our attention to how we record sound.
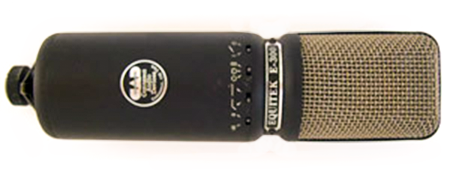
Types of Microphones
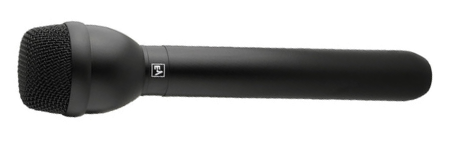
Most camera mics are shotgun mics, designed to pick up the audio directly in front of the camera even if it is at some distance.

Standard shotgun mic
These microphones are quite good at picking up sound emanating from directly in front of the camera, even if it is some distance away. They pick up sound in a narrow path directly in front of the camera, but not behind it or very far to the left or right. These mics are less effective at picking up sound to the left and right of the camera lens, where sound levels will drop off quickly.
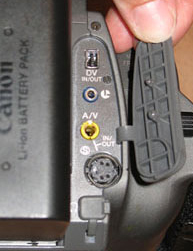
A/V in/out on your camera
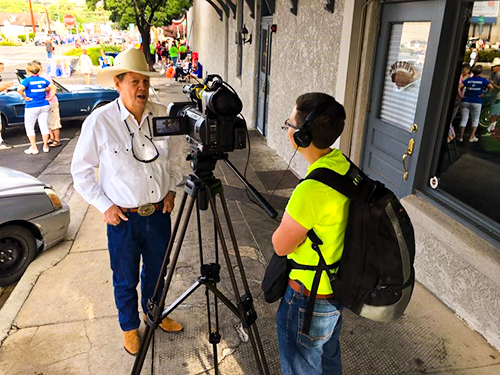
When recording voices (dialogue or narration) it is ideal to use a separate mic, both for higher sound quality and so you can separate out the voice from the ambient sounds. Separate mics are connected to your camera's A/V in/out socket (right).
To record a voice you might use a cardiod mic, or if you want to record two people talking at the same time, you might choose a bidirectional mic. An omnidirectional mic, just like it sounds, captures sound from all directions at once.
Use your microphone's directionality to cut out unwanted noise on location.
Let's look at some of some basic options for adding external microphones.
Below is a straightforward directional mic. It captures sound from the direction in which it is pointed:

Directional microphone
Note
Most microphones supplied with cameras are directional shotgun microphones.
This is an omnidirectional mic that captures sound from all around:
Omnidirectional microphone
Finally, below is a multidirectional mic. I can adjust the settings on this handy gadget to record directional, bidirectional, or omnidirectional sound—whatever I need.
Multidirectional microphone
Don't forget to wear headphones while you shoot, as the better your mics, the more audio detail your recordings will pick up.
Important
Wearing headphones allows you to monitor sound as you record it.
Headphones are an essential audio accessory.
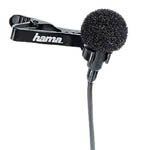
Lavalier mics are microphones that are attached to your interview subject's lapel or shirt. This allows the videographer to step away from the interviewer and not have a mic appear distractingly in the shot.
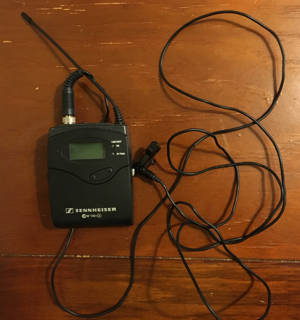
Lavalier microphone
Tips for Recording in Various Conditions
Understanding Room Tone
Let's try an experiment. I'd like you to take out your camera. Set it down on a table or some other steady surface in a seemingly quiet place. Put on your headphones and set your levels for normal dialogue to be audible at that location. Attempting to be as quiet as possible, record between one and two minutes of sound. As Paul Simon said, we are listening to the sound of silence. After you've finished making your recording, listen to it. Is it truly silent?
This little experiment was meant to introduce you to something called room tone. Room tone is the sound of the room or space in which you are recording.
Every room has its own sound. Room tone may include the sound of a ventilation system or the hum of lights or appliances. If you have the option, you may choose to unplug or turn off these devices (even your computer) while you are recording, to minimize extraneous sounds. Closing the window also helps control unwanted outside sounds.
There is a big difference between normal room tone and no sound at all. Taking a mic around the Sessions New York office, we found that almost everything in the office made some kind of contribution to room noise:
Important
Even an apparently quiet room has some background noise.
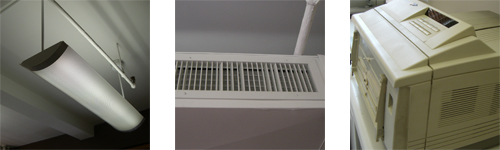
Lights, air vents, and printers
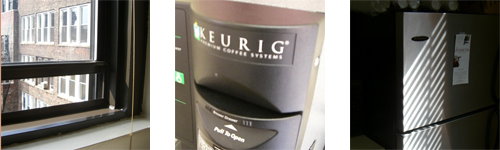
The windows, the coffee machine, even the fridge!
So, it's simple, right? All you have to do is minimize the room tone at your shooting location...
Not so fast though! Recording is one of those areas where you must always think ahead to the editing room. Imagine you grabbed a great-looking establishing shot that you want to use at the beginning of your video. The only thing is, right after you turned the camera on, the mail carrier came and your dog started barking furiously, creating unwanted background noise in your shot.
Once in the editing room, you may decide you really like the look of that particular take. It would be the perfect shot if Spot didn't have a barking fit. What can you do? Well, if there was no other action in the shot that caused sync sound (people walking, doors opening, and so on) you could remove the audio track and substitute it with relative ease.
Now, if you were to simply erase the audio track without replacing it with a track of room tone, your shot would stand out markedly from the shot before and after it, because of the difference in the quality of the silence. Simply cutting the audio track out results in audio dropout, which occurs when you temporarily lose sound altogether. Acoustically, this is a very noticeable event. Instead, what you would need to do is insert some "room tone" with any new audio tracks that you splice in during the editing process.
The moral: Whenever you record in a new location, always make sure to record a few minutes of silence on location, so that you have some room tone available for editing later.
Managing Background Noise
Background noise is another often overlooked factor in audio recording. When we discussed location scouting, I mentioned that you want to pay attention to the specific sounds and overall noise level at a particular site. You may find the perfect backdrop, but find that it's next to a freeway where cars honking and sirens pass by.
Make sure you record some environmental noise at every new location.
Likely that site is not going to work very well for you, unless the traffic noise is essential to your piece on traffic delays!
While some adjustments can be made in the editing room, you should always try to make the best on-site recordings possible, for that is the easiest way by far to get good sound.
Your original synced recording should be as clear and unpolluted with distractions as possible, bearing in mind that other sounds can always be added to enhance the soundtrack after the recording. It's a lot easier to add sound to a soundtrack than to remove it.
Combating Wind Noise
If you find yourself stuck with a less-than-ideal sound situation, you'll need to be resourceful. Professional productions usually use a variety of different kinds of microphones hooked up to the video camera so as to get very clear recordings with minimal extraneous sound. For this class, as discussed earlier, you will most likely be limited to using your camera mic, which on most cameras is a directional shotgun mic.
Consider using your subject as a shield at windy locations.
One tip for a shotgun mic is put your talent as close to directly in front of you as possible. Say you are shooting an on-scene news report from a noisy location. You can position your actor (or reporter) between the camera and the source of extraneous sound. Your talent's body will act as an acoustic screen, blocking at least part of the unwanted noise.
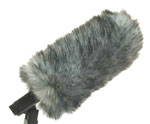
Another tip is to reduce wind noise as far as possible. Wind noise is a major factor in outdoor locations. This occurs when wind hits a microphone and is amplified. It can be surprisingly loud. Most microphone manufacturers make windshields for their mics, essentially small foam covers that fit on top of the mic like a sock, which blocks the wind without blocking the sounds that you are trying to record. Windshields for larger mics such as booms are sometimes more fuzzy. They are called furries and look a bit like Dr. Seuss characters.
You can also try to shield the wind from your mic with your hand, a piece of cardboard, or anything else large enough to block it. If this doesn't work, you may consider investing in a windshield, or if you are crafty, you can search the Internet for tips on DIY windshields.
And with those tips on using your camera's mic, guess what the exercise has in store!