Learning Objectives
In this lecture, you can expect to:
- Learn how digital video technology evolved.
- Learn what's involved in the three stages in video production.
- Learn important technical concepts for shooting video: formats, standards, aspect ratios, and image sensors.
- Learn how to use your camera controls: record/playback, manual and auto focus, white balance, exposure, and audio.
A Digital Revolution
It was 50 years ago when the digital video technology began with coding and in 1986 the Sony D1 digital recording format was introduced when this technology burst onto the scene and made movie-making accessible to the masses.
Though the revolution didn't exactly happen overnight, digital video technology has largely fulfilled that promise. The majority of movies shot today use video technology. Entry-level video equipment is affordable for the average consumer, video editing software is portable and inexpensive or free, and the Internet sites such as YouTube and Vimeo provide limitless free channels for publishing movies and reaching audiences.
Did you know that major motion pictures have been made on iPhones? The recent advent of high quality video cameras on smartphones means that the tools for movie making fit in your pocket. Video technology has come a long way, to the point where consumer and prosumer cameras are hard to tell apart.
To begin our course, let's take a look at how digital video technology began, and how it evolved. This will provide an important foundation for your own movie making.
Early Beginnings
The first true portable video camera was developed by Sony in 1965, just four years before Neil Armstrong set foot on the moon. Sony's product, called the Portapak, was a camera hooked up by a cable to a video recorder.

The Sony Portapak looks portable in this early ad, but don't be fooled!
In spite of its nifty name, the Portapak was anything but a portable device. Cassettes as we now know them did not yet exist, and so the Portapak recorded images onto bulky cylinders of 1⁄2" reel-to-reel tape. Its two-device setup was difficult if not impossible for one person to transport.
Note
The first portable video cameras weren't very portable. It wasn't until compact, lighter technology was developed that the video camera became a consumer appliance.
Though the Portapak was cumbersome, it did represent a breakthrough. It was the first time a video camera had been made available to the public as a consumer electronics appliance.
From 1965 onwards, the digital camera evolved through a series of product innovations that made it increasingly affordable and easy to use. The integration of camera and recorder, for example, made the camera much more convenient to lug around. More compact formats of video cassette tapes made cameras lighter and more portable and recorded footage easier to get from place to place.
By the 1980s, pundits predicted that the video camera would soon democratize filmmaking—opening up the medium to everyone. As Francis Ford Coppola said, "For me, the great hope is now that 8mm video recorders are coming out, people who normally wouldn't make movies are going to be making them."
The 1980s: From Analog to Digital
The digital video revolution, however, took time. Arguably the biggest obstacle to a speedy revolution was the recording format.
By the 1980s and early 1990s, a range of competing video formats had emerged: VHS, Beta, 8mm, and Hi-8, all of which recorded onto tape. As these formats flourished, amateur film-making boomed in sync. With portable equipment available for almost any budget, it seemed that anyone could make their own home movies or even independent films.
Note
Though video became popular in the 1980s and '90s, shooting video meant significant tradeoffs in cost and quality.
And anyone did. Let's face it, people like to ham it up, and home video allowed us to be in the spotlight without moving to Hollywood. Proof of the popularity of home video became abundant in the 1980s, when parents showed off videos of their children's dance recitals, and amateur cameramen sent in a multitude of embarrassing moments to the popular TV show America's Funniest Home Videos.
But these tape-bound formats had limitations. One major tradeoff was cost and quality. The quality of film formats ranged from merely tolerable to professional level, usually depending on cost. To get clear, bright images during this era, you had to pay for expensive film.
The 1990s: NLEs Save the Day
In the late 1990s, the digital video revolution began in earnest, as professional and amateur filmmakers took advantage of changes in the way video was edited.
By far the biggest shift in video in the 1990s was the transition from linear to non-linear editing. In the early days of video editing, linear editing would require that a video be edited in order from beginning to end. If you wanted to change the third clip in a finished project, you would have to backtrack and erase everything you edited after that point.
Note
Non-linear editing allowed video footage to be edited in any order.
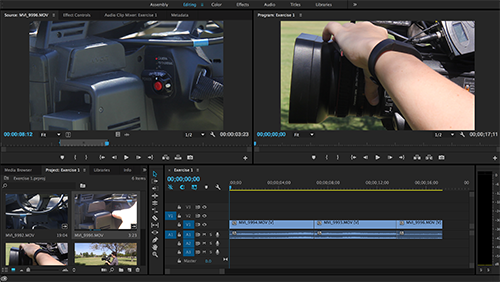
Adobe Premiere Pro, a popular non-linear editor (NLE).
With the advent of non-linear editing software programs like Apple's Final Cut Pro and Adobe Premiere, a video could be edited together in any direction, from start to finish, from the end backwards, or out from the middle. (That's why they called it non-linear editing!) Non-linear editing systems were able to do this because the videotape was first captured, then translated into a digital audio and video file on a computer.
Non-linear editing opened up all kinds of possibilities for video editors. Using a digital editing process, video material can be added at any point in a movie's timeline. Early non-linear editors (NLEs) were clunky, and had trouble handling projects with many large video files. But as time went on, storage space and hard drives got smaller and less expensive, and processors got faster—all of which greatly improved the performance of NLEs.
The 2000s: Tapes Begone!
Since early 2000s, the industry has undergone an industry-wide change from film media to digital media. There was a transitional period in which we used a variety of tape-based media, but we now (thankfully) predominantly use tapeless digital media: solid state P2 cards, memory cards, microdrives, and others.
Note
The transition to solid state digital media in the last fifteen years has made video making more accessible.
The transition to using solid-state media like memory cards provided one major benefit: solid-state media is lossless. During the tape media era, when footage was transferred from one tape to another, the tape quality would deteriorate. We called each new transfer a "generation" loss. Now with solid-state media we can share and copy files from computer to computer and never lose quality.
Solid-state digital media has now taken over broadcast journalism, advertising, even motion pictures. The year 2012 was a turning point; by 2012, more than half of all major motion pictures were being shot in digital media. Almost any project you can think of, ranging from music videos to corporate videos, is now being shot with tapeless technology.
Affordable, high-quality cameras, equipment, and software have brought video production and editing to the masses.
The 2010s: Video Sharing and Social Media
No course on digital video would be complete without acknowledging the impact over the last ten years of video sharing sites such as YouTube and Vimeo and social media sites such as Facebook and Twitter.
It might seem hard to imagine now, but just 10-15 years ago, publishing and sharing video content on the Internet was challenging to say the least. A dearth of widespread, affordable high-speed or broadband Internet access meant that videos had to be highly compressed for download or streaming. A lack of consistent support for video among browsers meant that video makers had to utilize various codecs and plugin "players" to have their videos play on a web page.

Thanks to video sharing and social media, you can share video projects with a global audience.
Finally, and perhaps most importantly, publishing and sharing a video in the pre-YouTube era meant you had to have a web site and be proficient in HTML and web design to publish your videos. And the final nail in the coffin? Once you had published your video on a web page, unless you were famous or an email marketer, you had no easy way to share it widely to help it reach your desired audience.
Fast forward to today, and you can see the enormous impact of the "web 2.0" sites for video markers.
When the video sharing sites YouTube and Vimeo emerged in 2007-2008, they took all the mystery, hassle, and expense out of publishing video content to a worldwide audience. Now anyone with video content could publish a video online for free, almost regardless of video file size or format, whether or not you had a web site.

One of the most viral videos of all time? Psy's 2012 Gangnam Style music video became the first YouTube video to gain a billion views. It now has 3.4 billion views.
When the social media sites Facebook and Twitter began to be widely adopted in the late aughts, they provided the final missing piece for video makers seeking a worldwide audience: social marketing. YouTube had already pioneered the phenomenon "viral video": a video that was widely shared on the YouTube network could suddenly have hundreds of thousands of viewers watching it.
When Facebook and Twitter came along, they established ways for video content to be shared (and reshared) by much larger networks of people not on YouTube. Indeed, in the last few years, Facebook itself has become a site that features more and more uploading and sharing of video content.
What this means to you as a video maker is that there's never been an easier time to publish and share video content. In fact, because it's easy for almost anyone to publish a video, it's particularly important that you learn how to make movies in a technically proficient and creative manner. And that's our goal in this course: To learn how to make compelling movies that meet professional standards in production and storytelling.
Okay, with that said, let's take a high level look at the process of creating videos: digital video production.
Digital Video Production
From Pre-Production to Post
No matter whether you're making videos for the news industry, corporate video, or social media marketing—you need to have a plan. There are three stages in creating a video, and they are generally described in the industry as pre-production, production, and post-production.
Note
There are three steps to creating a video: pre-production, production, and post-production.

Overview of the digital video production process.
Pre-production encompasses every task from your first inspired napkin sketch up to actually shooting the video. This can range from scouting the movie's location, to working with a script, assembling talent, storyboarding sequences, and other planning chores.
Production refers to every aspect of shooting the movie: directing the actors or real life subjects in front of the camera, lighting the scenes, capturing the footage, recording the audio, and so on. Think of it as the process of putting together the content that will appear in your movie.
Post-production describes everything that happens after the tape comes out of the camera. Post-production happens in the dark recesses of the editing room. You may have heard someone say "we'll fix it in post." What they meant was "we'll fix it later in the editing room."
Many creative decisions are made during the assembly and construction of a video. This is the stage in which the image is finessed and mistakes are mended. Audio is re-recorded and grafted onto a scene. The color of each shot may be corrected. Titles, music, and effects may be added to enhance the original material. Finally, it's important to note that post-production includes preparing for various formats: DVD, broadcast, the web, and so on.
Depending on the scope of the project, the person who manages this entire process (pre-production, production, and post-production) can be described as the producer and/or director. In big projects, those roles are separate. In smaller projects, there may necessarily be some overlap.
Entire movies can be made by one person, or close to it. For example, famous documentary filmmaker Frederick Wiseman just hires a sound person and does all the rest himself! Because he makes documentaries, hardly any pre-production is involved—just a lot of shooting and getting people comfortable around the camera.
Talking of which, let's make sure you're comfortable with your camera. At this point in the lecture, I'd like you to dig out your digital video camera and your user manual and follow along.

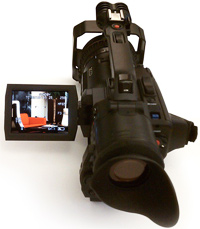
My video camera is a Panasonic. In this next section, we'll help you get familiar with yours.
Get familiar with your camera controls before shooting your first projects.
Getting Acquainted With Your Camera
Video Formats and Standards
First of all, let's establish what video standards and formats your camera supports. Your video camera records in a specific format and with a specific standard.
Let's talk format first. Back in the day, video cameras typically recorded images onto magnetic tape stock in several different formats that included: 8mm, Hi-8, 3/4", Beta, 1/2" or VHS, DVCAM, DVCPRO, large DV, MiniDV, MiniDV HD, and MicroMV.
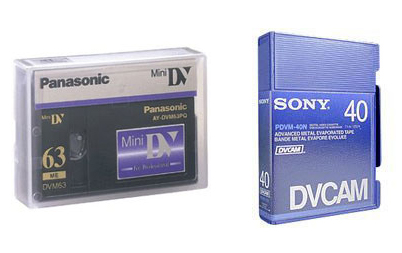
MiniDV and DVCAM tapes.
Most cameras today record information onto digital media such as the small memory stick, memory card (commonly known as an SD card), microdrive, or P2 card.
If your camera is newer, it will likely use one of these digital media formats:
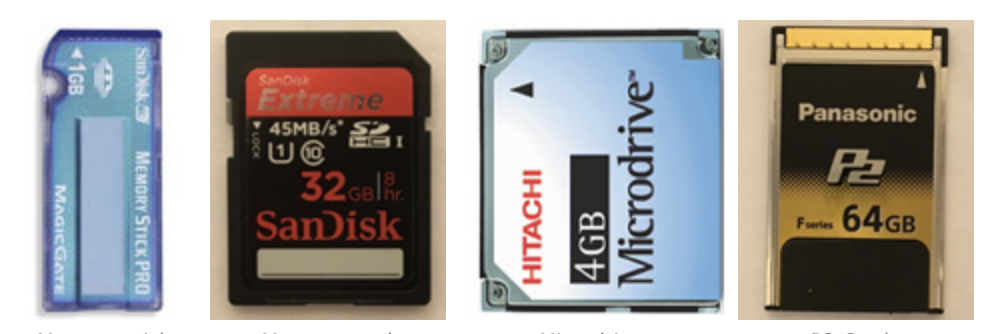
Memory stick, memory drive, microdrive, and P2 card.
Depending on your country (or where you bought your gear), your camera may record video in a specific standard.
When you watch a film in the movie theater, you are actually seeing 24 frames of film go by each second. There are hundreds of film formats (a new one is released almost every year) with each one using slightly different camera and film properties. The most common sizes are 8, 16, 35, and 65mm. You might have seen an IMAX film, which uses 70mm film in order to project clearly on a giant dome-shaped screens.
Note
Video standards such as NTSC, PAL, and SECAM dictate how many frames and lines per second are displayed during playback.
Video is broadcast in a manner that is similarly invisible to your eye, using frames and scan lines. In the U.S., a television image is comprised of 30 full frames per second, each containing 525 lines. This standard is referred to as NTSC (short for National Television System Committee). You can't take a tape or DVD from the U.S. and play it in England, for example, because they use a standard called PAL, which utilizes 25 frames per second, each comprised of 625 horizontal lines.
In France, there is yet another TV format, called SECAM, which also operates using 25 frames and 625 lines per second. However, SECAM transmits color information in a manner that differs from PAL. Vive la différence!
(Multi-system players have built-in converters that allow you to play both PAL and NTSC, and some recent cameras can record in either standard.)
Image Sensors
The first thing to understand about the image sensor in your camera is that it takes light waves and turns them into an image. There are two types of image sensors that capture images digitally: charged-coupled devices (CCD) and complementary metal-oxide-semiconductor (CMOS).
Both technologies have been around since the 1970s. CCDs were more common in the first camcorders due to the advantages they had over CMOS sensors during the early years.
Over time a change in image sensors occurred and video cameras began to move away from CCDs to using CMOS image sensors. CMOS sensors are now cheaper to make and are more effective in capturing images.
CMOS sensors are being used in many devices such as DSLR cameras, mobile phones, medical cameras, tablets, and many other electronic imaging devices. You can still find cameras with CCD technology floating around today but you will not find many new cameras using the technology.
So what does this mean for a filmmaker like yourself? Most cameras you will buy will have a CMOS sensor but the industry-wide switch from CCD to CMOS is a topic that is still debated. Many people still feel CCDs are superior to CMOS because of the quality of the images they capture, especially in low light conditions.
Nevertheless, the increasingly small video image capture devices we use today could not be built with a CCD sensor due to its energy consumption and heat output. That's why today you will find CMOS sensors in your mobile phone, digital camera, and video camera.
If you are interested in learning more about this technical topic, Petapixel.com has a nice chart comparing CCDs and CMOS.
Resolution
When cameras first became popular, the most common shooting resolution used was 720 x 480 in NTSC format, which, like most video formats, happens to use rectangular pixels instead of square ones. Translating that and viewing it on your computer screen will most likely yield square pixel dimensions of 640 x 480, as your computer will compensate and redraw the pixels to the best of its ability. There are many considerations when it comes to translating captured dimensions to display dimensions, including what kind of video, TV, or computer monitor you are using. We'll stick to the fundamentals here.
With the advent of HD, regular resolution expanded to sizes of 1280 x 720, 1920 x 1080 and beyond. Furthermore, progressive scanning was introduced, which means a certain number of entire frames could be scanned each second, rather than the traditional interlaced method that scans upper fields and lower fields separately then puts them together.
Nowadays, resolution is written in terms of height and type of scan method. For example, my camera's resolution of 1920 x 1080 is also called 1080i, or 1080 interlaced, while high definition progressive scan video resolutions like 1920 x 1080 are called 1080p. The advantage to progressive scanning is that jitter and blurriness are reduced, and it makes conversion to the square pixels on your monitor (where you'll be editing your footage) easier.
Aspect Ratio
Another important concept to understand as a movie maker is aspect ratio. Aspect ratio is a term that describes the relationship between the width and height of the screen and thus the proportions of your picture.
The standard ratio used to shoot video today is 16:9, which means that the ratio of the width to height for the image that appears on the screen is 16:9. During the 20th century, the aspect ratio for movies changed many times as motion picture studios competed with each other to provide progressively bigger and wider movie images. (If you're interested in this topic, check out The Changing Shape of Cinema: The History of Aspect Ratio by FilmmakerIQ.com.)
For most of the 20th century, the aspect ratio of television images remained 4:3. This is why most TVs and monitors were square-shaped. In the late 1990s, however, as fully digital media formats began to dominate, there was a fight to redefine the standard aspect ratio for shooting and displaying images.
Ultimately the digital powers-that-be decided that 16:9 should be the standard format, because it was the exact mean of the most popular aspect ratios. 16:9 has been the standard aspect ratio since 2009. This explains why our TV screens and computer screens are now rectangular.
Batteries, Chargers, and Adapters, Oh My ...
Now let's check on your peripherals. Most cameras come equipped with batteries, a charger, and an AC adapter.
Cameras tend to drain power quicker than you might think, so it's always a good idea to have at least one spare battery handy. The battery indicator in your camera will show you how much "juice" you have left.
Cameras nowadays tend to use lithium-ion (Li-ion) battery technology. Keep your spare batteries in your charger, fully charged, and figure out the expected battery life of your particular setup before each battery set needs recharged! On long shoots, you need to know when you can expect to run out.
Finally, when you are shooting inside (and not moving around too much), or when you are using your camera's playback mode function, you may find it more efficient to power your camera using an AC adapter.
If you shoot a lot of movies, you're going to end up carrying a lot of gear around. Here are some things I typically pack for my shoots:
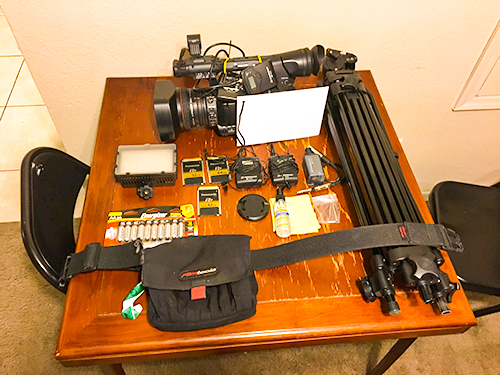
In my bag: Camera, extra battery, white card (for white balance), light, tripod, two P2 cards, two lavalier mics, lens cleaner, extra AA batteries, lens cap, and an Allen wrench to fix the tripod.
Your Camera Controls
Now that you've got your hardware in place, it's time to turn on your camera. Next we're going to discuss fundamental concepts for gaining control over your video images. If this next part feels like a photography class, it's for a good reason! In this section we're really exploring how to get the most out of each image you shoot.
We'll say goodbye to point-and-shoot and learn to control features like white balance, shutter speed, aperture, and focus. You'll thank me for this later when your movies start to look better!
In this section, I'd like you to try out each control as I discuss how it's used. You're going to apply each technique in the exercise that follows. We'll wrap things up with a look at how to use still cameras (cameras that primarily shoot photographs) as video cameras.
Record/Playback
When you're shooting your video, you need to think like a cameraperson. Adjust your LCD viewer to a comfortable spot and keep your eyes glued to that viewer.
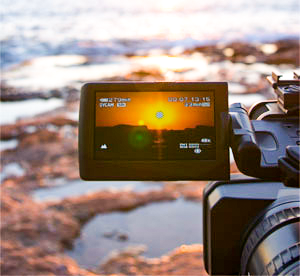
Keep your eyes on the LCD monitor as you shoot.
Try to spot any issues with the footage you are recording, seen from the camera's point of view. If the subject moves out of shot or a dog runs into shot in the background, be prepared to stop a scene in progress and retake.
Keep your eyes glued to your LCD viewer while you shoot.
If your scene requires multiple takes, don't be afraid to announce "take one, take two," and so on. The purpose of identifying a take is you can quickly find that one good take out of 20 later in the editing room!
When you're on a video shoot, you may want to check your footage when you are in between scenes. In order to do this, you can switch your camera's functionality from camera to playback mode. In playback mode, you can watch your footage on your camera's LCD monitor, and use the same handy play, rewind, and fast forward buttons that are common to video players.
This can be useful if you're far from home. However, if you have a TV or computer monitor available to you, you may find it easier, more enjoyable, and more informative to watch your material on a bigger screen. More on that towards the end of the lecture.
Record a short, 60 second sequence on your camera. Switch to playback mode and zoom to the middle of a sequence to isolate a specific frame.
White Balance
White balance, also called color balance, is designed to help you correct color cast issues in your shots. The feature works by helping you find your true or ideal white.
Have you ever noticed that when you're filming during a sunset, your white T-shirt seems to have a yellowish or pinkish glow on camera? To the naked eye, your white T-shirt will look perfectly white under those conditions. This is because our eyes have a built-in white balance mechanism that adjusts the colors we see proportionally, depending on the kind of light we are in.
In film photography, filters are placed in front of the lens to compensate for the bluish tint of daylight, or the greenish cast of fluorescent lights, and other such common color problems. White or color balance filters help you adjust the color of the image you are shooting by removing the color cast created by these different types of light.
The white balance function on your digital camera works in a similar fashion. It adjusts the relative brightness of the red, green, and blue components in your image, causing the whitest object to appear truly white, and all other colors in the frame to register more accurately.
On some cameras, white balance adjusts automatically, while on others it can be adjusted manually or by choosing from a selection of white balances. My camera has an auto white balance system that allows me to select from either indoor (light bulb icon) or outdoor (sun icon) mode.
Here is an outdoor scene shot with two different white balance presets on the camera:

 Outdoor

 Indoor
Get in the habit of adjusting white balance to your available lighting conditions.
Notice how the indoor setting has a bluish hue to it? Indoor light is generally more orange than outdoor light, so the indoor setting is deliberately skewed towards the blue (the opposite of orange). Similarly, if I were shooting outside with an outdoor white balance setting and walked inside, everything I shot indoors would have a too-orangey hue.
In situations where the subject is dominated by one color—like when shooting the ocean, close-ups, in rapidly changing lighting conditions, or when using fluorescent lights (which I try to avoid)—it often works best to set the white balance yourself. You can compare automatic settings and see which one works best.
If you have manual white balance options, zoom in on the whitest object you can find in the area you will be shooting before hitting the white balance button. What you are essentially doing is telling the camera what pure white looks like—so the purer the white, the better.
If you were to set your white balance on something like a manila folder, the colors would be skewed slightly to orange/red, which would make everything else look greenish-blue.
Auto and Manual Focus
Your camera's focus determines which objects in the frame appear the sharpest.
If you're just starting to use your camera, auto focus will be a familiar friend! But it has limitations. It may happen that your auto focus control can't concentrate on one point, causing your subject to move continuously in and out of focus. Or sometimes auto focus is fixed on the middle of the frame and you are interested in the object at the margin.
If you want to stay in auto focus, you can try an old trick: zoom in on your subject, focus, and then pull out again. This is essentially telling the camera which object you want to focus on. This works well when there isn't a lot of camera movement and the focus is stationary (fixed on one point).
If that doesn't work, try switching to manual focus. This mode allows you to choose which subject you want to focus on. It's really important to master manual focus. Manual focus gives you the ability to focus the viewer on specific elements in your shots—and create expressive variety from one shot to the next.
Set your camera to manual focus and try to focus on a foreground element in a scene, like a vase of flowers on a table top. Are you able to control which parts of your shot are in focus and which are blurred out?
Exposure
The exposure in a camera is determined by the aperture and shutter speed. Simply put, exposure determines how light or dark your video will look.
The aperture, also called the iris, describes the size of the opening through which light passes to hit the image sensor. The shutter speed is a measure of the rate or speed at which light strikes the film (in a still camera)—or in our case, the speed at which it strikes our image sensor for each given frame.
Larger apertures let more light into the camera. As on still cameras, aperture is measured in f-stops. It may seem counterintuitive at first, but the higher the f-stop number, the smaller the aperture.
In low-light conditions, a larger aperture (lower f-stop) is helpful because it allows more light to enter the camera. When shooting fast action, a larger aperture can be helpful because it allows you to shoot at a higher shutter speed.
Compare the results of using two different f-stops in the images below:

An f-stop of 5.3 is too light.

An f-stop of 11 is too dark.
Take the time to master both auto and manual focus options.
At some stage in your video career, you will undoubtedly encounter lighting circumstances that will confuse your camera's light meter. If you have a very dark subject on a bright background, for example, your camera may adjust for only one of these conditions.
If the sun is setting behind your subject, the exposure meter in your camera tends to read the brightness of the sky and "stop down" the exposure so much that the figure in the foreground appears in silhouette. Unless backlighting is the effect you are looking for, you may have to compensate for the underexposure in your subject by choosing a larger f-stop number for shooting the scene.
In scenarios like these, you should use the manual exposure control to achieve a better balance.
You should also consider shutter speed. Most cameras automatically shoot at a speed of 1⁄60 of a second, but on many cameras you can also adjust this setting manually. For example, my camera has an available range from 1⁄60 to 1⁄15000 of a second. In general you should remain shooting on 1⁄60th.
Turn the lights down low. Or turn them all on! Find some extreme lighting conditions and experiment with how aperture and shutter speed affect the overall lighting and sharpness of the image.
Recording Audio
The final camera control I would like you to experiment with is the audio recording feature. Often overlooked by beginners, audio plays a key role in video production. Low sound and excess noise are some of the most jarring (and most common) mistakes in video making.
Important
Use headphones while recording to monitor sound levels and avoid low sound and excess noise.
When shooting video, it's a good idea to wear headphones so you can hear the sound that your camera is actually recording. This will make you very attuned to noise distractions in your scene and also assure that you know whether the camera picked up your actor saying his lines.
On some cameras you will actually be able to see visual representations of the sound you are recording; these are called levels. In general, levels should be full, or high, but not peaking too much. The dialogue should be loud enough so the levels reach the peak (the red) but don't surpass it. Your room tone on the other hand, or your background sounds, should be at a fairly low level so as not to dominate too much.
One thing to keep in mind when recording material such as sound effects, however, is that you want to aim to get as clear and crisp and as high-quality a sound as possible. If you are recording your effects separately and adding them into your scene later, you can always lower the volume for that clip in the edit if it seems more appropriate.
We'll talk more about audio recording in Lecture Five.
Put your headphones on and experiment with audio recording levels. Turn on the TV or radio and check recording levels at different distances. How close do you need to be for the dialog to almost peak?
Putting It All Together
You've learned a lot about setting up your camera for a shot in this lecture. Check out this video tutorial to see how to put it all together in a live shoot:
Viewing on TV or Computer
Input/Output Connections
Once you've shot some video clips, you'll be excited to watch and edit them. This will involve connecting to your computer.
To import footage to your computer, you will need to either connect your camera directly to your computer or import your footage through a card reader.
Find the cable you need to connect your camera directly to your computer. Often these are FireWire cables, where one end connects to your computer and the other to your camera.
A FireWire connection provides a high-speed transfer of information, and is particularly suited to the large amounts of data involved in digital video. The DV end of the cable has four pins and goes into the camera while the FireWire end has six pins and goes into the computer.

FireWire cable with FireWire/computer end (left) and DV/camera end (right).
If you have a card reader, use that to import your footage. I use a P2 Card reader to import my footage because I shoot on p2 cards.
What About Recording Video on a Still Camera?
Now that we've covered all the ins and outs of using a "real" video camera, what about shooting video on your video-enabled still camera? Most still cameras now have video functionality and the technology is now starting to compete with video cameras as far as image quality is concerned.
So let's take a moment to review some of the common features (and limitations!) of shooting video with a regular camera.
Note
Still cameras and mobile devices can provide viable tools for recording videos.
One major difference in using a still camera is storage format. Most still cameras that shoot video store the information on some kind of tapeless format such as a flash drive, memory stick, or SD card. This offers a great deal of convenience as your video will be rendered automatically to a digital file, right along side all of your JPEG photos or other images.
This means that there is no need to "capture" the video in real time on your computer (more about that in the exercise). Instead, the video can be uploaded straight off the camera and watched immediately. One downside to this is that you are stuck with the format your camera chooses to render to. Normally will give you an MOV or AVI file, which is typically okay, but sometimes it's nicer to have the flexibility of choosing yourself.
Speaking of uploading footage, you'll have a slightly different connection to make with your computer than with a video camera. Instead of a FireWire cable, you'll use a USB cable to upload your video files. Note that this distinction is also true for any video camera that stores video information to memory rather than to tape.
Most cameras come with their appropriate type of USB cable, but a common one is the six-pin USB to four-pin mini USB as shown below.
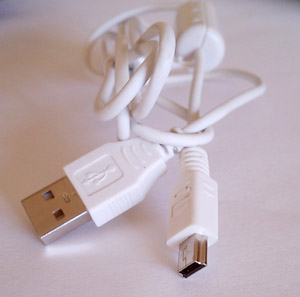
FUSB cable that attaches the camera (right) to the computer (left).
As far as the features are concerned, some still cameras offer the same features as video cameras, while others are quite limited. Before exploring your still camera's features, be sure to put it in video or movie mode.
You should be able to access all of your video settings through a menu or options button on the camera. The first and most necessary feature your camera needs is the ability to focus manually.
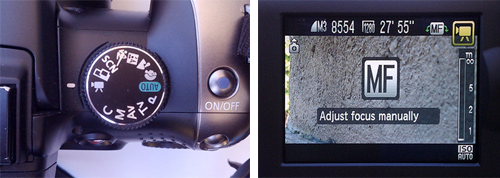
Video on the camera settings dial (left), LCD showing manual focus (right).
Most cameras that shoot video (with some exceptions) will give you this manual focus option. Usually the default is auto focus, so be sure to check out how to set manual focus before diving in.
The next most important feature is white balance. This varies from camera to camera, but yours should have the ability to not only select preset white balances but also manually select one.
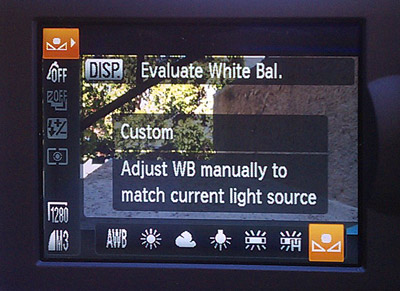
LCD showing white balance presets and custom settings.
As for the remaining features—iris, shutterspeed, and aperture—you most likely won't find these features unless you have a higher-end camera, but the same rules apply as with using a video camera. Make sure to do a thorough check of all of your features, as sometimes they aren't labeled the terms you see here. For example, on my camera you can control the iris with a separate button labeled with this icon:  . You can then adjust the amount of light entering according to the scale on the LCD screen.
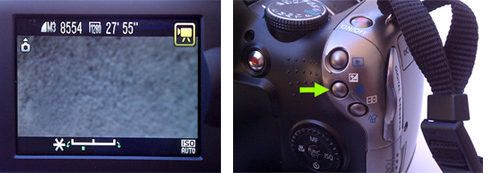
Iris adjustment scale from dark to light (left), location of iris button on camera while in video mode (right).
What about audio? Well, unfortunately here's one of the major limitations of still cameras. Most that do shoot video will shoot audio but with a medium-to-low quality microphone. Additionally, it's very rare to find still cameras that let you adjust the audio input or that leave much, if any flexibility, with the types of external microphones you could attach.
If you are going to shoot video with a camera like this, I highly recommend purchasing a good external microphone that is compatible. And, as I mentioned before, wear headphones whenever possible!
Details, Details ...
We've covered a lot of ground in this lecture. We've discussed how digital video evolved into the vibrant medium it is today and we've gained an overview of the video production process.
We've looked at the technical aspects of the camera that work to capture your recorded image—the standards, formats, and aspect ratio you'll be shooting in, and the basics of how an image sensor works.
We've also looked at some camera controls that you need to master to gain better control of your video shoots: record/playback, auto and manual focus, white balance, exposure, and audio levels.
This might seem like a lot to think about before you even hit record, but with practice you'll soon find it's second nature.
Now that we've spent some time exploring your camera, let's put it to use. The following exercise is designed to help you test drive some of the features we just discussed. The exercise will also prepare you for Lecture Two, by challenging you to think about the numerous ways you can shoot a scene.