You might have thought that in a video editing class, you'd be focusing exclusively on the moving image. Not so! With the growing popularity of social media videos, titles, transitions, and text animations are more important now than ever.
When we watch videos on Facebook and other social media sites we often see the video but don't hear the video unless we click the video and unmute it.
The need to provide videos that can be understood when muted has led to a resurgence in titles and transitions that incorporate text into a video. Corporations add text to video so that the video can be understood quickly by those just scrolling through. News stations have gotten in on this trend and are also making text-heavy social media videos.
Delivering any communication with a combination of text, sound, and images is the essence of multimedia design. Helping a viewer understand your content via several cognitive channels (by reading, seeing, hearing, and so on) is proven to increase engagement and absorption of information.
It's also a good way to encourage people to take a second look and maybe click your video and watch it!
In the era of auto-play videos, video producers are using titles to do a narration so viewers will still understand the presentation since the video is muted. These new video productions deliver messages perfectly whether it is muted or the soundtrack is audible. The point of the video is delivered in text and audio form, making sure that the viewer understands the appeal of what is being shown.
Let's explore some of the theory behind adding text and titles, then we'll look at how to do it in your video editing program.
Film titles serve many purposes. They
are used at the beginning of a movie to display the name of a
film and major credits and at the end for the full credits. Here's a classic title treatment from the opening of The Terminator:
Titles
are also used to reinforce concepts, to paraphrase a narration, to
provide instructions,
to
specify a time
and place, and to identify a subject or presenter. These types of titles, which you see often
on the news, are called lower
thirds because
they typically appear in the
lower
third
of the screen (mainly to avoid covering faces).
Every
video editing program has a tool or application that can generate text
files for titling. These title utilities have different features, but
they are all capable of creating basic titles for video.
More
elaborate titles can be also imported from other software applications
like Photoshop and After Effects. The former imaging program is like a right hand for most graphic designers. The latter is mostly used for motion
graphics. Apple's Final Cut has its own
integrated software for animated titles and motion graphics called Motion. For Premiere and Final Cut, there is a very popular motion graphics plug-in
called Boris RED by Boris FX. Some of these programs allow you to create ever-popular 3D animations: titles that swirl around, rotate, or appear in voluminous 3D letters.
As you can see, title sequences are a visual world of their own, which may be especially exciting
to those of you who are graphic designers. In this lecture, we are leaping from
editing into type composition, so we will stick
to the basics and look how to create simple 2D titles.
Adding and editing is really not too complicated within Adobe Premiere. Let's take a look at how to do it in this video:
Imported Graphic Titles Versus Vector-Based Titles
Every major NLE gives you the ability to
import graphics as titles or create them inside the software environment. Many
types of file formats can be imported; the most popular
ones are
JPEGs and TIFFs. But be warned, with the 72 ppi resolution that video requires, you'll need to leave plenty of room for resizing so you don't end up with any pixelated edges.
It's for this reason that the vector-based text tools within Premiere Premiere and other NLEs are a safer way to go than importing graphic titles. The built-in text tools enable you to create infinitely resizable text for your titles that is easy to manipulate and animate. Additionally, this gives you the ability to edit your text any time (beats running back to Photoshop, editing an imaging, and re-importing it!).
We're going to look at Premiere Pro's Titler feature in just a moment, but first, some tips and inspiration.
Title
Techniques
Planning effective
titles and credits is part of the video editing process. The font
that you choose, the size, the color, the background on which you place
your text... every detail says something about your movie.
You
can make titles as complicated or as simple as you like as long as
you follow certain
guidelines:
 |
|
 |
| |
-
Keep titles on screen at least long enough
to read
them aloud twice. Remember that you may know your text by
heart, but this is the first time the audience is seeing
it.
-
If you are working in interlaced video (that is, anything other than 1.0 pixel aspect ratio), avoid text that has very narrow lines
like
certain script or serif fonts or any narrow/light font. One-pixel lines flicker unacceptably
as
the field on which they appear alternates on and off. This
results in text that appears to "buzz" and is difficult to
read.
-
Usually,
the text size shouldn't be smaller than about 1/25 of the video
height.
A font size of 24 points (or 20 scan lines) is about as low
as most editors will go. Choose the size depending where
your video
will be primarily shown. For the web, text should be
bigger in proportion to the frame than for videos intended
to be
shown on TV or projected.
|
|
 |
|
 |
Though
feature films sometimes use titles that extend to the edges of the
wide screen image,
it is best to stay in what is called the "title safe area."
The title safe area is the
part of the video image that is guaranteed to be visible on all television screens.
The title safe area is
the inner 80 percent of the
frame. To prevent the text in your video from being hidden by the
edge of a TV screen, you should restrict any titles or text to the
title
safe area. We'll look at this in Premiere Pro in just a moment.
Now let's get inspired by two of the most famous title animations in movie history. Both
use quite ordinary techniques that can mostly be achieved
in your NLE.
The
first title sequence we'll look at was created by Saul Bass in 1959. Bass is most famous for the opening
titles of Hitchcock's Psycho and North By Northwest. His film titles were the first step for opening sequences to become an art form of their own.
Notice how Bass's title almost looks like it's done in 3D! That would have been a challenge, especially with 1959 tools, but instead it was created by overlaying text on a grid that evokes the windows on a skyscraper. You might think of combining similar graphic features with text in your own title sequences.
The
title sequence below is more contemporary, but like Saul Bass's work,
it is a milestone in movies. It is the title sequence of Kyle Cooper's Seven:
The Seven
sequence is as sophisticated a piece of video editing as it is an effective
title sequence. All techniques used in its frame animations (scratches, jitter, overexposed images,
flicker) are references to the cinematic medium itself. You
can create some similar edgy or nervous-looking animations by preparing
them frame by frame in Photoshop, then importing them as individual graphics into
Premiere.

Overlaying a Title on a Video
Let's overlay a text-based title onto some video. Open up any video of your choice in Premiere Pro to follow along. If you're in a different NLE, search for similar type and titling tools to the ones we'll describe here.
To superimpose text on our video, we'll need to create a new track just for the title. This track should be layered on top of
the video track that contains the section of the video that you want
as a background. To begin this process, move the playhead
to the video frame that you want to use as a starting point.
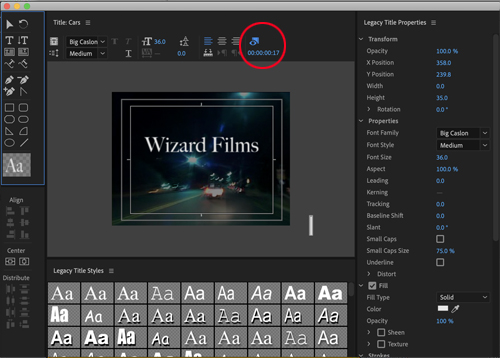
Let's create that track and start our title now. For this example we will use the Legacy Title editor and then later I will go over the Essential Graphics Panel. Go to File > New > Legacy Title. In the dialog that appears, name your title. The Titler will open when you click OK.
The Titler has its own Title Tools in the upper-left, which will look familiar to the vector tools you may have used in Photoshop, Illustrator, or Flash. Title Properties are found on the right side of the Titler and the main video area is shown in the middle. Yours should show just the frame of the video you've selected.
|
Click the icon just above the timecode in the upper-middle to toggle your video on or off. |
Notice that the Titler displays
two outlined boxes to use as guidelines. The inner box is the title safe area we discussed earlier. You'll want to keep all of your text inside this box. The outer box is the action
safe area for video display. Any essential video action should be here, as anything beyond this area could be cropped depending on the screen.
Choose the Type tool in the Title Tools (represented by a T), click in the main video area, and start typing some title text.
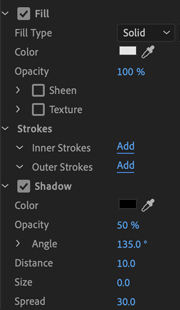 |
Fill Type, Stroke, and Shadow settings in the Title Properties panel. |
You can create multiple
layers of text per title and within each layer you can conveniently change
the font and size. Change the stacking order of layers by selecting your type with the Selection tool and choosing an option under Title > Arrange. Change the font size, style, color, opacity, and more in the Title Properties panel. You also might want to align your text to the center of the frame. Do this in the Title Actions panel in the lower-left with the Center controls: 
At the bottom of the Title Properties panel you have controls for creating special type effects. You can set a custom shadow, inner and outer strokes, and other features. Combine these with the shape and Pen tool drawing options afforded in the Title Tools panel and you have endless creative opportunities with something as seemingly simple as a 2D title. And that's before we set things into motion...
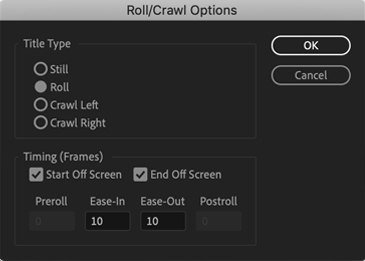
Ready to animate? Premiere offers rolling and crawling title animations as default settings. Click the Roll/Crawl Options button  in the upper-left of the Titler to open a dialog of choices. If you have selected a roll, for example, you can set the start and end position (Preroll and Postroll) and rate of movement at the beginning and ending of the title (Ease-In and Ease-Out).
Once you are happy with your title, close the Titler
and Premiere will create a clip of the title in the Project panel. This clip can be used and edited like any other clip in the Timeline (this includes the application of effects and transitions). To edit the title within the Titler again, double-click its icon in the Project panel.
Essential Graphics Panel
The most recent addition to Adobe Premiere is the Essential Graphics Panel. This addition is the most current way to add titles to your video. While this new addition aims to replace the previous Title Editor, it does lack some features that were present in the now Legacy Title Editor. With that said, Adobe will likely provide future updates to the Essentials Graphics Panel to satisfy those who depended on the original Title Editor as part of their workflow. The Essential Graphics Panel (EGP) does offer some great benefits. Let's explore it together.
First, access the EGP by going to Window > Essential Graphics. The panel should appear in your workspace and will contain two menus. The first menu is labeled "Browse" and will contain title templates while the second menu is labeled "Edit" and will contain all the necessary controls to make adjustments to your title.
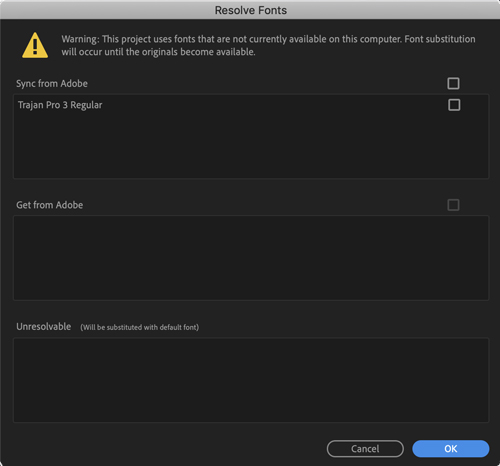
The Browse menu will let you use templates provided by Adobe to place things like credits. You'll find other templates separated into categories like captions and subtitles, graphic overlays, lower thirds, slates, social media and titles. Since we will be working with titles we can insert one of the templates onto our video. All you need to do is select one of the title templates and drag it on to your timeline. A window will appear that will show the progress of the template being loaded. You may encounter a pop up informing you that the template uses a font that you do not have but fortunately you will have the option to sync the font from Adobe Fonts.
|
Make sure you select the boxes near the font name to sync. |
|
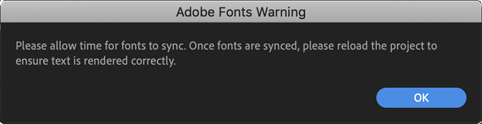
A window will pop up informing you that the fonts could take a little time to sync. |
|
If you have the Adobe CC App Manager installed, you should get a notification when the fonts are finished being synced. |
Many of the templates cover specific areas but you may find that you want something more unique. You are able to edit the template in Premiere.
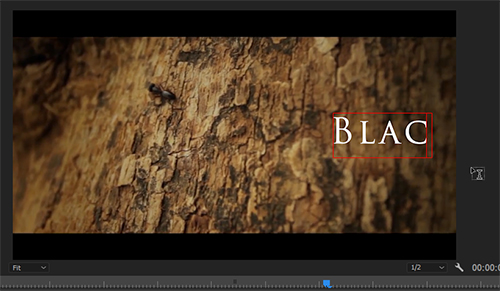
Let's go ahead and add text to our video. You'll notice now that there is a new tool added to the toolbar. It is the Type Tool that you may be familiar with if you have used Photoshop or Illustrator.
Move the playhead to the location where you want your text to appear. Don't worry about being exact since you will have the ability to move it on the timeline. Go ahead and type out some text. Premiere will automatically place the clip on the timeline as a graphic.
|
Adding text is much easier now. No more floating window for titles! |
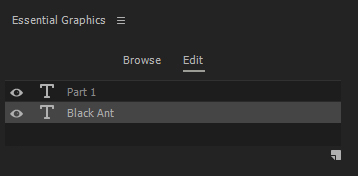
After you have created your text you will see the clip on the timeline already named. You will also notice that in the EGP it automatically switched to the Edit menu. You have the ability to make adjustments in the edit section of the EGP where you can change color, size, typeface and many of the same options from the previous editor.
|
Many of the features from the previous editor appear here but you might find some are missing such as gradients and outer stroke/inner stroke. |
One great addition to this new editor is the ability to have layers. When you typed your text you will notice the layer at the top of the EGP.
|
This probably looks familiar for any of you that have used Photoshop! |
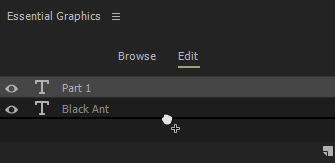
The text you create can live on separate layers which can make organization much easier in your project. If you have your clip selected on the timeline and add more text, it will automatically become a new layer. If you want to edit your first text then be sure to select that layer or use the Selection tool and click on the text you want to edit. If you clicked to create text but didn't write anything a new layer will still be created. Just select any layers you do not need and press the Delete key on your keyboard to remove it. You are able to arrange layers by clicking and dragging the layer up or down in the layers menu.
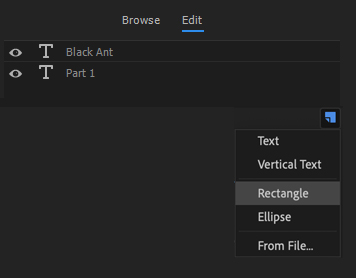
In addition to adding text, you are able to add rectangle and ellipse shapes using the EGP by clicking on the New Layer icon  .
.
|
With the New Layer icon you can create text layers, shapes and other options. |
The shape will become its own layer that you can make modifications to using the controls in the EGP. You can't make complex shapes with the edit options but you can insert files you already have. The last option found by clicking the New Layer icon allows you to choose a file from your computer. This is helpful if you want to include a fancy logo into your title or just somewhere in your video.
One last thing to remember with the layer is that by default the layer will only be as large as the sequence dimensions. So, if you are working with the sequence dimension set to 1280x720 then anything going beyond that will appear chopped off should you move the entire graphic clip out of place. Also, your graphic clip will not be added to the Project panel automatically. If you want the graphic to be an asset then drag the clip from the timeline and into your Project panel.
Once shapes, artwork and text are added on to the layer you will see that all of those assets exist in a single clip on the timeline. That graphic clip that was generated when the text was created is holding all those layers. You can make adjustments to the clip by going to the Effects Controls.
As you can see, both the new and old methods of adding titles to your video have their own benefits. The older title editor is now legacy which means at some point in the future Adobe may remove it entirely from the software. Again, the Essential Graphics Panel is still new and in the future will continue to be updated. Transitions such as this will become more common with the Adobe Creative Cloud with its ability to change overnight. As a subscriber you will have the option to roll back to previous versions of your software if you are unhappy with updates.
Introduction to Keyframes
Rolling and crawling within the Titler are the most basic types of animations you can apply to your titles. But you can get more complex if you add keyframes to the mix.
Keyframes are the backbone to all digital animations, motion graphics, and visual effects. Conceptually, they are simply points in time that hold information or properties of a given element. Say I want to animate a word from the upper-left corner of the screen to the lower-right over the span of three seconds. My first keyframe would be at the 0 second mark with the word sitting in the upper-left. My second keyframe would be at three seconds and in the lower-right. With these instructions, the software figures out what's in between and constructs the animation.
Let's take a look at how we could apply this concept to create a simple fly-in title. Follow along with your current video or a new one.
1. Create a still (not rolling or crawling) title in the Titler. Exit the Titler so that your title is in the Project panel, then drag your title from the Project panel to the Timeline.
2. With the title selected in the Timeline, go to the Effect Controls panel to view its properties (Window > Effect Controls). This is where we'll do all of the animating.
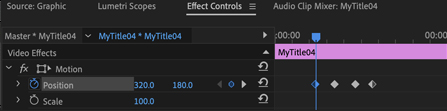
3. Click Motion to open up all of the title's motion properties, which include its position, scale, rotation, and other settings. On the right, our title has its very own timeline that we can work in. All of what we do here can also be done in the main Timeline, but it's easier to work in this isolated area.
4. Drag the playhead to the middle of your title timeline in the Effect Controls panel. Click the stopwatch  icon next to the Position property to create your first keyframe
  on the timeline. What you have now should look something like this:
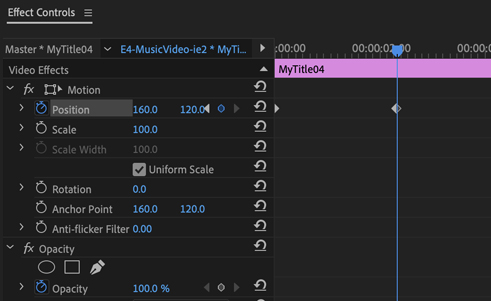 |
| Entering a Position keyframe on the Effect Controls timeline. Note that my position is 160, 120. Yours may be different. |
What does that little keyframe mean? It simply means "At this point in time, make my position x=160, y=120." In other words, the registration point for the title is 160 pixels from the left and 120 pixels from the top of the video edge (or whatever position you placed your title in).
In order to make our title actually move, we have to tell it to be somewhere else at a different point in time.
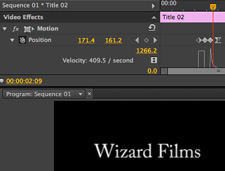
5. Let's go back in time. Drag the playhead back a few seconds and click the keyframe  icon to add a new keyframe. (Don't click the stopwatch icon this time, as that would deactivate keyframing for the Position property.) Now we've created another keyframe that we can give different position properties to.
6. Click and drag the first Position property (the x property number) to the right. You'll see that as the value increases, your title moves to the right of the frame. Keep going until the title is out of view. Alternatively, you can also click the property and enter a numerical value.
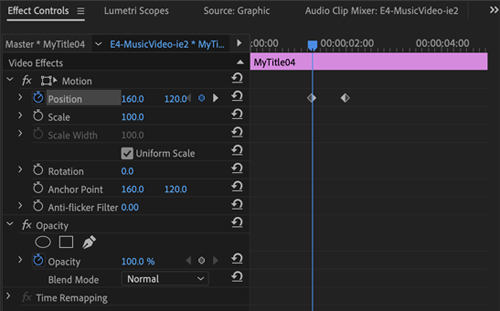 |
| Creating a second Position keyframe on the timeline |
Playing this back, you can see we now have a very simple fly-in animation, where the title glides in from the right.
Want to make it glide in faster? With our keyframes already created, changing the speed is a cinch! Just click and drag one keyframe closer to the other. By making them closer, you are simply telling Premiere to animate from point A to point B in a shorter amount of time. The starting and ending positions remain the same. Here's what we have now:
A little crude, maybe? Let's add a little more slickness to it. How about adding a fly-by in the opposite direction first? If we scale it down on the first fly-by, it would give the illusion the title is flying across the screen and toward us.
7. Go a little further back on the timeline and keyframe another Position property. Leave the actual position (x and y) as is, and move further back again to create a fourth Position keyframe. Reduce this property's x value until the title is off the screen to the left. You'll likely need to go into negative values here.
 |
| Our four Positions move the title left-to-right, then right-to-left |
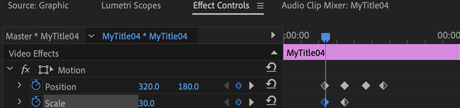
8. We've got our positions all set, so now we want to work on the scaling effect. With the playhead on your first keyframe (you can always tell if you are on a keyframe because the keyframe icon will be filled in), click the stopwatch next to Scale property. Enter around 30 as the value, which means 30% of the original size.
9. Using the keyframe arrows  on the Position property, navigate forward one keyframe. You'll see that these arrows are a handy way of getting around. Now bring the Scale property up to 100%. You'll also notice that as soon as you change a property, a new keyframe is added for you.
10. Playing it back, you'll see the title increase in size as it moves from left to right. Now let's say we wanted the title to instead to remain at 30% scale across the duration. To do this, make the first Scale keyframe a "hold keyframe" by right-clicking it (PC) or Control-clicking it (Mac) and selecting Hold. You'll see the icon change shape.
 |
| "Hold keyframe" on the Scale property |
The typical keyframes, like those we originally used for position and scale, are called linear keyframes, which transition a property from point A to B in a linear fashion. Hold keyframes maintain the property until the next keyframe.
11. Let's try another common keyframe type called ease, which creates a more gradual transition. Right-click/Control-click the last Position keyframe and select Ease In. Now instead of moving linearly toward this keyframe, we will be easing into it, or gradually slowing down as we approach it.
So after adjusting your keyframes a bit, you could have something like this:
Manual Easing
If you've already got a good handle on animation, you may want to go beyond the automatic options and manually adjust easing for various properties. You certainly aren't limited to just the options you've seen so far!
If you click the arrow to the left of the Position property it will reveal a temporal graph that gives you free reign over the interpolation, that is, the type of motion between keyframes. Here you can see how our "eased in" keyframe looks in the world of time. The graph represents the rate in which we approach the next keyframe property value, in this case gradually slowing down into our last position looks like a downward slope. The motion between our linear (not eased) keyframes is a straight horizontal line.
 |
| Temporal graph showing the keyframe interpolations |
Clicking these lines in the temporal graph will give you the option to push and pull the end points to create curves much in the manner of a Pen tool. Just be careful with these adjustments and always preview each edit you make.
This is just a small sampling of how you can use keyframes to create much more intricate movements. To open up the can of worms further, in Premiere Pro, every video and audio effect and their associated properties can also be controlled with keyframes in the same manner. You are truly only limited by your imagination!
How does output work? Recall that an NLE doesn't change files, but rather creates instructions on how to present those files. The
original files are not altered on output. Instead, the computer combines information
from the files, transitions, effects, and overlays, and computes a new
file. Depending on the complexity of the project, this can require large amounts of
computing power, resulting in a long rendering time (sometimes more than
10 times the running time of the video). The faster the CPU, the faster this process
runs. Luckily for us, producing compressed videos for the web is usually pretty quick and easy.
If
the result is intended for recording to DV tape (or any other tape for that matter), the rendered file
must be played on
the computer and an output taken to a DV deck or recording camcorder. The
output is the FireWire connection, allowing the pure digital
data to be recorded onto tape. If a camcorder is to be used as the
external recorder, its FireWire connection must be able to record
input as well
as replay output. This capability is called DV-In,
and not every camcorder supports it.
Color
Bars and Tone
If you plan to output a file to a master tape, you should consider including color bars and tone. When your tape will be copied on different master formats
such as Betacam SP, Digital Betacam, and others, it is standard to incorporate color bars and tone on the video for reference. These assure that the TV set or other broadcast device they will be played
on is calibrated correctly for color and sound.
 |
SMPTE
color bars |
To
check the color for your TV set or broadcast device, you must
look for two things:
 |
Pluge
bars |
How
do you incorporate these color bars in your video?
They can be created quite simply in Premiere by going to File > New > Bars and Tone. Click OK and the item appears in your Project panel, ready for you to drop in the Timeline. The -14 db tone that comes along with the bars is an industry standard. You can stretch or shrink the bars and tone generator to any length you need.
DVD Output
Now let's look at a common type of output for your digital videos: DVD. All you need to do is go to File > Export as you have for other types of projects and select MPEG2-DVD. This will create a movie file with the same settings as your project, which can then be imported to a DVD authoring program like iDVD, DVD Studio Pro, and many others.
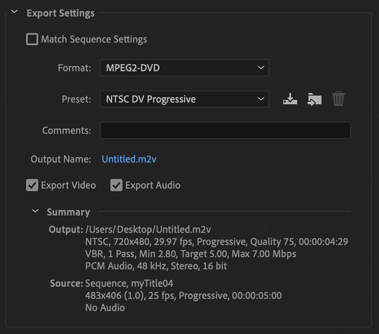 |
The default settings
for a DVD |
In this process, you
are making a self-contained movie,
in which you essentially make a copy of what is used in the sequence.
It will take a few minutes to write and occupies the same amount of disk space it
would take if you were to capture the same length from a tape.
When
you are finished with a movie and want to discard the original files,
this is the way to make a digital copy.
A Note On Codecs
Many video editing programs will provide you with a dizzying array of options for export. One reason for the wide range of choices is the variety of codecs that exist.
OK,
so what is a codec? The word codec comes from the even clunkier term: "compressor/decompressor," a bit of
software or hardware that takes raw video and compresses it, then can
take the compressed video and decompress it back to raw video. Whew!
Codecs
exist for all kinds of compressed video, including DV, motion-JPEG,
MPEG,
Indeo, Cinepak, Sorensen, On2 VP6, wavelet, fractal, RealVideo, vXtreme, and
many others. You will find some of them under the Export
option Adobe Media Encoder.
To make your options even more diverse, there are also so-called "hard" and "soft" codecs. Hard
codecs are hardware codecs: You supply power and raw video at
one end, and compressed video comes out the other end in real time. Flip
a switch and pump in compressed video, and raw, uncompressed video comes
out.
Soft
codecs are software modules that do the
same thing, such as the DV codecs we use here, supplied by
QuickTime or Adobe.
But software
needs to be rendered and the transformation does not happen in real-time.
Luckily, modern computers are fast enough that soft codecs can compress
or decompress a small sized video much faster than real-time.
The artist duo MTAA produced an interactive piece
that gives you a sense of the crudeness of compression. Here is a screenshot showing how the video can be affected.
|
Compression can have a strong impact on video quality. |
And with that, we've capped off a look at titling and outputting techniques for finishing off a movie. You'll practice working with titles in the exercise, and then it's off to the final lecture in which we tackle the world of audio editing.


 When
everything has been laid out in the Timeline and rendered
properly, Premiere, by way of Adobe Media Encoder, renders a new video file that contains the result. I'd like to go over some of the options you have when outputting your piece now.
When
everything has been laid out in the Timeline and rendered
properly, Premiere, by way of Adobe Media Encoder, renders a new video file that contains the result. I'd like to go over some of the options you have when outputting your piece now.