You have the option of choosing your own client for your capstone project or using our provided client Hostoftheweb Web Hosting, a Web hosting company in need of a mascot.
The project that you choose must be for a digital technology company with a Web presence and must result in the following deliverables:
 |
|
 |
| |
- 2D sketches of mascot character's key poses
- One full color 2D mascot image
- Wireframe mockup of client home page featuring mascot
- Written concept and storyboard for 30 second commercial
- Animation thumbnails
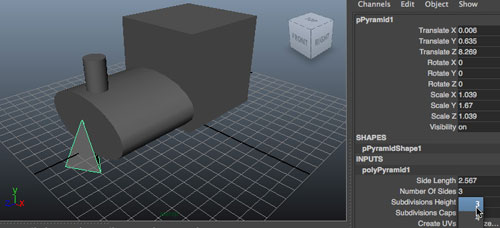
- One 3D Maya asset for animation scene
- Rough draft of 2D mascot animation in MP4 format
- Final draft of full commercial in MP4 format
- Final presentation
|
|
 |
|
 |
Creating Your Own Client
If you would like to choose your own client, you will need to decide on a number of important details before you begin your work. The digital technology company should have a distinctive name and a need for a Web presence. You should have a target audience in mind for the company as well as a sense of the voice or attitude of the client, which would affect the choice of the mascot. You should know/create enough details surrounding the client to create a realistic project. Your mascot should also be 2D, not 3D.
Remember that choosing your own client will require you to do your development of a logo and banner. This can be a time challenge and a design challenge, so choose wisely!
Write at least two paragraphs describing the client and the event to submit with your other Stage One items.
If you would prefer to work with our provided client, learn about their theater production below.
Provided Client: Hostoftheweb Web Hosting
 |
Your client: Hostoftheweb Web Hosting |
Your client Hostoftheweb Web Hosting is competing in a saturated market, and unfortunately they have an almost breathtakingly generic name. So they've hired you to create an ace in the hole that will help them stand out: a 2D animated mascot.
They want to use this mascot on both their Web site and for a short 30 second commercial. So from 2D to 3D and static to motion, this project will test all your digital media skills.
After careful review of portfolios and pitches, the client has decided that you're the designer to create a brand new mascot to boost their image. Any changes to the mascot the company makes in the future for this production will be tied together with your initial design.
Important: For maximum flexibility, the client is looking for a 2D mascot. But they are open to seeing the mascot interact with 3D assets in the commercial, as well as live action assets.
Hostoftheweb Downloads
The client has supplied a banner image and a logo. They would like to see a mascot that harmonizes with the color palette and typography of their logo, as well as the general creative direction of their existing design.
 |
The banner for Hostoftheweb Web Hosting. |
Fully layered Adobe Illustrator files for both the logo and banner are found in the downloads here. You will also find templates for your storyboards.
If you have chosen your own client, you will need to budget time for creating your own logo and banner, with successful color palette and typography choices.
Researching Your Mascot
In this project, the research and preparation of the concept for the client is almost as important as the actual production. You are expected to spend time researching other animated mascots in related genres, design and technology trends in those areas, and other work that may influence the direction of your concept.
With your submission for this stage of the project, provide the URLs of inspirational or competitive Web sites as references along with a written analysis and explanation of how they will contribute to your concept.
Creating 2D Sketches
After you have researched and developed a concept for your mascot, it's time to start making that mascot come to life. As with all animation projects, you will start with initial sketches. Create at least six black and white sketches of your mascot that feature key poses. Consider both your client needs, your mascot physiology and characteristics, and what will read excitingly in a short commercial.
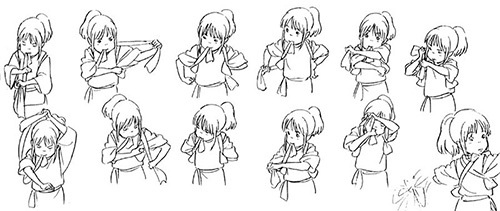 |
Sketches are an important part of the character development process. (Image credit: Studio Ghibli). |
As you learned in your studies of time based media, capturing and sustaining the audience's attention is crucial, and you'll want to begin thinking about how your mascot can do that at this initial sketching stage.
Save your sketches as a single 72dpi JPG with the name mascot_sketches.
Creating a Full Color 2D Mascot Image
Now you will create a full color 2D image of your mascot. Choose the best and most communicative pose from your sketches, and produce a fully polished full color 2D image of your mascot using Adobe Photoshop and/or Adobe Illustrator. Consider how the color palette and design of your mascot will interact with the company's logo and typeface choices.
Save your image as a 72dpi JPG with the name mascot_image.
Designing a Home Page Mockup Wireframe
Now your client wants to see how this mascot will look with their site design, which—surprise!—they would also like you to wireframe. (Clients are so demanding!)
Using your research into similar digital technology companies as a guide (for example, hosting companies), create a wireframe defining the content areas of the home page. Remember that the purpose of the wireframe is not to present a design of a page, but to present the main elements of the page in a proposed layout.
Identify the global page elements that will stay fixed throughout the site, such as the logo and branding elements, top-level navigation bars, and copyright/footer info. Show how your mascot design will fully integrate into the home page as a global page element.
 |
Study the Web sites of companies similar to your client for mascot integration inspiration. Here we see how Hostgator has integrated their mascot into their site. |
If you are using the provided client, integrate the provided banner image as well. If you are using your own client, you will also need to design your own banner.
Save your wireframe as a PDF with the name mascot_wireframe.
Producing a Commercial Storyboard
Once you have a fully fleshed out sense of your mascot, you can begin envisioning a 30 second commercial for your client that features the mascot. You're expected to create individual storyboards
Before you begin your storyboards, type out the overall concept and story for the commercial. Save this conceptual planning as a PDF file named commercial_concept.
Now you will need to create a storyboard for your commercial, and you may use the template supplied by the client to help in your organization. Your research and client should influence the direction of your storyboards (and later your commercial) in terms of content, style, pacing, attitude, and approach. Allow your research to help you develop the narrative for your commercial.
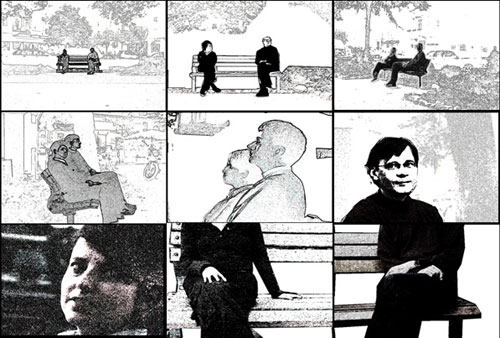 |
A
storyboard is always very helpful to plan and visualize
the progression. Shoots are not necessarily shot in successive order. |
Your client will be looking for an exciting, dynamic commercial that features a variety of editing techniques. Research commercials of similar length that also use animated mascots. Consider ideas of linear and non-linear storytelling, editing, and film techniques.
Save your storyboards as a PDF file named commercial_storyboard.
Submitting Your Concept and Development Deliverables
Before you continue on to the development of the commercial, you are expected to present your concept research, sketches, full color mascot image, and commercial storyboard to your department head for feedback.
In Dropbox 1 (Week 3), briefly explain how you feel your mascot will help communicate the message of the company and how you plan to implement the mascot concept in a 30 second commercial. Include your sketches, full color mascot image, and commercial storyboard. Additionally, please include your research URLs and your commentary on how they will contribute to your mascot concept.
If you have used your own client, also include at least two paragraphs that define the event.
We recommend waiting for feedback before you begin the next phase of the project in case any modifications are suggested by your instructor.
Back to top