Before we dig into the nuts and bolts of Animate,
let's take a few moments to consider the bigger picture: In addition to character animation, which is most of the context of this course, what have been the capabilities of Animate's predecessor, Flash?
So
let's look at a few examples that show the extent of projects that were created using Flash on the
Web.
In each case, I'll talk about the purpose of the project, and also
comment on some cool features to look for.
George
and John Duke It Out
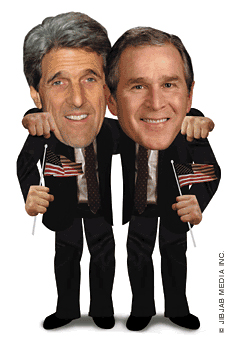 |
Political satire meets Flash character design in the " This Land" movie on jibjab.com |
In 2004, JibJab
Media produced
and animated a political parody featuring President George Bush and Presidential candidate Senator John Kerry. The cartoon quickly became one of the most popular animations on the Web, and put JibJab on the map. Millions of Web surfers flocked to jibjab.com to download and watch the "This Land" political satire, with predictable results—jammed servers and a bandwidth bottleneck. This cartoon is a perfect example of the right animation at the right time. While JibJab still features their parodies on their Web site, they have shifted their focus to electronic greeting cards.
The Bush/Kerry parody immediately became extremely viral, as fans of the cartoon sent the link to their contacts, creating an exponentially spontaneous marketing and advertising campaign that was virtually out of control.
The characters, rather than cartoon drawings of Bush and Kerry, are manipulated photos. The proportions were changed and the movements made more rigid and blocky for a fun, comic effect, and to make the characters look more puppet-like. Each body part was derived from actual photos that were edited in Photoshop to remove any unwanted background color and perform color correction. Then the backgrounds were made transparent in Photoshop and exported as PNG files (PNG files support transparency). Each of these files were imported into Flash where the characters were assembled as if they were puppets. It's a very unique-looking design style, similar to the South Park style of using flat, cut-out shapes. The style here dictates the method of animation. Very simple and crude, and since the style of the characters matches the style of the animation, the piece as a whole works very well.
Bear 71
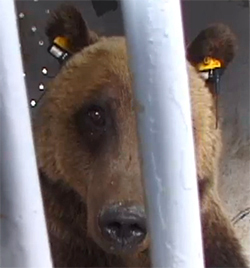 |
Canadian wildlife comes to your computer in this documentary created in Flash.
|
In 2012, Leanne Allison and Jeremy Mendes created a Flash-based interactive project called Bear 71 about a female grizzly bear living in the Banff National Park in Canada. It was a dramatic documentary produced by the National Film Board of Canada showing the conflict between existing wildlife and the encroaching human population and their technologies.
At the age of three this bear was tagged and collared with an electronic tracking device. The bear is then tracked by park officials throughout the rest of her life.
Users viewing this project online can explore the bear's natural habitat captured by the park's trail cameras. The audience can also traverse through a digital grid created in Flash. To give the bear a sense of compassion and character, Canadian actress, Mia Kirshner, provides a voice for the bear.
monoface
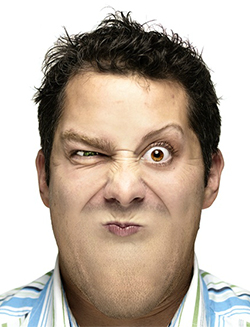 |
Create your own funny face with the use of various photos of eyes, noses, mouths, and heads.
|
On the lighter side, mono, an advertising agency with ofiices in Minneapolis and San Francisco created this fun application built in Flash that allows users to create unique facial expressions using different images of their employee's faces.
Click on the eyes, nose, mouth, and head to cycle through the various images available. You can also shuffle and have a face automatically created for you. There are 759,375 different possibilities of your perfect face.
You might even want to use this as a tool to create the characters of your animation. You can find the Web site here.
Animate offers several tools for you to choose from. You're sure to have used them before in your projects, so this will be a refresher before we get to the big guns, but with a focus on using the tools for character animation.
Each tool will yield different stylistic results. Some tools will create larger file sizes while other tools will result in smaller files. As you become more familiar with these tools, you will learn to choose the ones that best suits the artistic style you desire and any file size requirements you may have to abide by. It's the usual trade-off between file size and download times and playback performance. Let's take a look at each of Animate's drawing tools and discuss their pros and cons.
Brush
Tool
The Brush tool  is probably the most versatile of all the tools—especially when combined with a pressure-sensitive drawing tablet (but still very useful with a mouse as well). Drawing with the Brush tool is much like painting with a real brush, and is the most natural feeling tool when used with a tablet due to the support of pressure sensitivity and tilt features.
Some popular tablets used with Animate are made by Wacom. Wacom features several different sized tablets that include a cordless pen called a stylus. A Wacom tablet has become the industry-standard for digital artists over the years. Since a Wacom tablet can work in conjunction with your existing mouse, or replace your mouse completely, it use goes far beyond what you can do with Animate alone. Many digital designers use a tablet with any number of graphics editors and animation programs including Photoshop, Illustrator, and so on. But fear not, if you do not currently own a tablet, you can still use the Brush tool with one exception—both the tilt and pressure sensitivity features will not be available.
If you do have a tablet installed, selecting the Brush tool will provide you with two sub-selections that will affect your line quality. At the very bottom of the toolbox you will notice the Pressure modifier and Tilt modifier options. With one or both of these options selected, varied results will occur when drawing in Animate.
Here's what happens when drawing with the Brush tool (below left). The end result is actually a shape, meaning, it has vector points on all sides. The more points an object has, the bigger the file size. This particular shape was drawn with a pressure sensitive tablet. Notice the tapered ends and inconsistent line weight that results with varied amounts of pressure applied to the stroke.
 |
|
| Selecting the Pressure modifier gives a line that tapers or expands depending on the amount of pressure used on the tablet. |
Without the Pressure modifier selected, the stroke is formed independent of pressure put on the stylus and tablet. |
The shape above on the right was also made with the Brush tool but the difference is that the pressure sensitivity setting was turned off.
 It is not necessary to use a tablet to draw with Animate, although a tablet can, in some cases, make life easier depending on the tools you want to use.
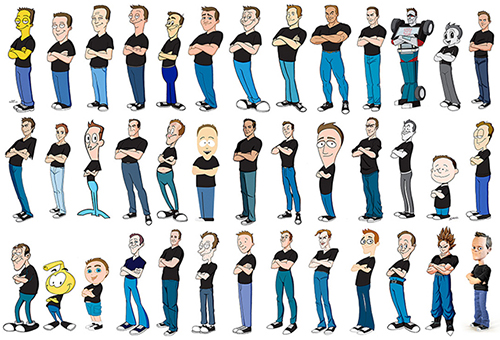
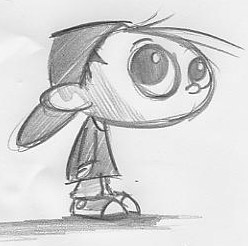
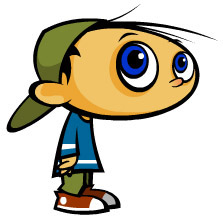
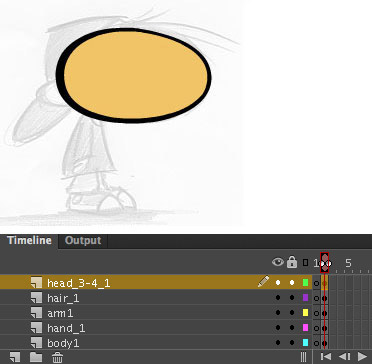
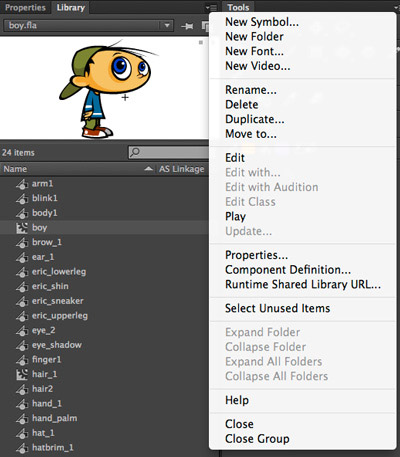
For example, the boy character I designed for my own business/identity was created entirely with the mouse and the Rectangle and Oval tools. I never had to use my Wacom tablet with the Brush tool. I could have easily chosen the Brush tool, but using the shape tools (which we'll discuss shortly) resulted in the ultra-clean line quality I was trying to achieve. Oftentimes the Brush tool can create several unnecessary points that bloat file sizes and can create headaches when trying to edit the shapes later on. For the boy, I was simply looking for very simple shapes and as small a file size as possible.
The Brush tool offers several sub-selections to help you draw certain effects (look for them near the bottom of the toolbox  ):
):
 |
(left to right) Paint Normal, Paint Fills, Paint Behind, Paint Selection, and Paint Inside. |
 |
|
 |
| |
Paint Normal: Paints over lines and fills on the same layer.
Paint Fills: Paints inside a fill color and outside of a shape (stage).
Paint Behind: Paints behind existing fills and strokes.
Paint Selection: Allows you to paint inside a selected fill only.
Paint Inside: Start painting inside a fill and you'll never have to worry about going outside the lines again! |
|
 |
|
 |
Pencil Tool
The Pencil tool  is the perfect tool if you want a consistent line weight throughout your character and if you need to keep file size as small as possible. Lines made with the Pencil tool consist of fewer vector points than the Brush. A perfectly straight line will only have two points, one on either end. A curved line will have as few as three points or more depending on the number of curves.
 |
| Try it yourself! Create a curve with the Brush and a similar curve with the Pencil. Select them with the Subselection (white arrow) tool, and notice the difference in the number of points. |
The Pencil tool also offers several line quality modes:
 |
Straighten, Smooth, Ink (left to right). |
Shape Tools
 The shape tools—Rectangle and Oval, as well as primitives and the PolyStar—create basic fills and strokes. Holding down the Shift key while using a shape tool will create a perfect circle or square.
You can select the fill and stroke color for your shape via the Properties Inspector (Window > Properties). Clicking on either swatch will open a color palette and allow you to edit the stroke or color choice. You can even specify no color for the stroke or fill by selecting the square with the red diagonal line through it  .
.
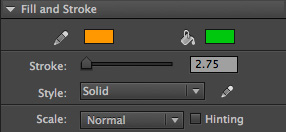 |
The weight and style of the stroke can be adjusted in the Properties Inspector. |
 The Onion Skin feature is located at the bottom of the Timeline panel, and it will come in very handy as you begin to animate your character designs in later lectures.
In traditional animation, or cel animation, characters "moved" through a series of acetate or celluloid sheets. To create the next frame of a character animation, the artist had to flip back to the previous frame as a reference. When sketching a character's movements, "onion skin" or semi-transparent paper was often used so artists could see through to the frames below. In Animate, Onion Skin mode works in the same way, allowing you to get a ghosted view of the previous frames to use as reference. With character design, this enables you to create precise motion from frame to frame.
Try out the two types of onion skinning as I explain them below. Start a new Animate document, draw a shape, and make several keyframes (five to ten). Vary the shape's placement on each keyframe slightly so you can see the effects of onion skinning as we try them out.
Select Onion Skin in the timeline to turn on this feature and add Onion Skin Markers to the timeline's playhead indicator. These markers can be clicked and dragged to expand the number of frames before and after the current frame.
Normal Onion Skin Mode
In normal Onion Skin mode, the selected frame is shown in full color while the previous and future frames are dimmed progressively. This gives an impression of a series of drawings created on semi-transparent paper and then stacked on top of each other.
 |
My third frame is selected, and the markers are stretched from the first frame to the fifth so I can see transparent views of the previous and future frames. |
Onion Skin Outlines Mode
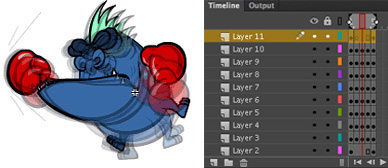
If you click the button to the right of the normal Onion Skin button, you'll be in Onion Skin Outlines mode. The current frame is shown in full color while previous and future frames are shown as outlines. This is visually easier when working with complex animations.
 |
| Outlines mode makes my working monster frame easier to see, and still gives me plenty of information about the previous and future frames. |


 Straighten: A great option if you want to freehand draw very straight lines. Even with a shaky hand, your lines will snap straight once you finish drawing your stroke.