Intermediate Rendering
This method will instruct you export a high quality lossless video from After Effects and then compress it using Media Encoder. This method can be good for large projects because when you export a lossless video of your project it will act as a source video that you can later use to create a compressed version for the web (or submitting your assignments). This method can seem like a lengthy process but it is popular with many After Effects users and is a good habit to get into. The only downfall to this method is that once you start the rendering process, you are unable to use After Effects. If the rendering takes hours then you'll have to wait.
To export your project you will go to File > Export > Add to Render Queue or Composition > Add to Render Queue. You can also use the shortcut key CTRL + M.

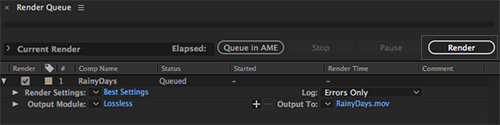
Located at the bottom of the screen you will see the Render panel with a couple options that are labeled Render Settings and Output Module (in red box above).
Render Settings should default to Best Settings. If you click on 'Best Settings' it will open a menu. Go ahead and peek at it but you shouldn't have to adjust anything. Just make sure it is set to Best Settings. Click OK to close the window.

Click on "Lossless" in the Output Module setting to open a new window.

For PC users, set the format to AVI to create a .AVI file. Mac users should set the format to QuickTime to create a .MOV file. It is possible that your computer has a different lossless format set up by default. Some After Effects users will set their format to be images that can later be imported into Premiere as an Image Sequence but for this course we will be using AVI. Keep in mind that a lossless file is uncompressed so the file can be quite large. You will not be submitting the AVI.
Click OK to close the window.
To the right of the Output Module setting will be a setting labeled 'Output to:' and this is where you tell After Effects where to place your video. Click on the name shown (which is normally the name of your comp) and search for a folder where you want to video to be saved.

When you're ready you can click on the button labeled 'Render' found to the far right of the screen.
At this point you should now have a nice high quality uncompressed video of your animation. Since you most likely started with a 1280x720 composition, then the video should be nice and large. Great! The last step will be to insert it into Media Encoder for compression.
Export to MP4
This method will instruct you to export directly from After Effects to an MP4 using Media Encoder. This method is frowned upon in the After Effects community because Media Encoder will only do one pass when compressing which could result in glitches and poor quality. In some cases, certain effects may be rendered incorrectly making this method not ideal to set up your final deliverable. Imagine, you worked hard on a project and rendered it out and after 4 hours of rendering you find that the quality is not very good. You'll have to render the video again and hope for a better outcome. I would only suggest this method if you need to output a rough version of your project. Small light weight projects with few effects may also be okay to render this way. The one benefit about letting Adobe Media Encoder do the rendering work is that it won't prevent you from working in After Effects while it is rendering.
To export to an MP4 from After Effects will you will want to go to File > Export > Add to Adobe Media Encoder Queue or Composition > Add to Adobe Media Encoder Queue. You can also use the shortcut CTRL+ALT+M.
Your project file will show in the Queue Panel of Media Encoder. This step is identical to the Media Encoder steps found in the Intermediate Method except that you will not be using a high quality source video because your project will be compressed from the start.
Media Encoder
Now that you have that video (or your project in the queue) we need to compress it so it can be submitted through Canvas. Open Media Encoder.
Media Encoder is a media processing app that allows you to encode your video and audio in different formats. The app is part of the Creative Cloud subscription and is a companion to After Effects, Premiere, Audition, Character Animator and Prelude.
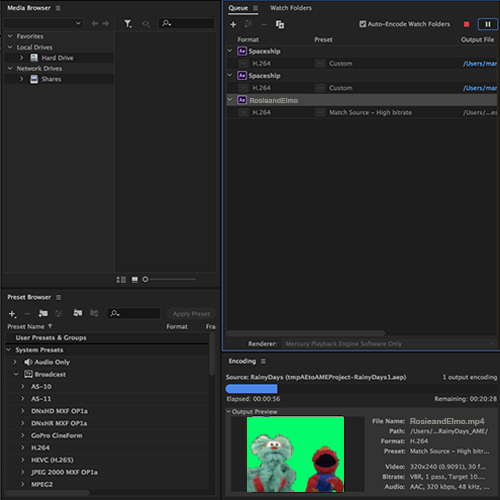
Media Encoder is made up of four panels. There is Media Browser, Preset Browser, Queue, and Encoding. You can use the Media Browser to locate the folder where your video was saved or you can simply drag the video file into the Queue panel. The Preset Browser panel lets you view presets and make adjustments to them or you can create your own! Finally the Encoding panel will give you information about the file being encoded and the duration.
 |
|
To make sure that your Media Encoder interface is set up like the image above, go to Window > Workspaces > Revert Workspace.
|
With your file queued up, you will need to make sure it's output is correctly set. Underneath your file name in the Queue panel, click on the text.
It might say 'H.264'. This will open the Export Settings window.
After the window opens you will notice many settings but we will only focus on certain settings to save your project as a compressed video.
Let's focus on the top part of the window. Format should say H.264 since we want this to be web ready. This codec will save the video as an MP4. Preset will probably be set to read "Match Source - High bitrate". This means it will match the source video and will save it with the same resolution, same amount of frames and same bitrate. This will change once we start making adjustments so you can leave it set to "Match Source - High bitrate". Let's skip over Comments and take a look at the Output Name. You can click the text in the Output Name field to change the name of the file and the location where it will be saved. Just under the Output Name are two check boxes. If your video will not have audio then you can uncheck the box and your video will export without any audio. Finally there is a summary comparing your source with the video export. Again, this will reflect changes you make to the settings so you can look at it again once we finish.
 |
We've just finished looking at the top half of the settings window. So now we will focus on the middle section where we get to change dimensions.
The next section will consist of several tabs that have settings of their own. These tabs are labeled Effects, Video, Audio, Multiplexer, Caption and Publish. For your assignments, only the Video and Audio tab will be necessary. Let's start with the Video tab.
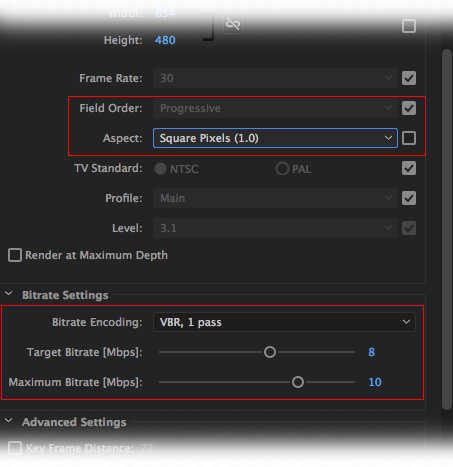
In the video section we will need to change the dimensions of your video. It probably shows the width as 1280 and the height as 720. If the setting is grayed out then it is locked but you can unlock it by clicking on the checkbox to the right. Many of these settings may be locked by default. Make sure the setting is unlocked so that it can be changed to have a width of 854 and a height of 480.
Next, your frame rate should already be set to 30 frames so you shouldn't have to change it but this is the location where you can set the frame rate if you are working on a different project. Your frame rate should have already been set up in your original composition in After Effects.
The Field Order setting should be set to Progressive based on your After Effects composition. This setting should be determined by your original composition in After Effects. Progressive is the setting you want to use when working with web video.
Aspect is the next settings and it should be set to Square Pixels. This is also information that is taken from your original composition in After Effects.
The remaining options can be left alone and the last thing we need to change is the Bitrate Setting. The setting should be set to 'VBR, 1 Pass'. VBR stands for Variable Bit Rate. Underneath you will see two sliders. One is labeled Target while the other is labeled Maximum. This setting can greatly affect your quality and file size. For your assignment submissions we will just set these settings to 8 and 10.
You've probably noticed that a lot of the information is being taken from how you set up your original composition in After Effects. This is nice because there isn't too much to change.
Finally, I want you to take a look at the Audio tab. First, the Audio Format should be set to AAC. The Audio Codec should also be set to AAC. Make sure the Sample Rate is set to 48000 Hz and that the Channels option is Stereo. Audio Quality should be set to high and finally the bitrate will be 128kps.