Before we dive into talking about interpolation, let's take another look at your preferences settings. In any application, preferences allow you to customize your software to best suit your needs and your style of working. Preferences in AE includes the following daunting list of categories to the right:
I'll start off this lecture by showing you how I set my preferences.
General
Go to After Effects > Preferences > General on a Mac or Edit > Preferences > General in a PC to open the Preferences dialog.
The one item I change under general preferences from the default preferences is turning on "Default Spatial Interpolation to Linear".
My dialog looks like this:

Interpolation is when there are two values, such as the position of two key frames, and the program calculates how to fill in the information between the existing values to create the motion of an object. Interpolation also occurs in Photoshop when a photo is enlarged and the program has to determine the color of added pixels from one pixel to the next to compensate for empty spaces when the image size was increased.
The default preference for Spatial Interpolation (movement) is Auto Bezier, which is a curve. By changing the interpolation to Linear, which is straight, the object you are animating won't be forced to travel on a curved line. For this course, most of the animations you'll be creating will be on a straight path.
Should you need to change the type of interpolation for the animation, right-click on the keyframe, select Keyframe Interpolation, then choose which type of interpolation you want. You can also go to Animation > Keyframe Interpolation and the same option window will appear.
Display
In Lecture One, we briefly discussed motion paths. Under the Display preferences you have the option to turn off the Motion Path or to display only a certain number of keyframes.
I find it best to see all my keyframes and my complete motion path. You'll also notice that there is an option to turn off showing thumbnails in the Project panel. You may find this option useful later to speed up your workflow if you notice your computer is slowing down on an effects-heavy project.

Labels
We learned in Lecture One that you can change the colors of layers. Here, in the Labels preferences pane, you can set your colors. You can choose any colors under the rainbow to customize your layers. You can also choose to change the label name.
You may even want to manage a whole workflow around colors. I find I like vibrant colors better than the default pastels. Change the colors by clicking on them and choosing new ones from your color picker or you can click on the eyedropper and sample a color on your screen. Label colors may seem insignificant now, but as your projects grow and you incorporate more assets and layers, these colors will become your friend.

When we chose to create a solid in Lecture One, a new solid appeared as the default gray. In this manner, any of the layers you create in AE or import are assigned colors so you can identify them in the timeline. You can change the default identifying colors in the Label Defaults preference pane.
Appearance
The Appearance preferences give you more options for aesthetic interface customization. First, select Cycle Mask Colors. With this box checked, AE will automatically pick a new mask color for you. (We haven't gotten into masks yet.)
You may also adjust the brightness of the interface. I think Adobe did a pretty good job with this dark gray, but feel free to change it.

When you are done with this preference, click the OK button. We'll cover the other preference panes in later lectures.
Now that we'll be getting into more complicated keyframing, it's important to know how to zoom in and out of the Timeline and the Composition panels. Sometimes you need to look at those windows up close!
Let's practice those techniques now—make sure you try everything in this section to get familiar with the controls.
Timeline Zooms
There are many ways to zoom in on the timeline. You can use the + and – keys on your keyboard or you can use zoom controls  on the Timeline. You can also drag the Navigator Start and End Brackets at the top of the window.
Once you have zoomed in you can use the Hand tool  to move the viewable area around. This also works on the Comp panel, and can be really useful when Bezier handles extend beyond the viewable area. You can also press the space bar to temporarily invoke the Hand tool.
Composition Panel Zooms
You can choose a zoom level  from the Magnification menu.
Or for more specific zooms, you can select the Zoom tool  from the Toolbar. Click in the window. Each click doubles the current magnification, centering the display around the point you click. You can also click and drag the area you want to magnify. The maximum magnification level is 6400%, for those who need to look at tiny details. To zoom out, hold down the Option/Alt key when using the Zoom tool.

With a composition selected you can use the comma key (,) to zoom out and the period key (.) to zoom in. You can also use Shift + to zoom in and Shift – to zoom out.
To change the view to 100%, double-click the Zoom tool. Again, once you've zoomed in you can use the Hand tool to move the viewable area around.
Okay, ready to make make some animations?
As stated before, interpolation is all about the relationship between keyframes—it's about how we travel from one keyframe to the next. For example, do we move from point A to point B at a constant rate, or do we gradually accelerate then gradually slow down as if driving in a car between stop signs? Or, are we like a tennis ball being thrown in the air, where the acceleration rate is fastest at the beginning and end of the journey? These are just a few basic examples. There are numerous other ways to interpolate, but thinking of them in terms of what happens in nature is an easy way to conceptualize them.
When we create a project in AE, we are generally working with layers in time (temporal keyframes) and space (spatial keyframes). As we discovered in Lecture One, any layer can have temporal properties like Opacity, Rotation, and Scale. That same layer can also have spatial keyframes, like Position and Anchor Point (although I discourage anyone from keyframing the Anchor Point).
The Graph Editor
So far we've been working with linear interpolation, which can create some pretty abrupt transitions between keyframes. In order to edit keyframe interpolation, we need to take a visit to the Graph Editor, the place where a lot of the real After Effects magic happens!
In Lecture One, we did a motion control move scaling from 100% to 20%. Go back to this motion control comp from Exercise One or make a new one and keyframe the zoom out (scaling down). You'll notice that once keyframes are active on the Scale property a button  appears beside it, which, when pressed, enables graph editing. First click this button, then click the Graph Editor button
  near the top of the Timeline to view the Graph Editor.
This graph is currently showing you that, for your Scale property, the interpolation is linear (a straight line from A to B) and the rate is constant (a flat line).
 |
Notice the straight lines between two keyframes. No easing is applied. |
What if you wanted to slow down the scale as you approach the second keyframe? Select the second keyframe and go to Animation > Keyframe Assistant.
You'll see three options: Easy Ease, Easy Ease In, and Easy Ease
Out. The purpose of these tools is to slow down both the ingoing and
outgoing velocity of a keyframe. Easy Ease In will slow down only the incoming
velocity of a keyframe, and Easy Ease Out will slow down only the outgoing
velocity of a keyframe. Easy Ease slows down incoming and outgoing velocities
and is only useful when you have more than two keyframes.
To ease into our 20% scale keyframe, select Easy Ease In. Once selected, the Scale value
graph is no longer linear and the Velocity graph is curved not constant.
Do a preview to see your nice ease. Compare this eased animation
to the animation you did in Lecture One. This one is better, right?

There are also buttons for easing below the Graph Editor timeline, as well as some handy shortcuts. Here's the rundown:
By easing into the 20% keyframe, we changed the velocity and value graphs and we also changed the shape of the keyframe. We went from a Linear In, Linear Out  , to a Bezier In, Linear Out
  .
.
 |
A Bezier curve |
If you have ever worked with Animate (formally Flash) or Illustrator, you are familiar with the term Bezier. Bezier curves have handles that you can manipulate to create curves and shapes. In After Effects, Bezier curves can affect a keyframe spatially, temporally, or both.
Let's try this out! Make a new comp (320 x 240, 30 fps, 10 seconds), and call it "Keyframe Practice".
Your comp is empty and the empty background is black. You can change the background color by going to Composition > Composition Settings > Background Color. This is handy if you want to use one less layer, and use the background layer as sky, for example. There are ways to render out a file without a background, by rendering it with an alpha channel. (Don't worry, we'll get to alpha channels later in the lecture.)
By the way, you can change any of your comp settings and rename your comp at any point by going to Composition > Composition Settings (Command/Ctrl-K).
Scaling Artwork
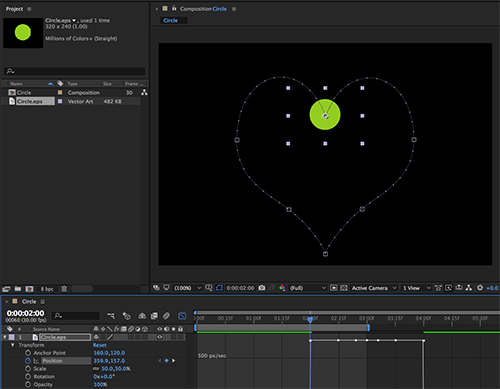
Go to your downloads folder for Lecture 2 and import the file Circle.eps.
Select the Artwork folder in the Project panel and then import the file. It will automatically go inside that folder. Bring it into the Keyframe Practice comp (drag and drop) and scale it down to 50%. As you can see, the horizontal X and vertical Y values of the scale are linked together.
 |
|
Artwork scaled 50% |
Click the Constrain Proportions icon  to the left of the Scale values to scale the X and Y values separately. As you can see, changing the values will resize the circle.
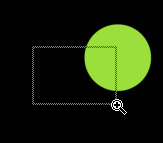
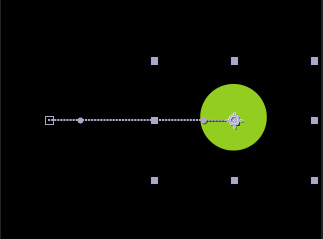
You can also scale in the Composition panel by clicking on the circle layer and dragging one of the handles.
To scale proportionally, hold down Shift as you drag any layer handle. To scale freely, drag a corner layer handle. To scale one dimension only, drag a side layer handle.
Try out those options on your green ball:
 |
Manual scaling in the Comp panel |
Setting Keyframes
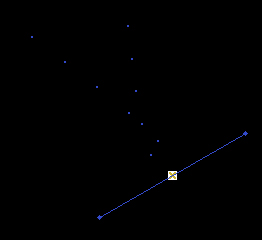
Now move your circle to the left side of the composition and set a position keyframe here at zero seconds. Go to two seconds and drag the circle to the other side of the comp window. Hold the Shift key to constrain the movement to the X axis only. Now you have two linear keyframes that are linear both temporally and spatially.
If you were to play your animation, the circle would move from left to right over time.
 |
Like a speeding bullet |
Now, suppose we didn't want the circle's path to be linear? What if we wanted the circle to move around and bounce or speed up or slow down? That's what objects do in the real world, after all.

Here we can apply some Bezier magic. Go to the Toolbar and click and hold on the Pen tool to reveal the tools beneath it. Scroll down the list the select the Convert Vertex tool.
A vertex is a point where two paths intersect. This tool is going to enable us to add Bezier handles to our animation, which will allow us to manipulate motion paths and keyframes.
With the Convert Vertex tool, click on the second keyframe and drag out a handle. You can always change the position of this handle once you let go. If you click the keyframe again with the Convert Vertex tool you will convert the Bezier keyframe back to a linear keyframe.

You have just converted a spatial linear keyframe to a spatial Bezier keyframe. Do a preview to see the circle follow its new motion path. You'll notice that the shape of the keyframe hasn't changed in the timeline. That's because only temporal Bezier keyframes look physically different. You can see that this keyframe is a Bezier spatially in the Comp window.
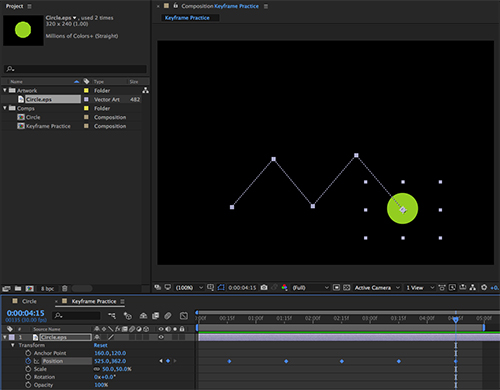
Now make a third keyframe at three seconds and move the ball towards the upper left of the screen.

As you can see, the motion path now looks different: the dots on the second part of the path are spaced further apart than in the first part of the path. Remember how the dots represent frames? The first portion is 2 seconds long, or 60 frames long, while the second portion is 1 second long, or 30 frames.
Types of Bezier Interpolation
Now that you've gotten a taste of Bezier interpolation, it's time to admit that there are actually three different types of Bezier keyframes:
 |
|
 |
| |
- Bezier
- Auto Bezier
- Continuous Bezier
|
|
 |
|
 |
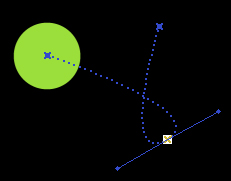
Because I created that third keyframe, the keyframe at 2 seconds became a Continuous Bezier keyframe. This means that when I move a handle on one side it affects the handle on the other side—the handles have essentially become one.
 |
Continuous Bezier keyframe |
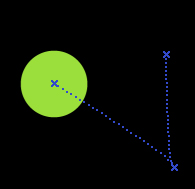
If I hold down G and click on one of the handles, I can manipulate only that handle. This is a normal Bezier keyframe, in which the direction handles operate independently:
 |
Bezier keyframe |
The third type of Bezier keyframe, called Auto Bezier, is the default
shape you are given the moment you convert a keyframe into a Bezier keyframe. It's the program's way of just slightly rounding out an edge. This works in some cases, but most of the time you'll want to manually alter it yourself.
 |
Auto Bezier keyframe |
Be careful while you are manipulating Bezier keyframes. Once you break handles on a keyframe, you can't join them again. You have to convert the Bezier keyframe to a Continuous or Auto Bezier keyframe. To do this, select the keyframe you want to convert and go to Animation > Keyframe Interpolation: Option-Command-K (Mac) or Alt-Ctrl-K (PC).
This will bring up the Keyframe Interpolation dialog where you can see and change temporal and spatial keyframes.

Roving Keyframes
At the bottom of the Keyframe Interpolation dialog (above) there's an option for Roving. This is another means of fine-tuning your motion paths.
Roving will eliminate variations in velocity and smooth out your motion paths by evenly spacing out your keyframes. You can use this by selecting all your keyframes or by selecting a keyframe that is between two other position keyframes and then selecting Rove Across Time. Try this with your example.

You can see here in the Comp panel where I roved my keyframes that the motion path is now smooth. The keyframes are now equaly distanced from each other in the timeline, and I have the same number of frames going and coming from that second keyframe. The roved keyframe is denoted by the small circle  .
.
A bonus to roving keyframes is that if you need to speed up or slow down the animation by dragging keyframes, the velocity remains constant. After roving your keyframes, select the last keyframe and move it—notice how the other keyframes follow. Remember you need at least three keyframes to rove.
 |
Original spacing |
After move, roved keyframe stays centered |
You can rove keyframes in the timeline too. Open up the Graph Editor in the Timeline.
You can see the velocity is perfectly even, meaning it moves at a constant rate the whole time. To rove or unrove a keyframe, Control-click on the keyframe (right-click on a PC) to bring up your options.

As with most programs, you'll find that there are usually a few different ways to accomplish the same thing.
Changing Keyframe Velocity
In the same way you manipulate the handles of a spatial Bezier keyframe, you can manipulate the incoming and outgoing velocity of a temporal Bezier keyframe. Delving into temporal keyframe velocities can become an advanced topic so I'll just give you some of the basics for now. We'll be exploring more of this later in the course.
With the Graph Editor still open, and the Position property selected, right click the graph and make sure you have Edit Speed Graph selected then select the third (last) keyframe. Then click and drag the small handles from it down towards the bottom middle of the graph, like so:
What did we just do? We have told After Effects to move from the first keyframe quickly, go through the roved keyframe really quickly, then gradually slow down to the last keyframe.
Take a look at your Comp panel. You should see how the dots along the motion path get closer together as we move towards the last keyframe.

This is a great visual of what's happening. The further spaced out the dots, the faster the object will move, the closer the dots are together, the slower it will move. Have a look at the preview to see what I mean.
You can also accomplish the same tasks numerically. Let's try this out by changing the first keyframe to mirror what we just did with the last keyframe.
Select the first keyframe in the Graph Editor and go to Animation > Keyframe Velocity. The shortcut is Command/Ctrl-Shift-K.
You'll open up the Keyframe Velocity dialog. It shows you the incoming and outgoing velocity, the influence (which is the same as the amount of ease), and whether a keyframe is continuous. A continuous keyframe has equal incoming and outgoing speeds. Because we've selected a linear keyframe, the influence is 0.01%.

Don't change anything and click OK. With the same keyframe selected, press F9 to apply an ease in and out. Press Command/Ctrl-Shift-K to open the Velocity dialog again.

The influence is now 33% on either side—which is the default influence when you use any of the ease keyframe assistants. Notice that the incoming and outgoing speed is 0. How can that be? Let's go back to the Graph Editor to see what these numbers mean.

After adding an ease to the first keyframe, we can see that the incoming and outgoing speed has been set to zero. But, as you can see by the curve, the speed instantly goes way up right away. Remember: the incoming and outgoing speeds for a keyframe only apply to that keyframe, for that instant in time. The very next instant, or frame, is a whole different story.
Now grab the handle of this first keyframe and take a look at how you can edit the influence by dragging horizontally.

This is just a manual way to do what we just did numerically. Try pulling out the handle so the middle, roved keyframe is right on the crest of curve, just like I've done.
Taking a look at the dots along the motion path in the Comp panel, we can see the effect we've had on the keyframe velocities.

Using these techniques you can put together something that resembles a roller coaster ride for our green ball by changing the motion path. Take a look, and try it yourself!