Go to the Downloads area (you'll find the Downloads link at the bottom of your course homepage) and download the bootcamp-round1 folder.
Open the index.html file in a browser window. This HTML file includes seven challenges. The first challenge has already been completed, but you'll need to finish the rest of the challenges by matching each large layout to the corresponding small layout. Size your browser window to about 770 pixels wide to match your layout exactly with the diagrams. You won't need to edit the HTML file. All styling will be done in the CSS file.
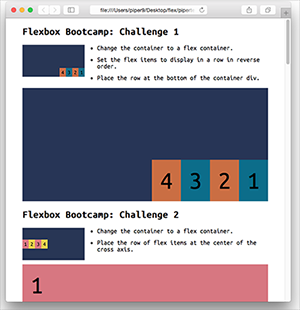 |
| Don't worry if the divs towards the bottom of the HTML file are jumbled—you'll fix this with flexbox formatting! |
Open the flexbox.css file in the code editor of your choice. Add the necessary flexbox properties to complete each challenge.
 |
| Here's a hint ... each bullet point in the HTML file corresponds to one flexbox property. If there are two bullet points, you'll need two flexbox properties. |
I've created a cheat sheet in case you need to reference any of the flexbox properties we covered in Lesson One.
Part II: Bike Shop Identity Project
Your college roommate has fulfilled his life-long dream of opening a bike shop in San Francisco. His service is topnotch, but he needs a strong logo and brand identity to stand out from the competition.
This project is the focus of the class. In Exercise 1, you will name the bike shop, design a logo (and animate it), and develop a typography and color palette. In Exercise 2, you will build the page layout using flexbox. In Exercise 3, you will preform some necessary tasks to prepare the site for production and add a CSS3 animation for extra flair.
Go to the course downloads and download the bike-shop folder. Take time to familiarize yourself with its contents now:
 |
|
 |
|
- HTML documents for the following pages: home, bikes, services, staff, about, and contact. The content has already been inserted into HTML documents. Your job will be to style the page layout using flexbox in Exercise 2.
- An HTML document titled style-tile.html, which you will use to plan your design concept.
- A css folder with a bootstrap.css file (a CSS framework*), a style-tile.css file (a framework for the style-tile.html), and a custom.css file (where you'll be writing your custom styles).
* We won't be using the Bootstrap grid for layout in this class, but the bootstrap.css is provided to handle basic typography and browser resets.
- An images folder containing photos.
|
|
 |
|
 |
(Note: Our thanks to Digital Photography Department Head Felicia Kieselhorst for providing Bay area images! Please do not use any provided images for any purpose beyond this course project.)
As a general note, I want to point out you're not limited to using the provided images. If you have a strong vision for an image treatment that will make the site really fly, using relevant images that you researched, by all means pursue that direction.
RESEARCH
Use your preferred search engine to do a market study of neighborhood bike shops in San Francisco. What elements do these sites have in common?
BRAINSTORM A BIKE SHOP NAME
To make this project a highly individualized portfolio piece, you are to choose the name for the shop. Brainstorm a name for the bike shop. A thesaurus might come in handy here. Keep in mind that short names are easier to remember (and fit into a logo).
PHOTO SEARCH
In addition to the provided photography, you'll need to search and find a royalty-free, high-impact image for the home page from Flickr.
It's important that the home page "hero shot" is strong. Try different keyword combinations to find the perfect photo: san francisco bike / san francisco biker / san francisco bike path / san francisco perspective / fast bike / bike in motion.
When you find the perfect photo, download it to your computer and open it in Photoshop. Change the image size to 1200px wide to fit a standard container div. Crop the image height to 400px.
Save your "hero shot" in the images folder as "banner.jpg".
Open the style-tile.html file in a code editor. Scroll down to the artwork div, and insert your banner image below the <!--insert banner photo here--> comment. Give the image a class of "img-fluid" so it will resize to fit smaller screens.

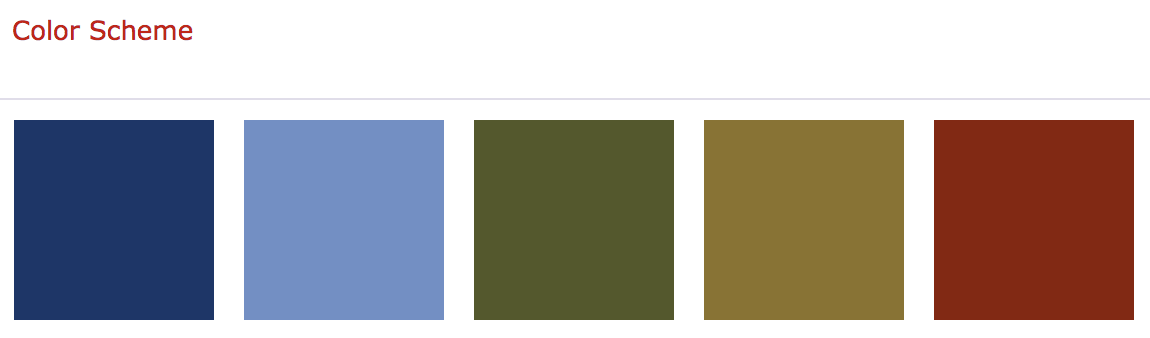
BUILD A COLOR PALETTE
Go to Adobe Color CC to build a color scheme. Explore different color schemes by searching for keywords: san francisco / biker / biking / outdoors.
After choosing a color scheme, click Edit Copy. Copy the hexadecimal code for the first color swatch.

Open the style-tile.css file. If you are using Adobe Dreamweaver, you can use the Related files toolbar to toggle to an external style sheet.

Edit > Paste the hexadecimal code for the first color swatch into the ".colorbox1" style.

Repeat for the additional swatches. Preview your style-tile.html file in a browser to see how it looks.
DEVELOP A LOGO CONCEPT
Do some sketches on paper to plan your logo design. Combine type and image to create a unique visual icon for the bike shop. Look at logo collection sites for ideas.
BUILD A TYPE PALETTE
You'll need a font for your logo, a font for headings, a font for paragraph text, and a font for bold text.
Before you choose your fonts, do some research. Browse the font samples at fontpair.co. Which fonts express the style of your bike shop?
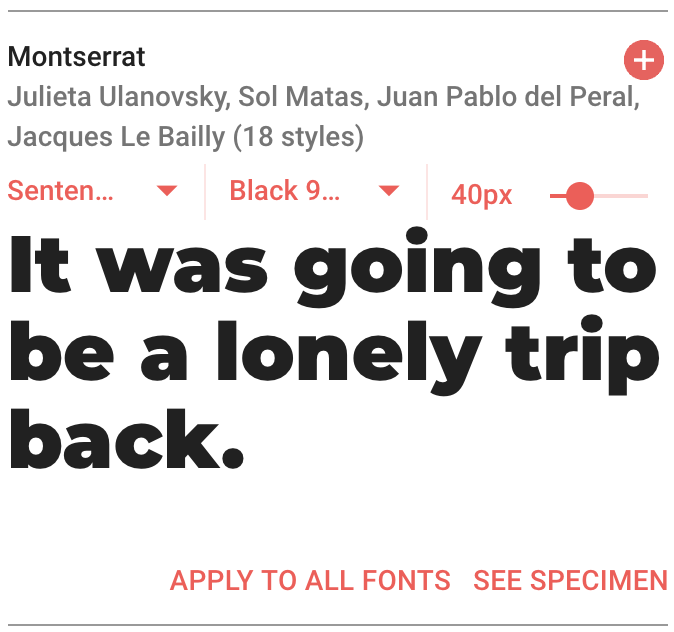
Head to Google fonts and choose a font to use for the bike shop logo. Type the name of your bike shop into the Preview area to see how it looks. If your font offers different font-weights, choose a font-weight using the dropdown menu. I've chosen a "Light 300" font-weight. Click the red plus sign to add a font to your collection.

You may use the same font as the logo for your headings, or choose a different type style. Here I'm adding a "Black 900" font weight to my kit. Choose the "Sentence" option from the dropdown to see how the font looks as a heading.
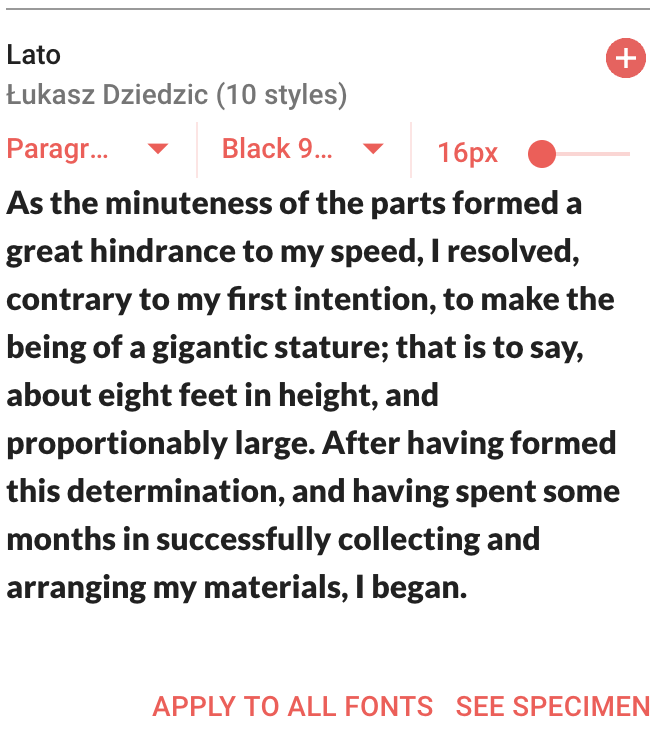
Choose a font for the paragraph text. Choose "Paragraph" to preview the font set in a paragraph. Click the red plus sign after making your selection.

Choose a third (or fourth) type style for bold text. This could be the same font as your paragraph text, but in a bolder font-weight. Click the red plus sign after making your selection.
After making your final font selection, click the "Families Selected" tab at the bottom of the document window. Copy the code to embed the font.
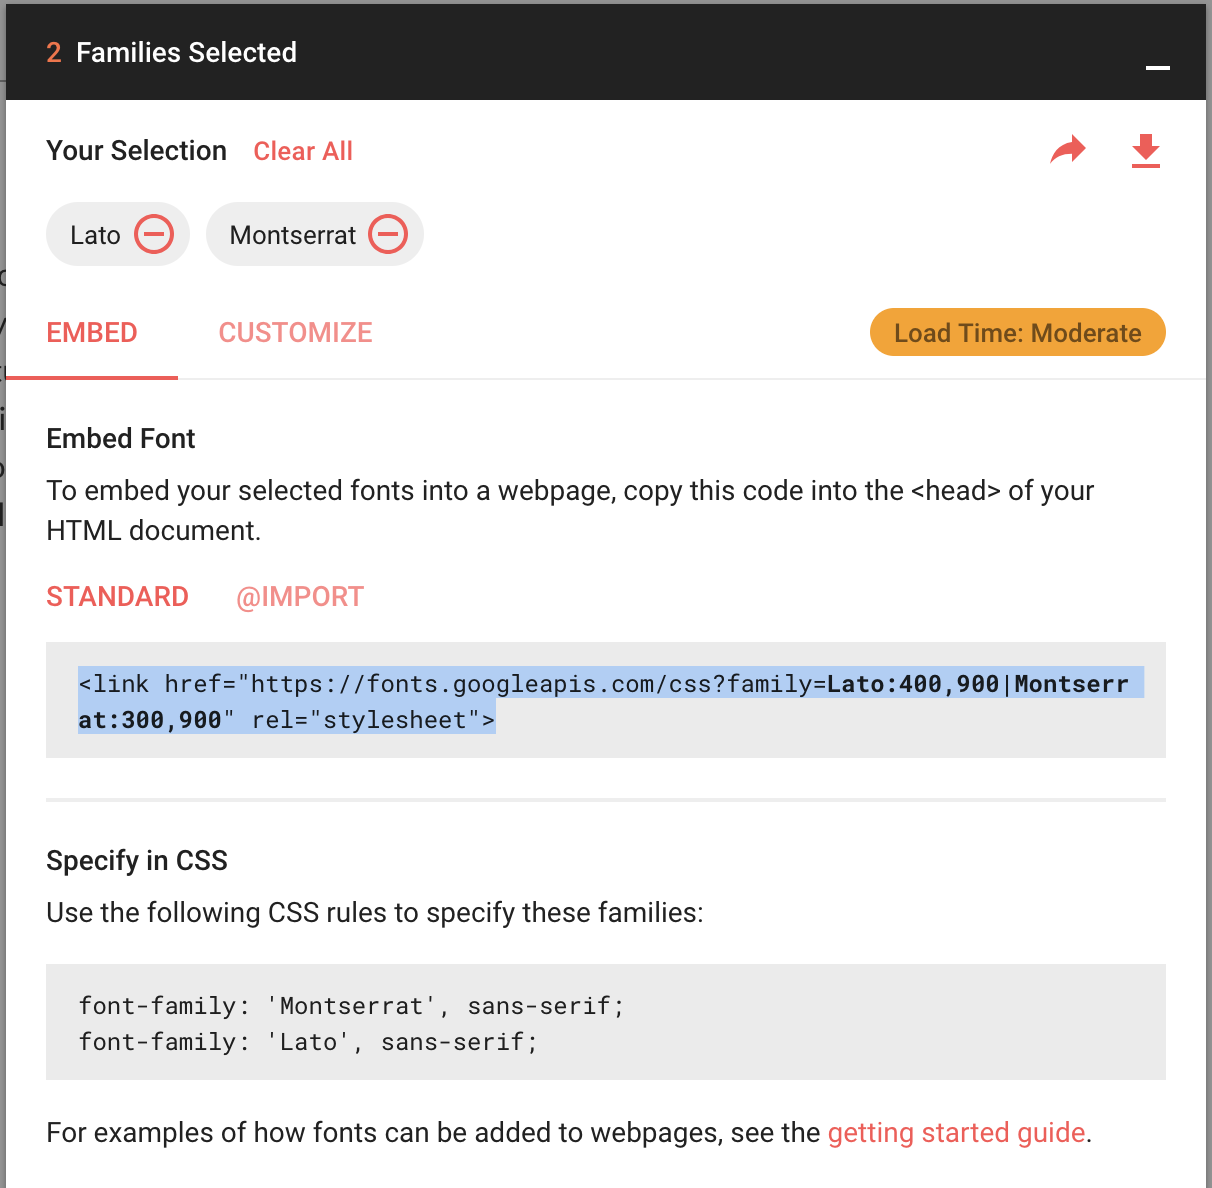
Expand the bike-shop folder and open the index.html file in your code editor. Edit > Paste the embed code into the document head, below the <!-- FONT --> comment.

Hop back to your Google fonts page. Copy the font-family declaration for the font that you are planning to use as a paragraph font.
Toggle to the custom.css file. Edit > Paste the font-family property into the body style.

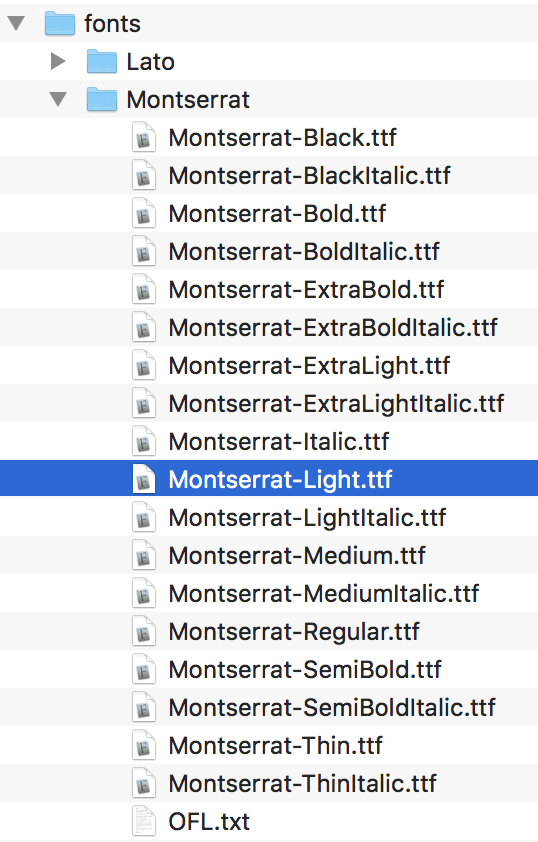
When you work with web fonts, it is important to define the font-weight. I've chosen Lato in two font-weights, 400 and 900, and Montserrat in two font-weights, 300 and 900. The font-weights are listed in the embed code.

Add the font-weight declaration below the font-family.

Which font style did you choose for bold text? Edit > Paste the font-family property into the strong style. Include the font-weight declaration.

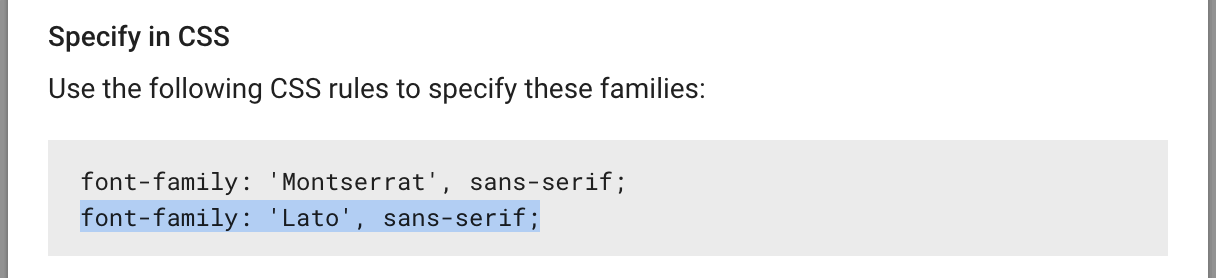
Hop back to Google fonts and copy the font-family declaration for your heading font. Copy and paste the font-family declaration into the h1 selector. Define the font-weight.
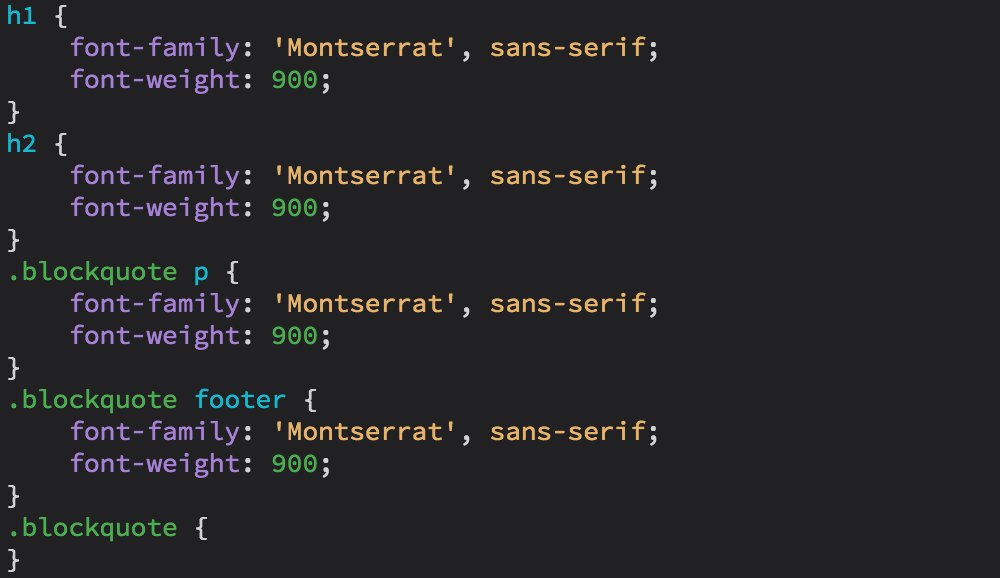
Add the font-family and font-weight declarations for the h2 selector (the sub-headings), the .blockquote p selector (the quote inside the blockquote) and the the .blockquote footer selector (the byline below the quote).
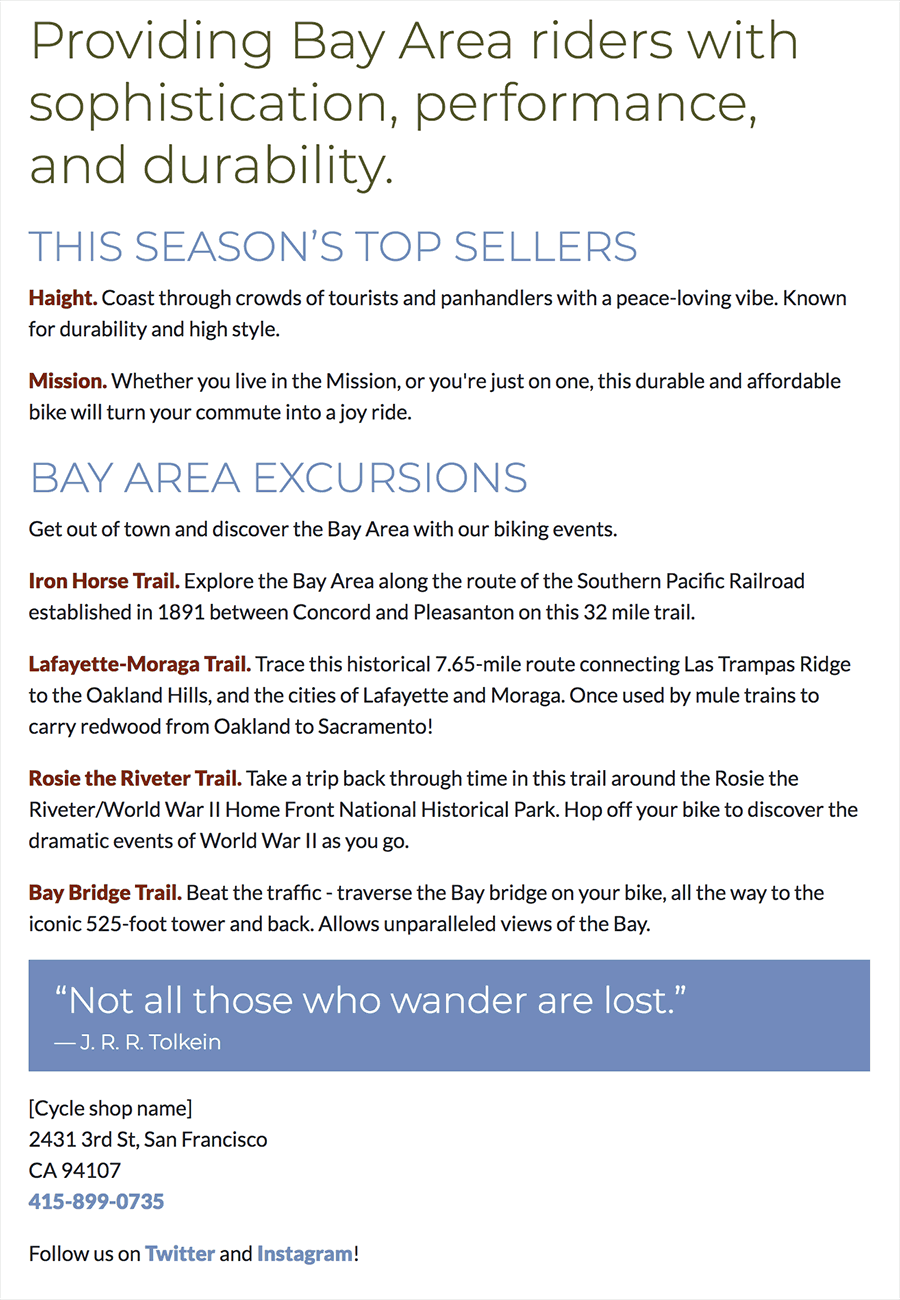
Preview the index.html file in a browser to see how it looks so far. You can keep your type in black and white, or add color.
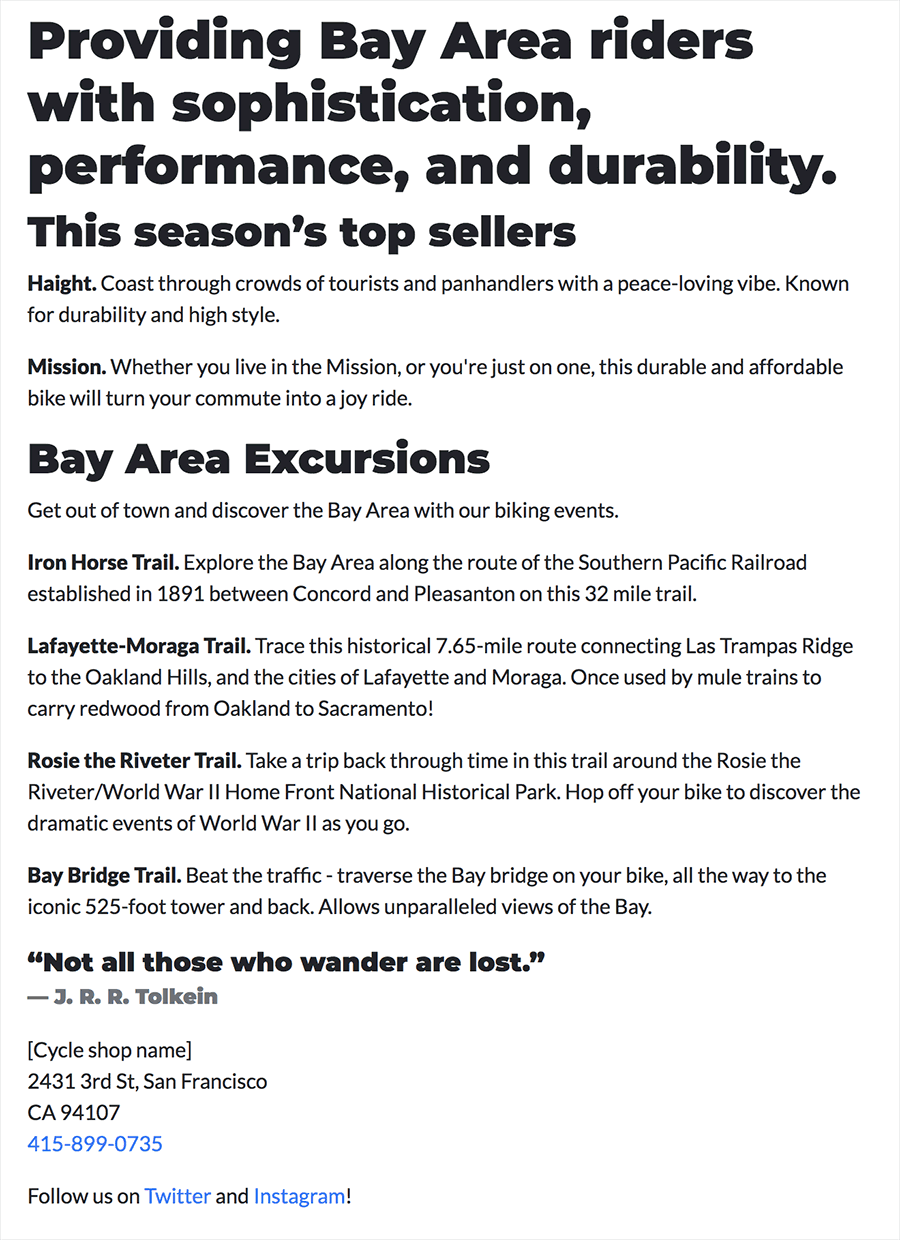 |
| The fonts in my sample are displaying, but it needs more variety. |
Copy the hexadecimal code for the color you'd like to use for the headings. Add the color declaration to your h1 style. Don't forget the # before the hexadecimal code.

As needed, add color to the additional type elements. You may also experiment with other CSS properties. For example, setting text-transform to "uppercase" or increasing the font-size of the blockquote. Define a link color and hover color.
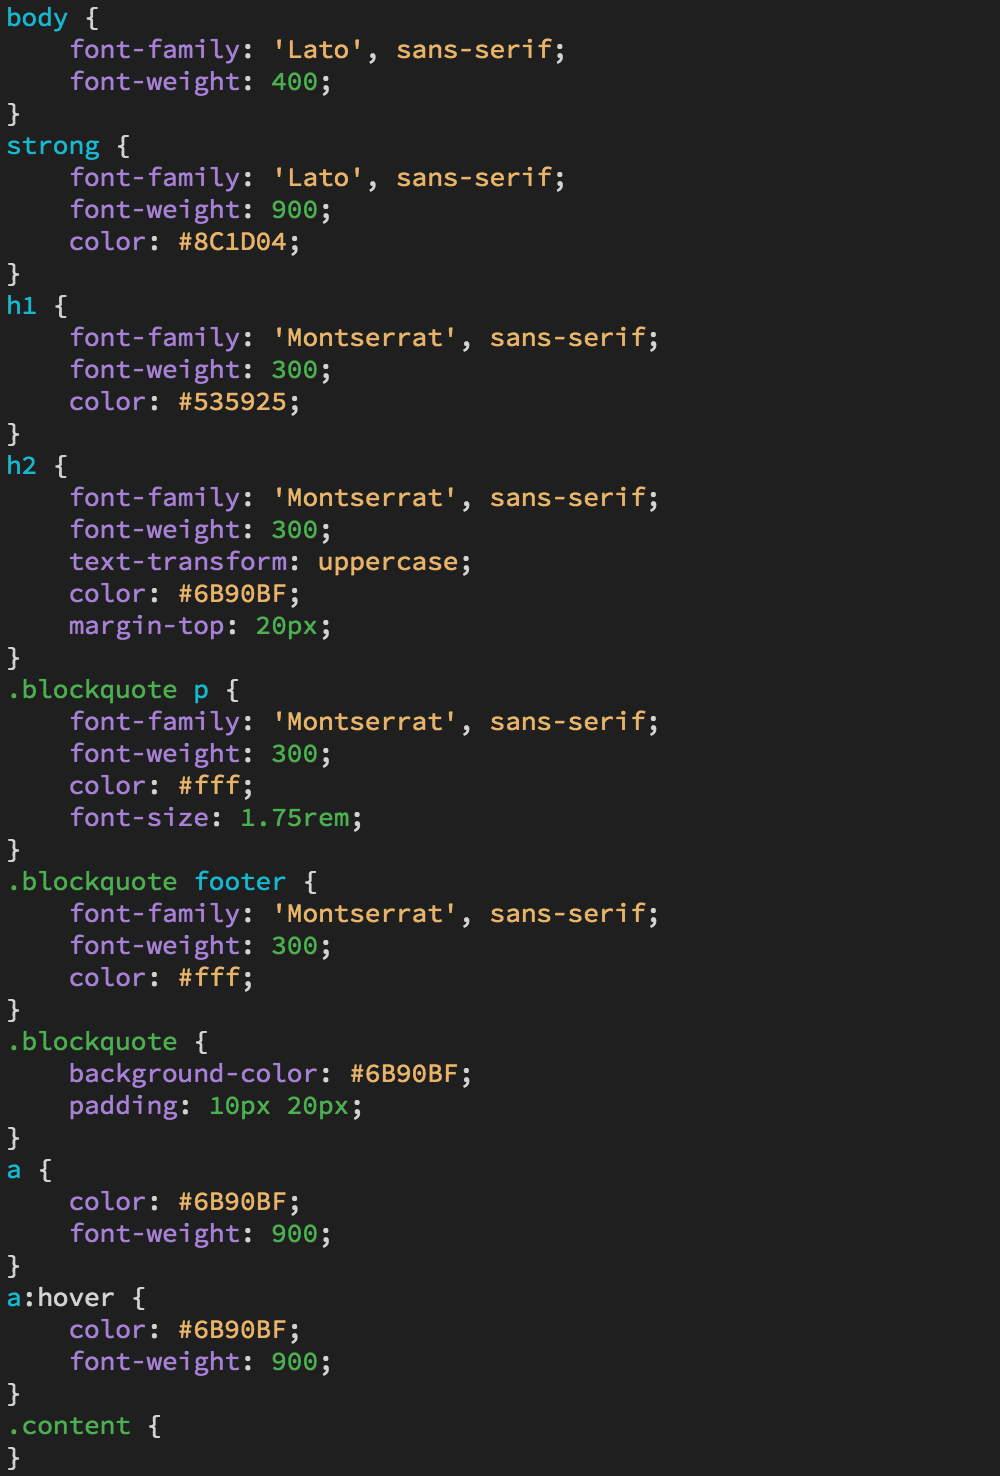
Preview in a browser and make further adjustments until you're happy with your type and color palette. I wasn't sure about the extra-bold headings, so I've changed the font-weight to 300. I applied a background-color and some padding to my blockquote.
 |
| My final text sample includes several variations of color, font, and style. |
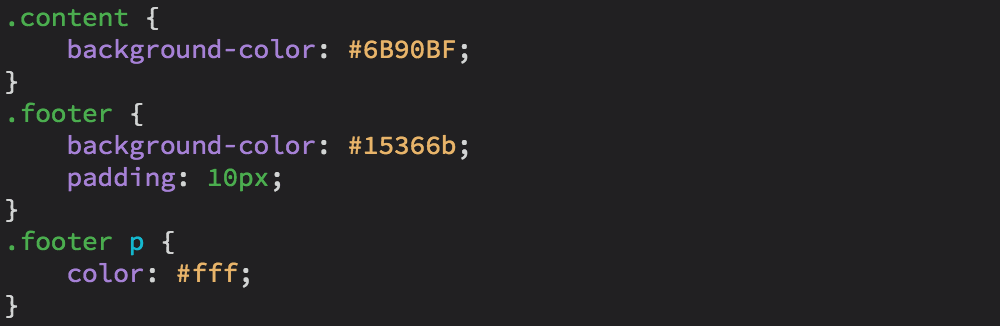
For a different style, you may experiment with background colors in the content and/or the footer divs.
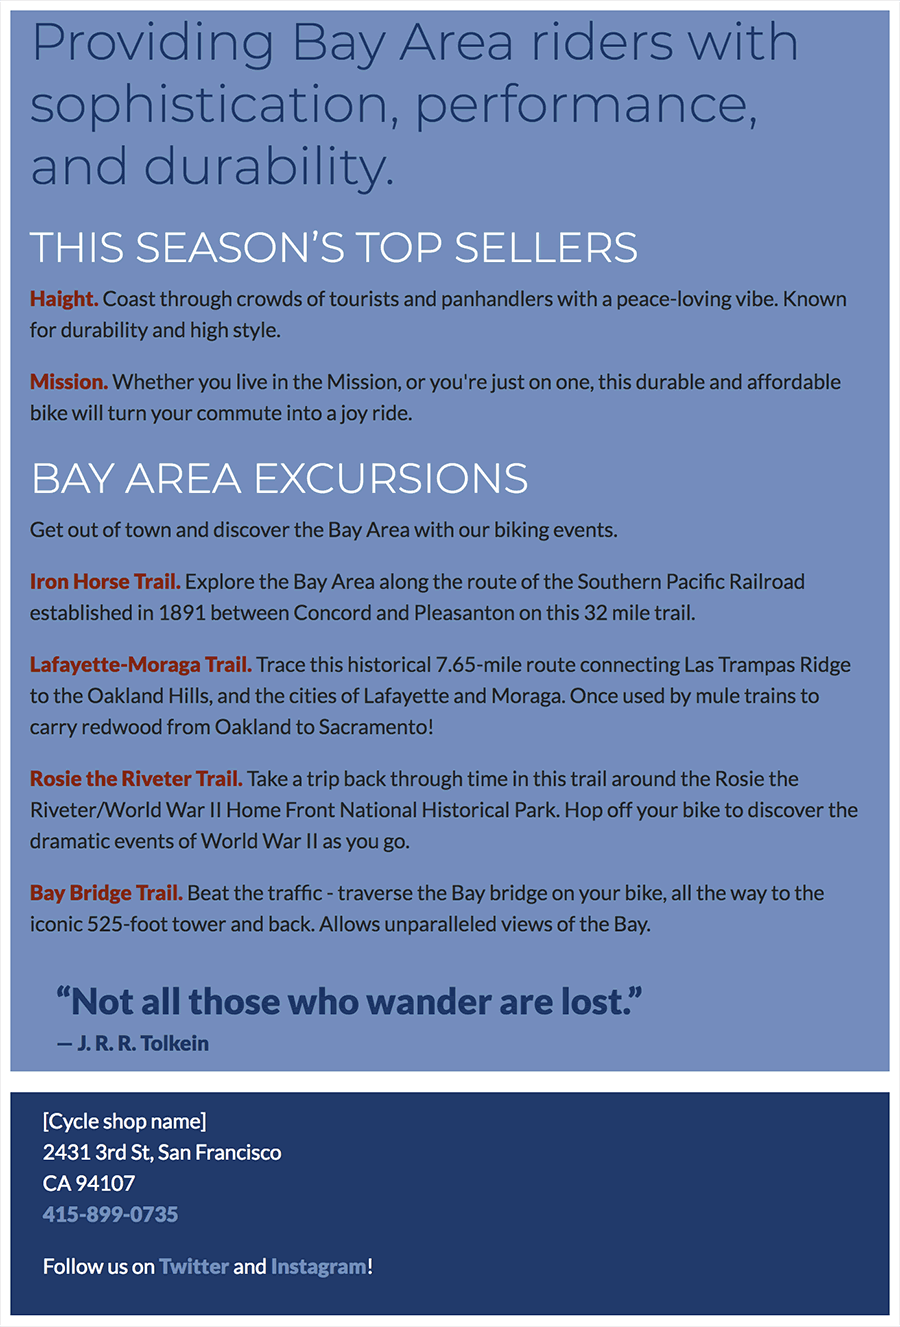 |
| In this variation, color is applied to the content and footer divs. |
Edit the .content and .footer selectors if you'd like to add background colors. You might also need to change the paragraph text color inside the footer, using the .footer p selector.
DOWNLOAD THE LOGO FONT
You'll need to install the logo font on your computer so you can use it to design the bike shop logo in Adobe Illustrator. Click the downward arrow in the top-right corner of the "Families Selected" tab to download your font collection to your computer.
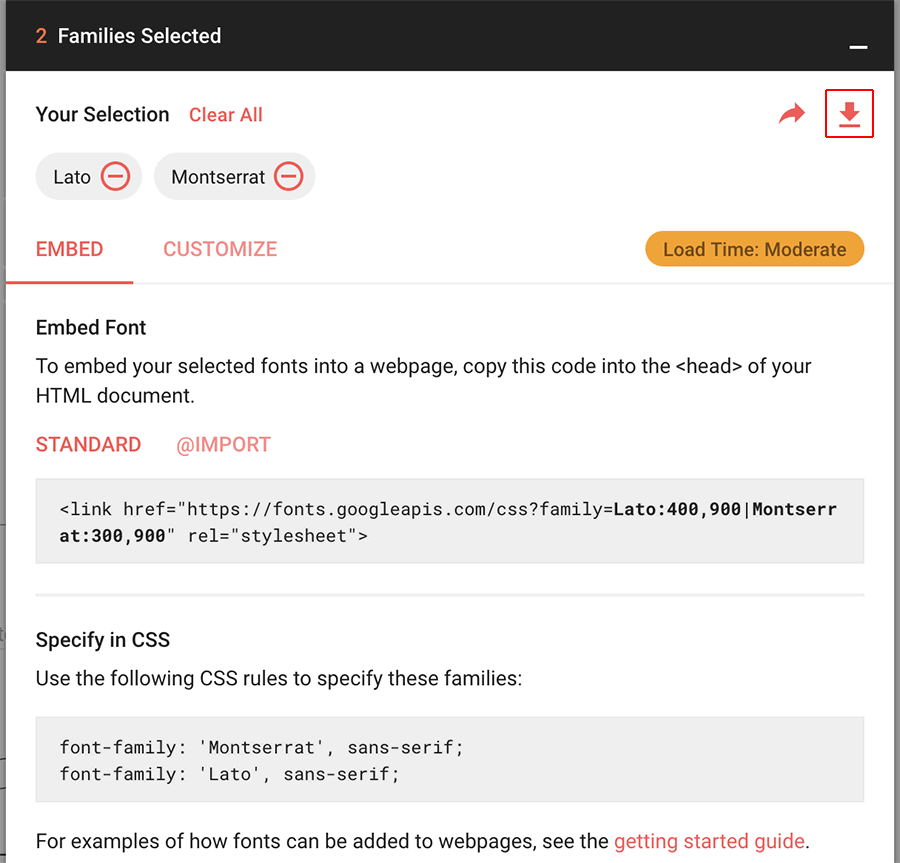
|
The download button is located in the top-right corner of the Families Selected tab |
Install the font by adding it to your system's Fonts folder, or by opening the font file itself and clicking the Install button (depending on OS).
|
The download button is located in the top-right corner of the Google fonts interface. |
DESIGN
Launch Adobe Illustrator and create a new document, choosing the Web format. The initial canvas size should be about 400 pixels by 400 pixels.
Design your logo, typing the bike shop name and adjusting the kerning and letterspacing. Add an illustrative element to the logo. You may create your own graphic directly in Illustrator, or download a SVG icon from thenounproject.com.
Consider which part of the logo you'd like to animate and place it on a separate layer. Label each layer so you'll be able to identify it in the code later on. The top layer should be named "logo". Remember to use lowercase letters, no spacemarks.
 |
Toggle open each layer to name the paths inside the layer. These names will show up as IDs in the SVG code. |
EXPORT
When you've finished your logo design, go to Object > Artboards > Fit to Artwork Bounds. This removes any extra space around your logo so the SVG graphic will be as small as possible.
Go to File > Export > Export As to export the logo in SVG format. Save the SVG file in the images folder inside the bike_shop folder.
Choose a setting from the Font menu: "Convert to Outlines" or "SVG".
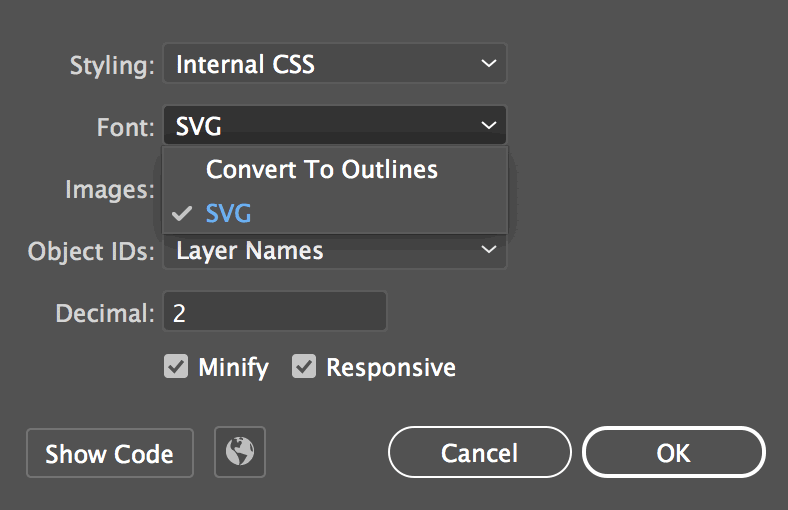 |
If you choose "Convert to Outlines", the logo text will be converted to outlines, like a graphic image. You won't need to load the logo font in the browser, but the SVG file size will be larger.
If you choose the "SVG" font format, the text will be rendered as normal text in the browser. You'll need to load the font using the Google embed code. This is a good option if you planning to use the logo font elsewhere in your site design (for headings or pull quotes for example). |
EMBED
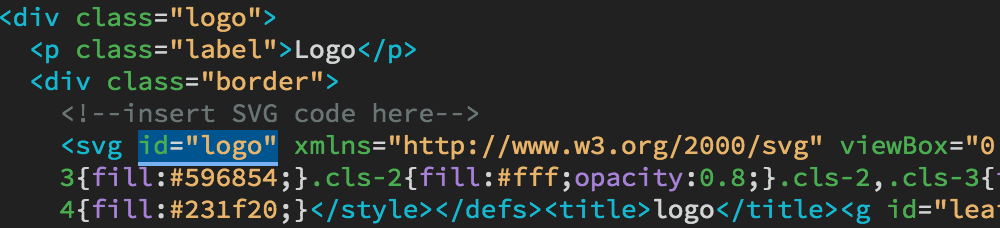
Open your logo.svg file using a code editor. Copy the <svg> code.
Open the style-tile.html file and paste the <svg> code below the <!--insert SVG code here--> comment.

If you named the top layer in your Adobe Illustrator Layers panel "logo", the svg will have an ID of "logo".
Open the custom.css file. Edit the svg#logo selector (this will format any svg with an ID of #logo). Give your logo a max-width of 300px.

ANIMATE
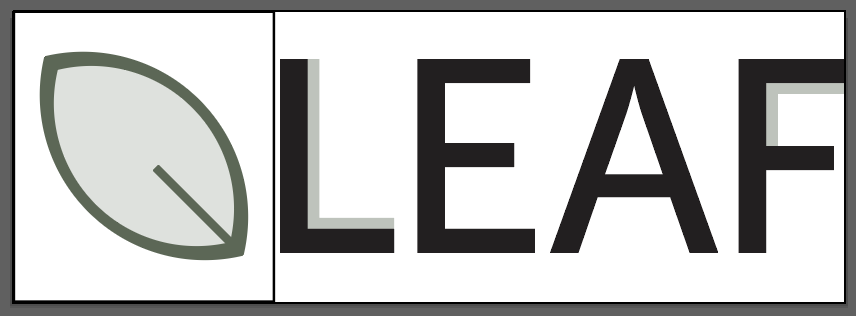
Below the svg#logo selector, add two additional selectors to apply a CSS transition to your logo. Here are some examples of properties you can animate. (The links below connect to W3schools definitions for each property.) Your animation can be very simple — a simple color transition is fine. The fill, stroke, and opacity properties are the easiest to alter.
|
|
|
| |
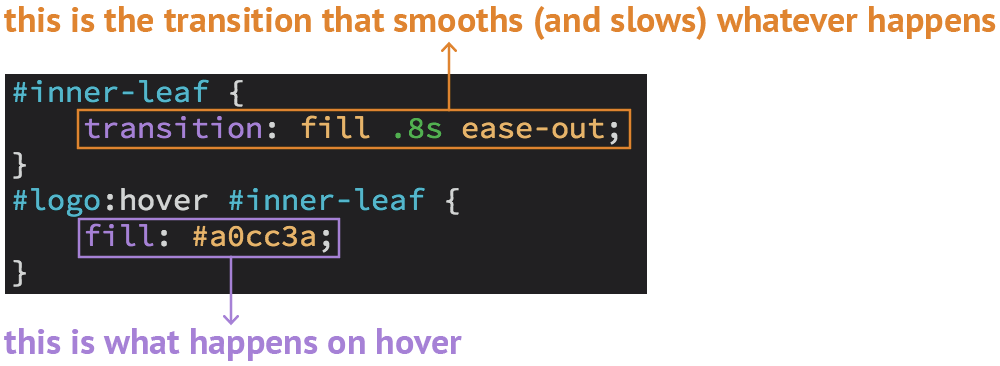
- fill: changes the background-color
 |
| Click to view demo. |
- stroke: changes the border-color
stroke-width: changes the border-width
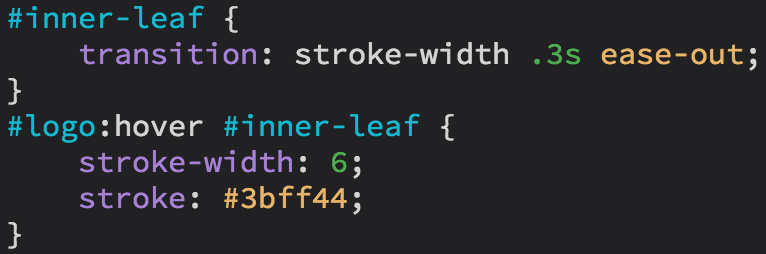 |
| Click to view demo. |
- opacity: changes the opacity
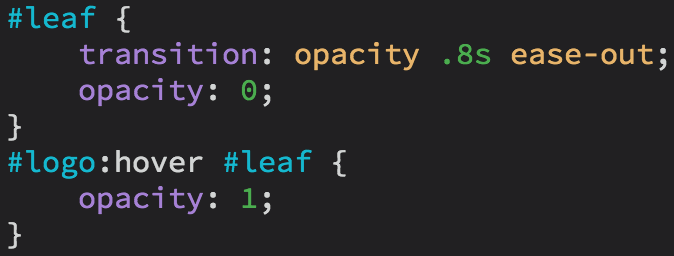 |
| Click to view demo. |
| In this example, the leaf was set to an opacity of "0" in the Adobe Illustrator file using the Transparency panel (Window > Transparency), so it is invisible when the page first loads. It is brought up to an opacity of 1 on hover, so it becomes visible. |
|
|
|
|
|
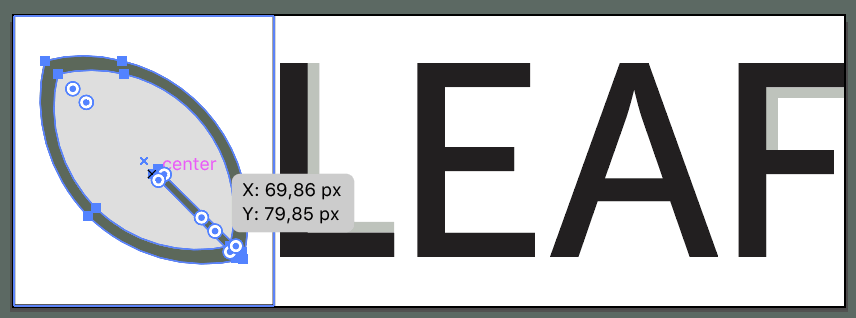
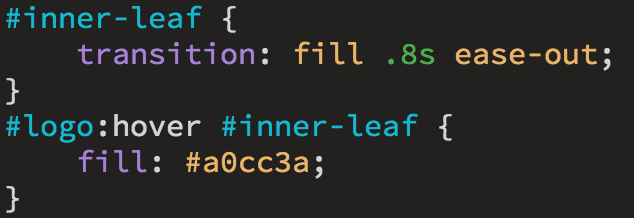
Remember, you need two selectors to make a transition work. For the first selector, use the layer ID you want to modify. This style defines how the transition will occur — which property the transition is applied to, how long the transition will take, and how the transition will ease in and out.
For the second selector, use the #logo:hover selector followed by the layer ID you want to modify. This style defines what you want to happen on hover. For example, you want to change the fill color.
OPTIONAL: For an additional challenge, try one of the more complicated transition effects listed below.
|
|
|
| |
- rotate: rotates the element clockwise
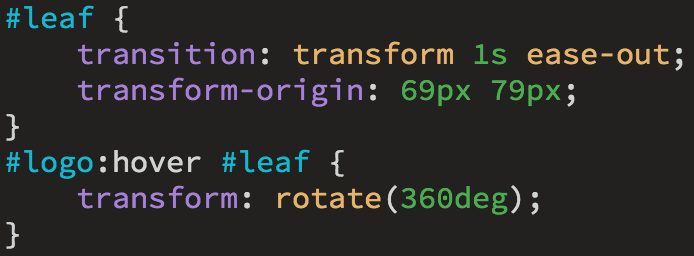 |
| Click to view demo. |
- scale: increases or decreases the size of the element
 |
| Click to view demo. |
- skew: slants the element to the side
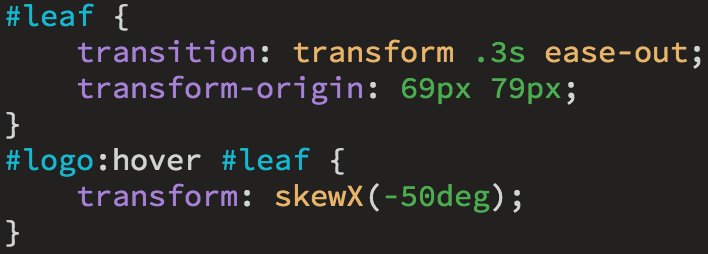 |
| Click to view demo. |
- translate: moves the element along the X and Y axes
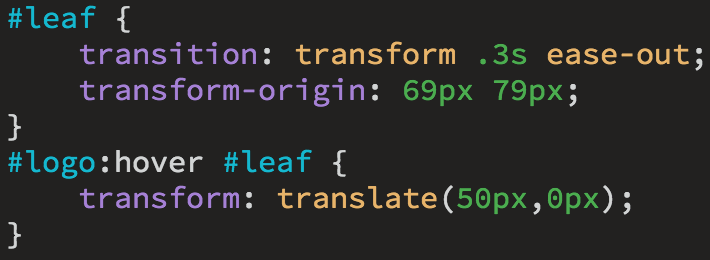 |
| Click to view demo. |
- rotateY: rotates the element around its Y-axis
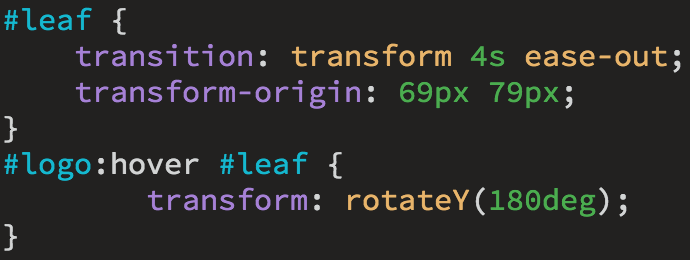 |
| Click to view demo. |
|
|
|
|
|